| Author | Message | ||
Tim |
I just ordered the valves and springs from ASB. I'll let you know what I think, when I get it back together. | ||
Evomx |
Tim, You're installing them on an M2? I'm anxious to hear how they work for you. What are the differences between the stock springs and the new springs you'll be installing? Thanks! | ||
Henrik |
For regular type damping rod forks, the Race Tech product is their Gold Valve Emulator (cartridge forks get the Gold Valve). I've got a set in the SV and together with correct rate spring and heavier oil it works great. I have always purchased my suspension upgrades from Traxxion Dynamics. They know their stuff and seem to have a little more time to make sure their customers get the right parts and know how to get the best result. If you buy the full package from them, they are also good about advice on set-up after you do the install. No affiliation. Just happy with what they've done for my three bikes. Henrik | ||
Sem1 |
Henrik: I think the correct url is Traxxion Dynamics. Cheers, Semi | ||
Henrik |
Semi: thanks for the correction. Ought to teach me to check my typing before hitting "post"  Henrik | ||
Tim |
Evomx, Stock spring rate is .730 kg/mm. For my weight (250lbs)race-tech recommends .995 kg/mm so I ordered 1.0 kg/mm. | ||
Nemo |
Could someone please explain how to disassembly the 2001 shock. I built a copy the "Progressive Shock Tool". I can compress the shock, release the clip inside the can. But I cannot get the spring out. There is another clip which holes the spring in tension. This is as far as I can go. I am in need of a heavier spring. I have found a source that lists the spring dimensions (L, I.D.) and the rates are in 50 lbs increments. Prices are 50 to 75 dollars each. If I could just get the spring out measure it. Any help would be great. Thanks | ||
Blake |
Where's Andy Speigel when we need him?! | ||
Jrock |
I'm a suspension idiot. Can any of you guys suggest settings for stock 2000 X1 suspension that will not jar my teeth out unless I'm really thrashing it? I'm 142 lbs. Please help! | ||
Blake |
Jrock: First. Make sure your tire pressures are in spec per your owner's manual. Second: Get a notpad and document/log all six of your current suspension settings. Your owner's manual will describe how to measure/adjust these and which ones are where... 1. Front Sag, the suspension travel measured from fully unloaded (forks extended) to the equilibrium position with you sitting on the bike in riding position with all riding gear (yes, having a helper is very benificial when measuring sag). A zip tie wrapped around one of the fork sliders will also aid you in this measurement. Follow the instructions in your owner's manual to measure/adjust the preload in order to attain proper sag. Third: Your owner's manual will tell you how to set up the factory reccomended baseline. Do that, and verify and record the 6 settings in your log. Fourth: Take a test ride. Fifth: Record your observations of the ride quality. Try to discern between front and rear suspension effects and rebound versus compression (this can be difficult at first but becomes easier with time). Sixth: Adjust only a single suspension damping setting. Seventh: Measure and record all six settings. If sag has changed (doubtful) readjust it back within spec and reverify/record all six settings. Eight: Take a good test ride (same road/route every time). Ninth: Record pertinent observations. Tenth: Repeat 6th thru 9th until you are happy, or you feel the suspension settings are optimized. The idea is to work on one damping setting at a time until you feel that particular setting is optimized. Then go on to the next setting. Start with the ones that you feel are most in need of adjustment. Still not happy? A set of the aftermarket valving (Racetech Gold Valves) has done wonders in taming many a harshly over-damped suspension. Sounds to me like your damping is set too harsh and/or your preload may be way too high (little to no sag). The lighter you are, the less compression damping you will need. If you want to get a feel for extremes, go ahead and back your damping settings off a bunch, even all the way, and take a VERY careful ride to learn the effects (can you say "pogo stick"?). Preload should remain set within the range specified in your owner's manual. If you don't carry a passenger, you might benefit from adjusting your sag to the high end of the specified range (less preload). That should allow you to back off on the rebound damping a little. The preload (spring compression in inches (or mm) for fully extended suspension) simply dictates how much compression and rebound travel your shock has available when you are on the bike. If sag is adjusted within the range recommended by your owner's manual, further preload tinkering will not significantly affect ride harshness for a constant rate sprung suspension like your X1's. Adjusting sag (preload) within the allotted ranges WILL affect the steering qualities of your X1. Raising the rear (minimum sag) and lowering the front (maximum sag) will both tend to quicken/destabilize your steering. But that's another discussion for another time.  Once your preload/sag is withing spec, the damping settings are what you are needing to dial in. Don't hesitate to start adjusting your damping, just make sure you record each change in your log along with post ride notes. Otherwise, you can get the effects of the adjustment all confused. Having a log is invaluable. BTW, this doesn't get a lot of attention, but colder weather will tend to harshen motorcycle suspension damping. My winter settings are quite a bit different than my summer setup. Geesh, sorry for the length! Blake (ramblinggiverofadvice) | ||
Jrock |
Blake, Thanks for the advice. I'll give this a try ASAP. | ||
Blake |
JRock: My pleasure. Upon review, I saw fit to clarify/add a few things in my post above. | ||
Newfie_Buell |
Can anyone please help? I have purchased the Buell Race Springs for my 98 S1 as I find they dive way too easily. Is there a way to replace these without having to take the forks off the bike. Can I let go the fork clamps, push the fork legs up a little, loosen the nut at the top and pull the springs out. The service manual says to basically strip the whole front end. Has anyone attempted to do this before? Any advice is good. Bill  | ||
Ara |
Bill, Yes you can replace the front springs without removing the fork legs from the triple clamps. First I'm going to tell you how to do that, and then I'm going to tell you why you should consider doing more. To do it, you must support the front of the bike with the wheel off the ground, take all the tension out of both adjusters, loosen the top triple clamp pinch bolt on both legs, and then unscrew the fork caps. The fork cap/adjuster, a spacer, and a washer will come out - take a mental photograph of their arangement so you can replace them properly. It should at that point be very easy to extract the springs, but don't jerk them out of there. They're covered with fork oil, so pull 'em out slowly so that the fork legs keep as much of the oil as possible. Put in your new springs, replace the parts from the top of the fork legs, and apply the proper torque to both the fork caps and the pinch bolts. Reset the adjusters to factory settings as a good starting point, and then dial it in. Not hard. Now then, how old is your fork oil and have you ever cleaned and regreased the steering head bearings? You're going to some trouble here, why not at least replace the fork oil since you're doing suspension work? But let me tell you that a LOT of folks on this list have found that the factory is way stingy with the grease on the steering head bearings. Further the design does not protect the bearings from water incursion, so if you ride in the rain much or the bike has been parked in the rain those bearings have seen water. I did mine, and was literally astounded at the improvment in handling with sufficient good quality grease on the bearings. Just a word to the wise, Bill. None of this work is rocket science. Russ | ||
Buelliedan |
Ara, What do you mean when you say "take all the tension out of both adjusters"? Are you saying to back off the compression and rebound as much as possible? Also, how full do you fill them with fork oil? getting ready to do this project myself and need advice!! Thanks | ||
Newfie_Buell |
Thanks, I figured that would work, but what exactly do you mean "take all the tension out of both adjusters" as Dan states do you mean to back off the compression & rebound. I have not got through the full manual yet but is there a drain for the fork oil at the bottom of the fork. Also I am 6ft, 235lb rider what weight fork oil would you recommend. I notice that with the stock set up and even compression turned up I bottom out the forks at times. Especially when the front wheel returns to the ground. thanks, Bill | ||
Henrik |
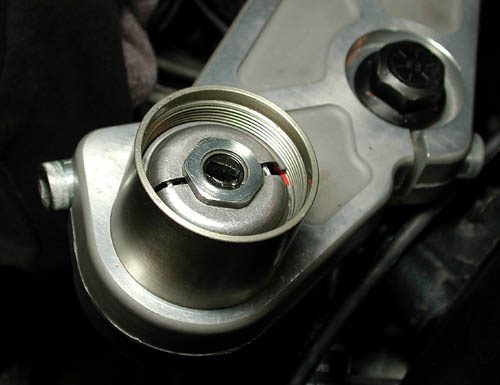
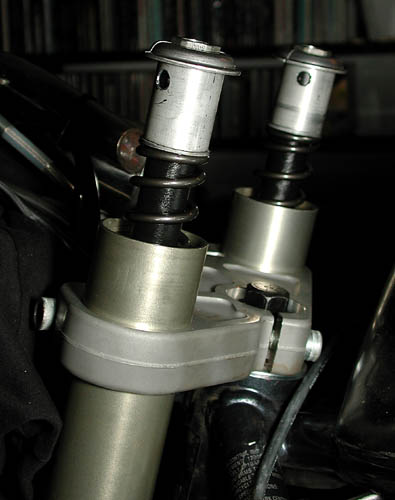
Bill/Newfie: I honestly don't think the Buell Race Springs are going to be high enough spring rate for you. At that weight you're going to need at least 1 kg/mm springrate. Walk through the Race Tech Spring search to make sure. Also, one addition to Ara's explanation; since your S1 has upside-down forks, when you get the fork tube caps off, you'll see the spring held in place under tension by two "half disks" that clip into a groove in the top of the compression/rebound adjuster rods. It took me a long time and a call to Andy "fork guru" Spiegal before I realized that you need to lift on the front wheel (2x4) and slide this assembly out of the top tube a bit to get these "half disks" out. Careful here - the springs are under tension - wear protective goggles. Once the "half disks" are off, you can remove the springs. Your new springs may be a different length than your stock springs, and you will need different preload, so make sure you have preload spacer material available as well. Henrik | ||
Ara |
Bill and Buelliedan: I would have said it your way if I'd thought of it! Yes, back off the compression and rebound adjusters all the way. If you have upside down forks like my S3, there's no drain. You have to remove the fork tubes from the triple clamps, turn them upside down and drain 'em. To fill them with new fork oil you hold them upright and add the amount of oil specified in your manual. As I recall, the manual says to add oil until it rises to a certain linear measurement below the top of the tube. I used a welding rod held at the specified length by a vise grip. It takes less than an quart for both tubes. My manual specifies 5 weight oil, but I understand 7 weight is an option. At 235 lbs, Bill, I'd take Henrik's advice seriously. (And thanks, Henrik, for reminding me about the half-disks.) Russ | ||
Rocketman |
And a little trick you can do to the bottom bearing race is, the very bottom cup has a lip that faces upwards and this creates a classic water trap. It will do no harm to file away a section of the wall at the rear of the cup. Rocket in England | ||
Newfie_Buell |
Well looks like the forks will have to come off. Seeing they are off I guess I will repack the steering head bearings and change the fork oil. According to Race Tech the stock spring is .646 kg/mm and the ones I have bought are .85 kg/mm so this will be a definate improvement. What about oil, which weight will I use? Thanks again, Bill | ||
Blake |
Wow. That's the first time I've heard that the stock spring rates are 0.646 Kg/mm. Race Tech says I need around a 0.95Kg/mm front spring rate. That's almost a 50% increase! That puts the design weight of Buell's average rider at around 155 LB. I guess that's about what we've been saying all along. | ||
Henrik |
Here's a couple of pictures of these "half disks". Inside the fork tubes:  Pushed up out of the fork tubes:  Bill, at 235 lbs the Race springs will not be enough for you. You'll have to add a lot of preload to get the right rider sag, which will set your race sag at close to zero. If you need more than 1 kg/mm Traxxion Dynamics have higher spring rates. Race Tech "tops out" (pun intended) at 1 kg/mm. Henrik | ||
Blake |
Hmmm, thh stock rate for an X1 is listed as 0.75 Kg/mm. For a '97/'98 M2 stock spring rate is shown as 0.94 Kg/mm. I guess my stock springs are good nuff! I'm surprised. | ||
Ralph |
Bill, the Buell race springs are going to be light for you. I'm about the same weight and am using Racetech 1.0kg springs and 15w oil. Andy the guru still dialed in a fair amount of dampening. Massive difference. I also had my WP shock revalved and resprung at White Brothers and it's amazing how good it handles, and I live in Nebraska! I honestly didn't think I would notice the difference, but it makes a huge change for the better. bighairyralph | ||
Bluezhawg |
Has anyone ever installed a grease fitting in the neck for lubrication.I installed one on my 80 Shovel,and my Glide has one from the factory.Any suggestions for my 2000 S3T would be helpful Thanks... | ||
Bluezhawg |
Ooooops previous post in the wrong thread sorry???  Can somebody advise me on isolators.I have a 2000 S3T it has been off of warranty since october of 2001.Have the dealers been doing the upgrade on off warranty bikes.I'm trying to get all the upgrades and probelms taken care of.Help would be great. Steve... Can somebody advise me on isolators.I have a 2000 S3T it has been off of warranty since october of 2001.Have the dealers been doing the upgrade on off warranty bikes.I'm trying to get all the upgrades and probelms taken care of.Help would be great. Steve... | ||
X1rated |
On an X1, how in the hell do I get the front end supported off the groung to dissasemble the forks? Only two things I can figure is to lay the bike over on it's side, or use an engine hoist. By the way, thanks to Blake and Henrik for all the help! Justin | ||
Blake |
BHawg: Ask them to do the isolators along with the 10K service. The swingarm has to come off for bearing check/lube at that point anyway, so the isolator replacement labor is already covered.  | ||
Blake |
X1Rated: You can buy a special stand for around $120. Or you can block off the rear tire, and use a scissors jack to lift the from under the rear shock's front mounting clevis/bracket (be very careful to ensure a good stable jack position). Or, you can hoist from above. Sorry, I don't have any pictures. | ||
Henrik |
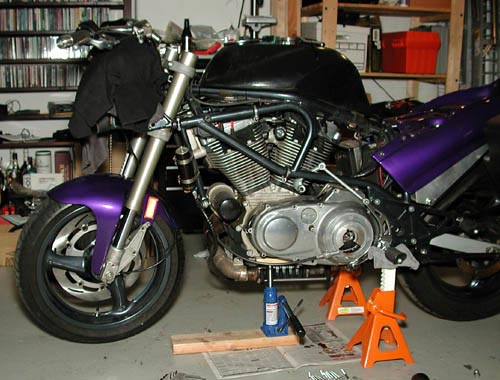
Justin: I use a set of cheap jack stands under the rider foot pegs, and a 2 ton hydraulic jack under the front of the engine:  You could also use a swingarm stand to secure the bike at the rear and a regular ratchet strap over the rafters for the front end. Henrik |