| Author | Message | ||
Gearheaderiko |
http://www.badweatherbikers.com/buell/messages/20164/110366.html?1129607493 | ||
Buellboy492 |
Wow- that's cool how you can post a link and it takes me right to the page. Thanks! When I look at the DO NOT REMOVE bracket, I wondered why the "ground strap attachment" seemed so robust!!! It was for another heim joint. That makes sense. Thanks to all who post here- you are my lifeline!!! | ||
Buellboy492 |
update on motor mount issue. I inserted a thick washer in the bottom tie-rod mount, it kept the tabs from bending in when I torqued it this time. So far so good, over 500 miles. The last few have only lasted 200 miles or so... next issue: now sometimes it feels like it is running out of gas and about to go on reserve. I will check the vent tube, fuel filter, and I think I will just put in the bigger jet. | ||
Swampy |
Hey! Welcome back, you haven't posted in a while! Hope the washer works out for you. I have had pretty good luck with getting the two bolts tightened then tightening the center bolt, I think it keeps the isolator from being twisted when it is installed. Also supporting the engine instead of drawing the engine up with any of the bolts. Also I think some of the old stock isolators were bad stock, just my opinion though. | ||
Gearheaderiko |
Thanks for the update Buellboy. Been wondering how its going. (Message edited by gearheaderiko on October 19, 2006) | ||
Rocketman |
That's interesting. On my S1W I've tried a number of combinations of nuts bolts and washers to keep those tabs nice and parallel rather than slightly squeezed in as they go with the stock hardware fastener. If I use anything that allows those tabs to be parallel, the nut (which should face rearward) always manages to contact the oil filter at some time. Yes my engine mount / isolators are fine. Rocket | ||
Buellistic |
Rocketman: When you "Ride It Like You Stole It" the engine moves quite a bit due to the engine being rubber mounted ... If you shim up the ISOLATORS it will vibrate like a Pre-2004 Sportster !!! In BUELLing LaFayette | ||
Rocketman |
Thanks Lafayette. I worked that one out despite the gap, the first time I dented the oil filter, lol. Rocket | ||
Swampy |
Well, here it is November! The boys and I go for a ride and when we stop for gas, I notice the Big Kids Blast has the left side bolt missing on the "Do Not Remove" Bracket! So I look at the Little Kids Blast and he has the same bolt broken! WTF! Looks like I am going to be busy, they both broke at the most inoportune time! | ||
Ezblast |
Replace all those bolts when replacing the one - saves re-occurance. GT - JBOTDS! EZ  | ||
Swampy |
I got one of the bikes apart and started drilling the remaining piece of bolt out. I drove the EZ-out into the hole that I drilled in the bolt and the bolt started turning pretty easy! I got it out and it was a piece about 1/2 inch long! I look in the bolt hole and there is still a piece in there! The bolt broke in three pieces! I have to figure something out here, there has to be a better way, anybody have any ideas? | ||
Joey |
I had that bolt replaced 3 times! The third time, I ordered the bolt by the part number, which was updated, and put it in myself. It hasn't broken since. The first two times, it was under warranty. They tried a really hard bolt, which lasted less than 1K. The second was a bit softer, and lasted almost 7K. I guess this is one of those things that Buell has figured out just what bolt is the right balance between flexibility and hardness. Make sure you get the bolt by its part number, and not just a replacement that matches the hole. | ||
Swampy |
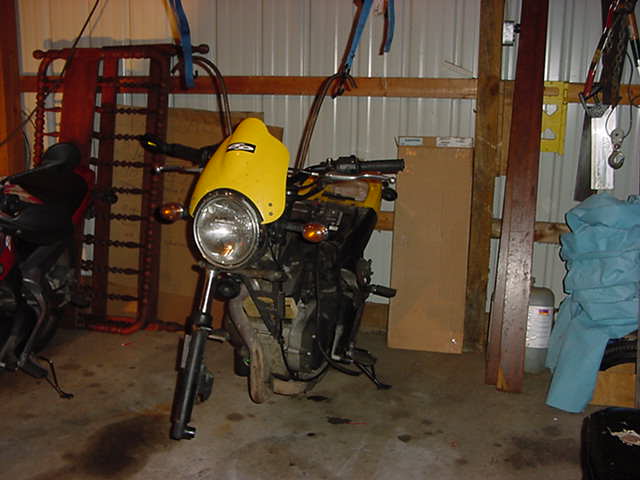
Here are a couple of pictures, the first of the Big Kids Blast suspended from the trusses by a deer spreader and a couple of rachet straps, with the Little Kids Blast in the background waiting the same operation.  | ||
Swampy |
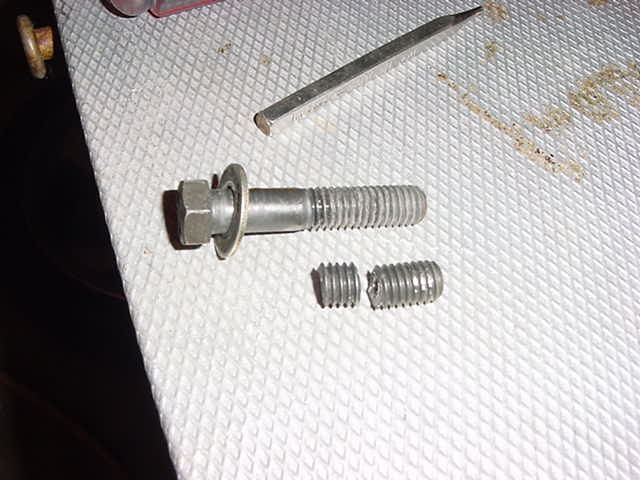
and a picture of the three piece bolt, the right side bolt in one piece and the left side bolt in three pieces(hex and shaft missing)  If anyone can tell me why this bolt would have broken like this let me know. The only thing I could imagine would be the bolt broke at its furthest part in then vibrated to break at the outside end. | ||
Buellboy492 |
Well Swampy, It looks like the season is bout over for us in Michigan. I rode a bit Sunday, really nice to on two wheels again. Obviously, some of us Blast riders just have a problem with shearing off these bolts. I see you really tear it down to get at it. I use a rod through the rear axle and lift the back end up in jack stands. I remove the exhaust. Then I remove the gas tank. Then I remove the rear engine tierod, then front lower one. I support the engine with floor jack. Then remove the two isolator bolts from the do not remove bracket. I can get at the bolt hole on the throttle side no problem. The other side, which has broken on me like 4 times now, I have to reef on the whole engine and raise or lower the floor jack, etc to pull it far enough to the clutch side to drill out the broken bolt. I have used ratchet straps to "pull" the engine into position and keep it there (strap to the frame on one side and attach somewhere on the engine to pull the right way) I have had luck so far with the new bolts. I replaced both bolts, and used new washers. I created a thread chaser out of another bolt- I cut a gap in the threads on the length of the bolt with a cut-off disc to run in and make sure my threads are as clean as I can make them. The factory bolts have a coating that I assumed to be threadlocker. But maybe it is an assembly lubricant...Good luck, I probably won't be checking in until January when I get cabin fever. | ||
Swampy |
I talked to Spiderman about this, he said that I should check the threaded hole for being too large. When I thread a bolt into the hole, I find that it does wobble around a bit until it is threaded all the way in. I am going to install Helicoils in the holes. | ||
Ezblast |
AA0718.1CZB are the bolt part numbers you asked for. GT - JBOTDS! EZ  | ||
Swampy |
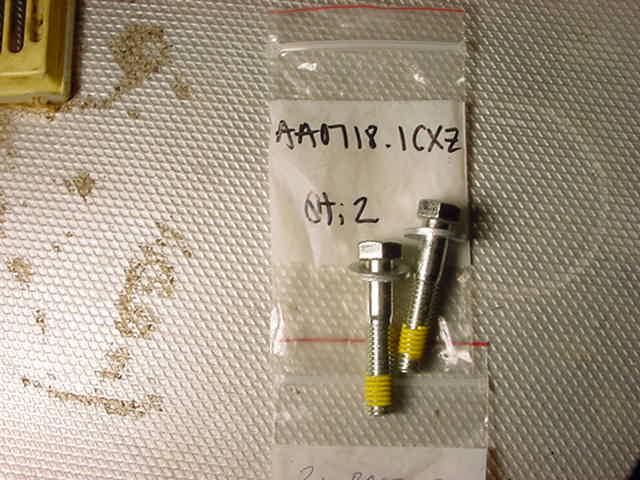
According to Daves, there is a left and a right side bolt and left and right side washer. The right side is AA0718.1CXZ So the left side must be AA0718.1CZB All these numbers, no wonder they break! | ||
Ezblast |
In my parts book - it lists the same number for both - Washer # - BA0714.2Z GT - JBOTDS! EZ  | ||
Buellboy492 |
No kidding, two different bolts? I should order one of each to see if they are actually different!!!!! | ||
Gearheaderiko |
AA0718.1CXZ 2002-2005 model years (zinc w/scotch grip)! AA0718.1CBZ 2000 model year I'd use the later model year bolts (unless of course the 2000 year bolts never break!?) and none of my parts books list a left and right bolt! | ||
Berkshire |
Swampy, my '00 parts book says bolts are AA0718.1CBZ and washers are BA0714.3Z | ||
Ezblast |
Thats weird - I have a 2000 - 2001 parts book and the numbers I put up are what is called for, yet Berkshire's straight 2000 book says above, and 2002 books say something else, I updated my numbers and would go with the 2002 numbers for the reasons stated above. GT - JBOTDS! EZ  | ||
Swampy |
OK, everything is now explained! Daves called me today to apoligize, apparently Tuesday is his Monday(If you know what his weekends are like you would understand) and he was under a heavy dose of cold medicine. The bolts are the same, the washers are the same. He was looking at the ground strap bolt in the parts book! So for the betterment of Blasting the correct bolt part number is: AA0718.1CXZ And it has the Scotchgrip on it. Now the question is, on the bolt with the scotchgrip do you put red Locktite on it? | ||
Swampy |
 | ||
Ezblast |
could'nt hurt? | ||
Berkshire |
Are you still going to helicoil the head? If so, could Locktite pull out (unscrew)the helicoils if/when you remove the bolts? | ||
Swampy |
I am really concerned about that happening with the Helicoil.... BUT........ I don't understand why the original bolt would have broken in the first place. The only reason I could come up with is the hole is elongated and is in need of repair. | ||
Swampy |
OK, here is the update. I couldn't find Helicoils that were extra long so I bought a kit anyways and figured I would stack them. When I got the package open I found the instructions said that if you need more length you can stack them. When I installed the Helicoils I used RED DEATH Hi-Temp Red Locktite. Two Helicoils were too long for the hole so I had to cut one. I would recommend using a high speed abrasive cut off tool and cut down through the coils two threads. That will put the first thread inside the hole a little ways. I cut the Helicoil before installing it. I did all this with the head on the bike and the engine in the frame, so I had to shape the end of a 7/16 bolt so that it looked like the Helicoil installer so I could install the Helicoils in the left side hole. I see other coil insert manufacturers have different style installers that may have been able to reach through the frame to install the insert. So check out the installing tools and inserts before hand, I really don't think there is much difference between inserts as they are all made in China. I then did the regular install, new bolts and washers, using regular Red Loctite, oil on the washer, torque to 60 lbs, one full turn back off and retorque to 60 lbs. Hopefully this works. I will find out some time in May when the weather warms up again!LOL! Ugh! Oh yeah, one more thing, I found the grommet really lose where the rocker vent tube plugs into the rocker cover,(thats why the engine was dirty) so I changed out the grommet and its really tight now! I would recommend to order the part and have it handy to change out next time you remove your fuel tank! | ||
Ezblast |
 Thank You! |