| Author | Message | ||
Mike_lee |
always something huh. other than that, you're happy with the outcome so far? | ||
Falloutnl |
Definitely happy with the outcome. It's like an (even) better version of the M2 I used to have. Once the kinks are ironed out, this'll be a wonderful machine. And I absolutely love the way it looks. | ||
Falloutnl |
Was wondering about that 4,5k rev ceiling hammer specifies. Seems kinda high actually. Don't need (that) much more out of these motors. (Message edited by falloutnl on June 04, 2019) | ||
Mike_lee |
I think its below 3k rpms for the first 50 miles then no more than 4k for the next 500. If you have an aftermarket ignition module, you can set the limiter. I think i set mine at 6k just because i dont like revvin it out and rarely take it above 5500. That and it gives you the choice of curves. Is this what you meant about hammer and rpms? | ||
89rs1200 |
Harley-Davidson recommends; BREAK-IN: THE FIRST 500 MILES (800 KM)The sound design, quality materials, and workmanship that is built into your new Harley-Davidson will give you optimum performance right from the start. * We ask that for the first 500 miles (800 km) and to wear-in critical parts, please observe the simple riding rules below. This will assure future performance and durability. 1. During the first 50 miles (80 km), keep the engine speed below 2500 RPM in any gear. However, do not lug the engine. 2. Up to 500 miles (800 km), vary the engine speed and avoid any steady speed for long distances. Engine speed up to 3000 RPM is permissible in any gear. 3. Avoid fast starts at wide open throttle. Drive slowly until engine warms up. 4. Avoid running the engine at extremely low RPM in higher gears. * Do NOT exceed 50 mph (80 km/h) for the first 50 miles(80 km). * Do NOT exceed 55 mph (89 km/h) for the first 50-500miles (80-800 km). * Do not "lugg" the engine! Never ever below 1500 RPM. -- operating at very low rpm in high gears -- or subjecting a cold engine to fast starts with a wide open throttle during the break-in period. S&S and others recommend; 1- Initial start up. Run engine approximately one minute at 1250-1750 rpm. DO NOT crack throttle or subject to any loads during this period as head gaskets are susceptible to failure at this time. During this time, check to see that oil pressure is normal, that oil is returning the oil tank, and that no leaks exist. 2. Shut off engine and thoroughly check for any leaks or other problems. Let engine cool to the touch. 3.. After engine has cooled, start up again and allow the motor to build some heat. Engine should be run no longer than three to four minutes. When the cylinders become warm/ hot to the touch (approximately 150į) shut the motor down and let it cool to room temp. Follow the same cautions as for the initial start-up, and continue to watch for problems. 4. Repeat this procedure 3 or 4 times. Each successive time it should take slightly longer to warm up and you can increase the temp slightly each time (+10į). You can be more liberal each time with the rpm, gently vary rpm continuously from idle up to 2500 rpm in the final cycle. Donít be too concerned with final carb settings at this time because idle speed and mixture cannot be correctly set until the motor reaches full operating temperature. The motor should not reach that temperature during these cycles. Do not allow engine temperature to become excessive. After the motor has cooled to room temperature for the final time you are ready to start the 1000 mile engine break-in process. 5. The first 50 miles are most critical for new rings and piston break-in. Engine damage is most likely to occur during this period. Keep heat down by not exceeding 2500 rpm. Avoid lugging the motor, riding in hot weather or in traffic. Vary the engine speed. Do not lug the engine. We recommend changing the oil at 50 miles. 6. The next 500 miles should be spent running engine no faster than 3500 rpm or 60 mph. Avoid continuous steady speeds, and do not lug the engine. Vary engine rpm. We recommend changing the oil again at 500 miles. CAUTION: Lugging or running engine prematurely at sustained high rpm may result in damage to pistons and other engine components. S&S voids itís guarantee if engine is not broken in properly. 7. For the balance of the first 1000 miles the motor can be run in a normal but conservative manner. You can be more liberal with the rpm range and motorcycle can be operated at normal highway speeds. Avoid overheating or putting any hard strain on the engine: no drag racing, dyno runs, excessive speed, trailer towing or sidecar operation. 8. After 1000 miles, verify carburetor jetting and adjustment. Change the engine oil. Motorcycle can now be operated normally. (Message edited by 89rs1200 on June 04, 2019) (Message edited by 89rs1200 on June 04, 2019) | ||
Williamscottrobertson |
Someone posted this here a while back. I found it interesting. https://youtu.be/xpoglovyy_8 In aircraft engines, we run them rich, maximum continuous power, low load, for the first 25 hours on mineral/dino oil or the rings donít seat. An old timer told me to ride it like you want to break it on break in... or it will break. | ||
Falloutnl |
An old timer told me to ride it like you want to break it on break in... or it will break. Might be something to that, given what they say in that video. Still... better be on the safe side. @89rs1200 thanks! yeah those S&S recs sound kinda like what Hammer is saying. Worked out well for my X1, so I'm sticking with that. Is this what you meant about hammer and rpms? Yep, thanks. That's interesting btw, the after market ignition module. Might look into that.} | ||
89rs1200 |
Morning Williamscottrobertson, That video from Motorcyclist Magazine really does dis-service for us that want their motor to last. They used a small metric motor and tore it down at 2000 miles. that was the end of it. Also, personally I have a problem with the idea that something abused hard at the beginning will last longer. How does that make any sense?! I believe most of the folks advocating hard break-in do not keep their motors for more than three or four years. That is what I see from most of the Harley Davidson owners I know. Check out what these Harley Davidson mechanics have to say; https://www.youtube.com/watch?v=v_ONwjiosFI | ||
Mike_lee |
I tend to agree with 89rs. If it were a two stroke dirtbike, absolutely ride it like you stole it. But those are supposed to be rebuilt like every 15 hrs. Unlike four strokes. Ive done both and with the four stroke, i tend to break in the engine gradually. This is my first big motor rebuild so i certainly followed the kits manufacturer/seller on break in. Just to be safe. Hammer sold you the kit, follow their instructions. My .02 | ||
Williamscottrobertson |
Yeah I always follow the manufacturers instruction. I was just demonstrating that there has been some research on the topic. Teledyne-Continental aircraft engines, the manufacturers break in recommendation - rich, high rpms, low load for 25 hours. Most depends on the engine manufacturers components. What is the cylinder wall material - steel, chrome, nikasil, ect ? The rings and pistons? Cast or forged? Is there Teflon on the rings? Many variables. What works for one engine may destroy another. | ||
Falloutnl |
My new speedometer mechanism + cable have finally been shipped. Hopefully back on the road this weekend. | ||
Mike_lee |
good deal man....sucks when our bikes are down. especially during riding season. Where'd ya find a speedo gear? mine just started squeaking. I see a c-clip on there. If I remove this, will I be able to get in there and lube it up? | ||
Falloutnl |
If I remove this, will I be able to get in there and lube it up? We tried that during the rebuild process. However, we weren't able to open the gear up completely (despite removing the c-clip something wouldn't budge). My dad was afraid we would damage it by prying it open. So we washed it out best we could and loaded it up with grease. But it didn't work obviously. (edit: could work you though, who knows. Our bike really had seen some shit, so the gear probably was in really poor shape to begin with.) I got the new gear + cable from Twinmotorcycles in the Netherlands (like most of my other parts), it was about 75 euro for both. Had to wait about two to three weeks though, they're getting kinda rare apparently. sucks when our bikes are down. especially during riding season. For real. Luckily the X1 and Uly are up and running. But yeah, it's the S1 I desperately want to have a go on :P (Message edited by falloutnl on June 27, 2019) | ||
Upthemaiden |
Used to play that game with gear shifters when I worked in bicycle shops in college. They'd get gunked up and the ratchet would stop working. Spray cleaner in as best as you can, then spray lube in it, work it back and forth a few times, back to the cleaner, then lube it. A few times and they'd usually start working fine. You'll have to find some good grease that's thin enough to works it's way through it, but not so thin that it'll just rinse out when it gets wet. | ||
Falloutnl |
Alright, so - it's back on the road again with properly indicated speed and ODO that is going steadily up. Almost halfway through the break-in process. The only issue I have with the bike now is either something with the front forks or maybe the front motor mount. Half of the time it will absorb bumps quite nicely, but the other (and sometimes even with the tiniest bumps) something seems to snap back into place or issue a kinda 'twangy' feeling. At first I suspected the forks. Remember those rubber bits that emerged from the fork fluid we refreshed? Those were from the bump stops that disintegrated somewhere along the way (non serviceable). Only I don't think those are needed so frequently that the lack of them is what I'm feeling - especially when it's over smaller bumps too. So I'm thinking maybe the motor mount. It's one of those new milled pieces from Twin Motorcycles. We had some issues mounting it because the bolt wouldn't fit bottom up, so it went in from the top of the frame downwards. We couldn't torque it with a torque wrench, had to do it by hand. Maybe it's not tight enough? What I'm feeling is really hard to describe, but if someone has any ideas - or if you think my suspicion of the motor mount might be correct. I'd love to hear it. Picture from one of the rides:  | ||
Brother_in_buells |
Did you use a small bolt in the big hole of the motor mount ,or used a spacer? | ||
Falloutnl |
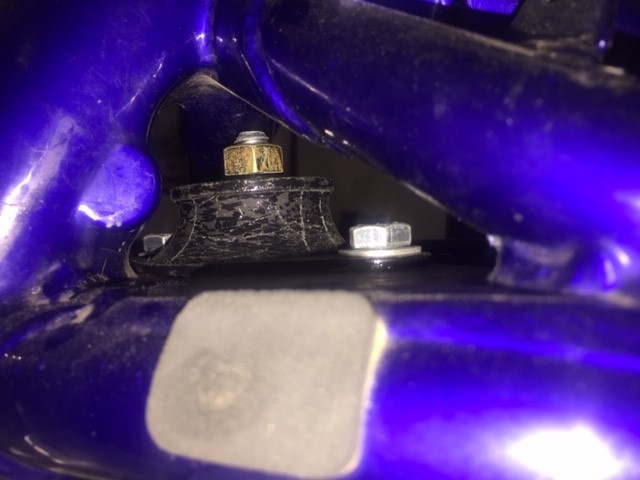
It's the stock bolt, so the same one that was used to install the original piece. We ditched the D-ring that was up top for something with less thickness, otherwise there was not enough room to screw on the entire nut. This is what it looks like now:    | ||
Upthemaiden |
Do you have the updated front isolator? One issue is that the bikes originally came with an isolator that had a 1/2" bolt, then when they made a replacement they came with 7/16" bolts. That means you're sticking a 7/16" bolt through an engine mount with a larger hole meant for a 1/2"" bolt. If you didn't tighten the bolt down enough, there would be enough room for there to be some movement. No idea if that's what you're feeling, but it's an easy fix regardless. Search ebay for "7/16 1/2 reducer" and buy one of these. Put something under the engine to supports it, remove that nut, slide the spacer up over and bolt and inside the engine mount, and tighten your bolt back up. Some people also drill the new isolators out so the old 1/2" bolt fits through it, but I wasn't really looking to drill that one. See if you can get some calipers on the bottom of that bolt to see what size it is. https://www.ebay.com/itm/1-2-to-7-16-REDUCER-INSER T-SPACER-HEIMS-HEIM-JOINTS/370935106918?hash=item5 65d748d66:g:txwAAOSw3fNdGiI- | ||
Falloutnl |
Much appreciated. I will investigate! | ||
Falloutnl |
Haven't gotten to the bottom of the matter just yet. My dad's attention been grabbed by an 1125r we managed to buy for next to nothing. Here's a picture of the S1 though: 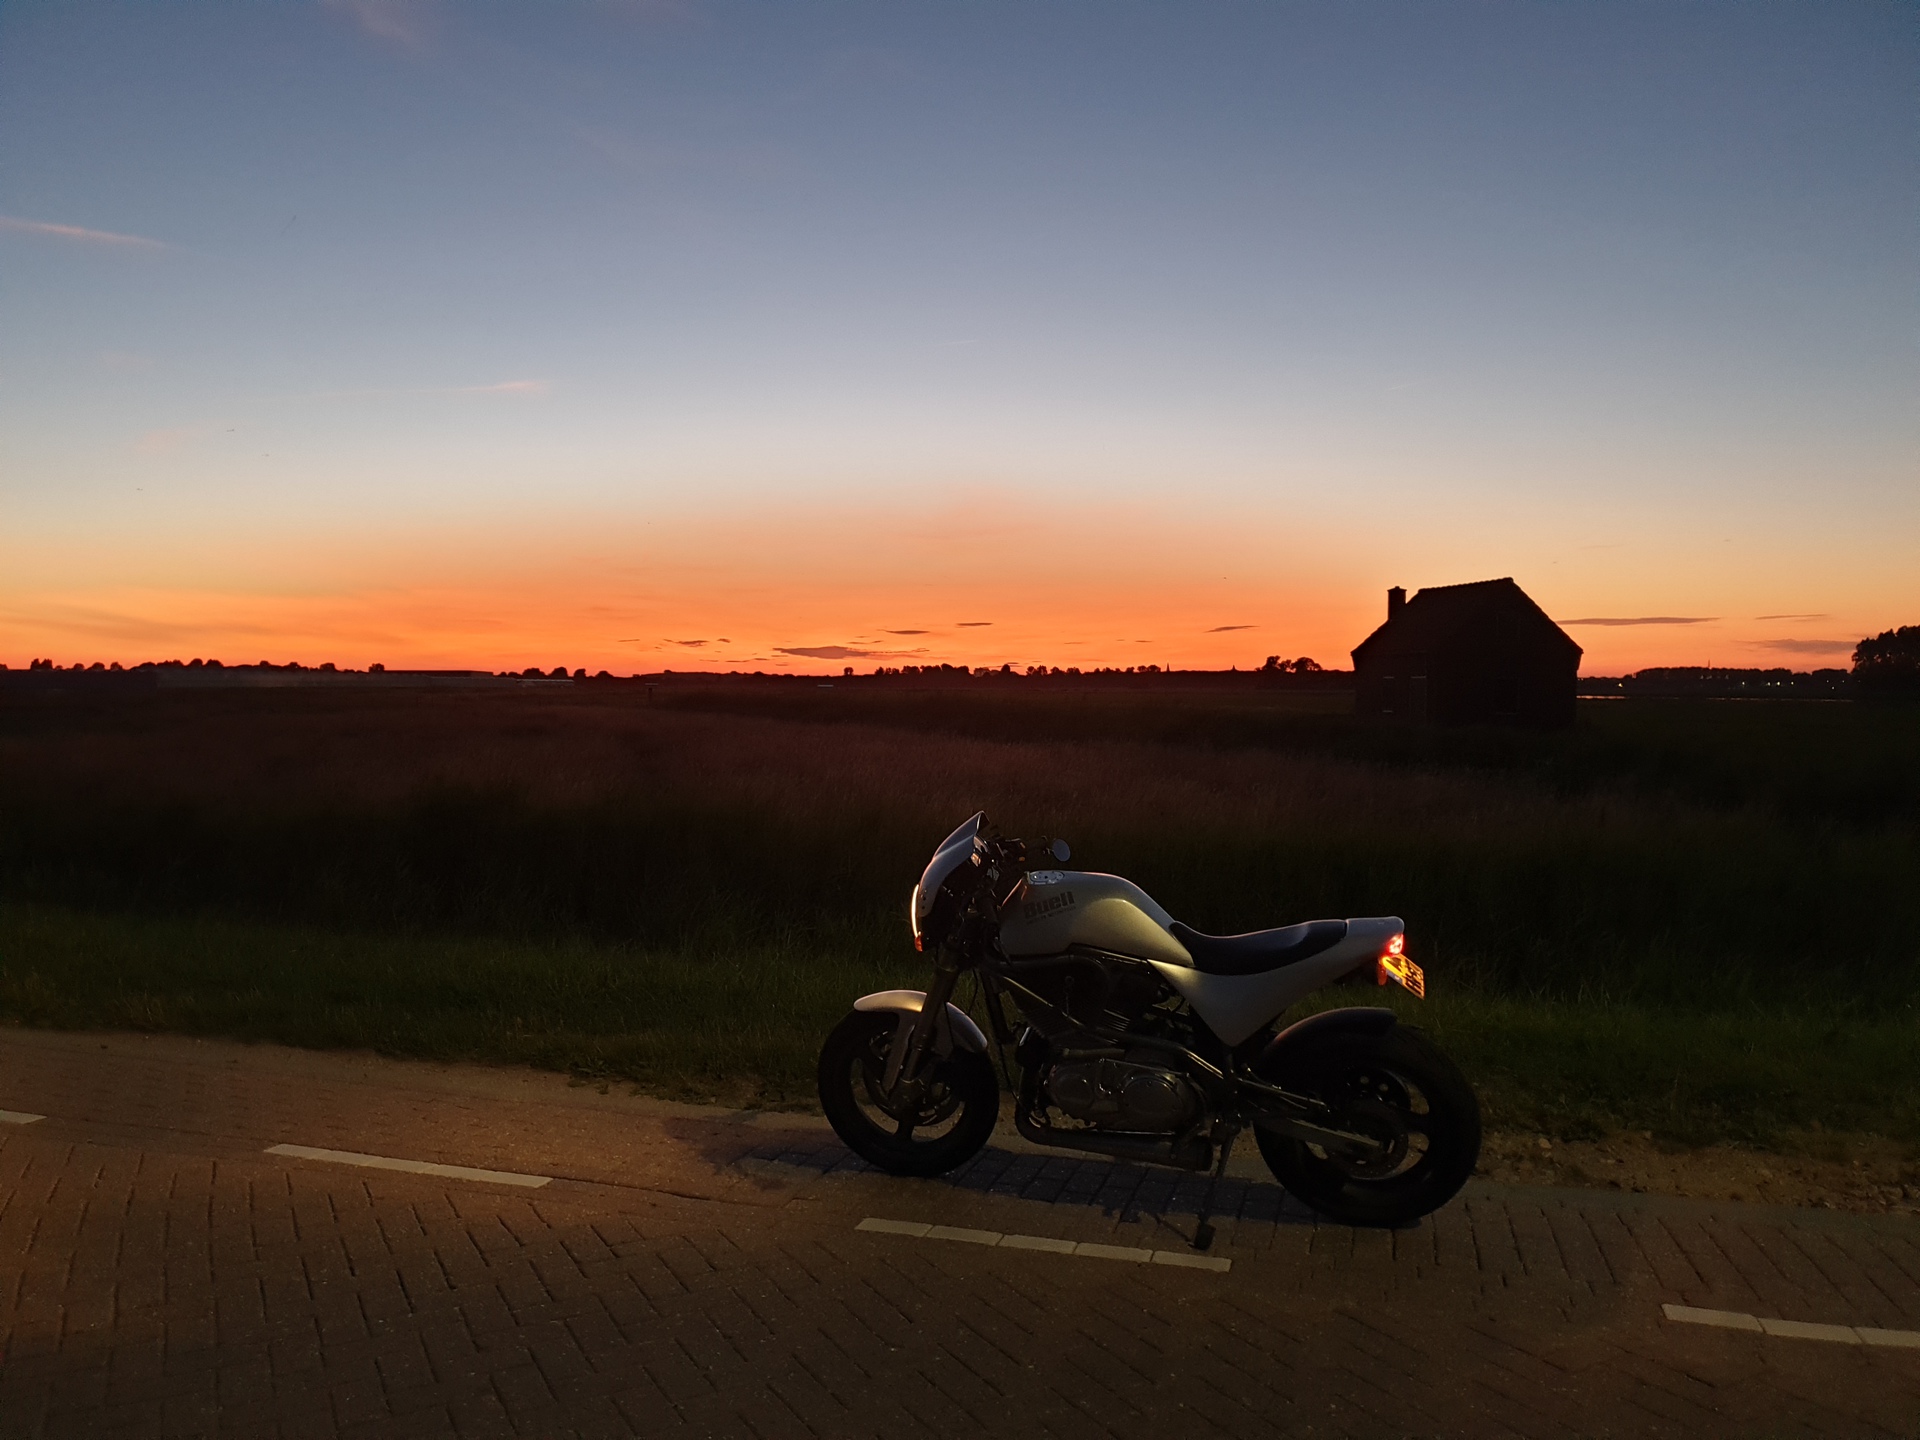 And! The little bracket went, but it did last 500 miles  (which means the break in period is over) (which means the break in period is over) 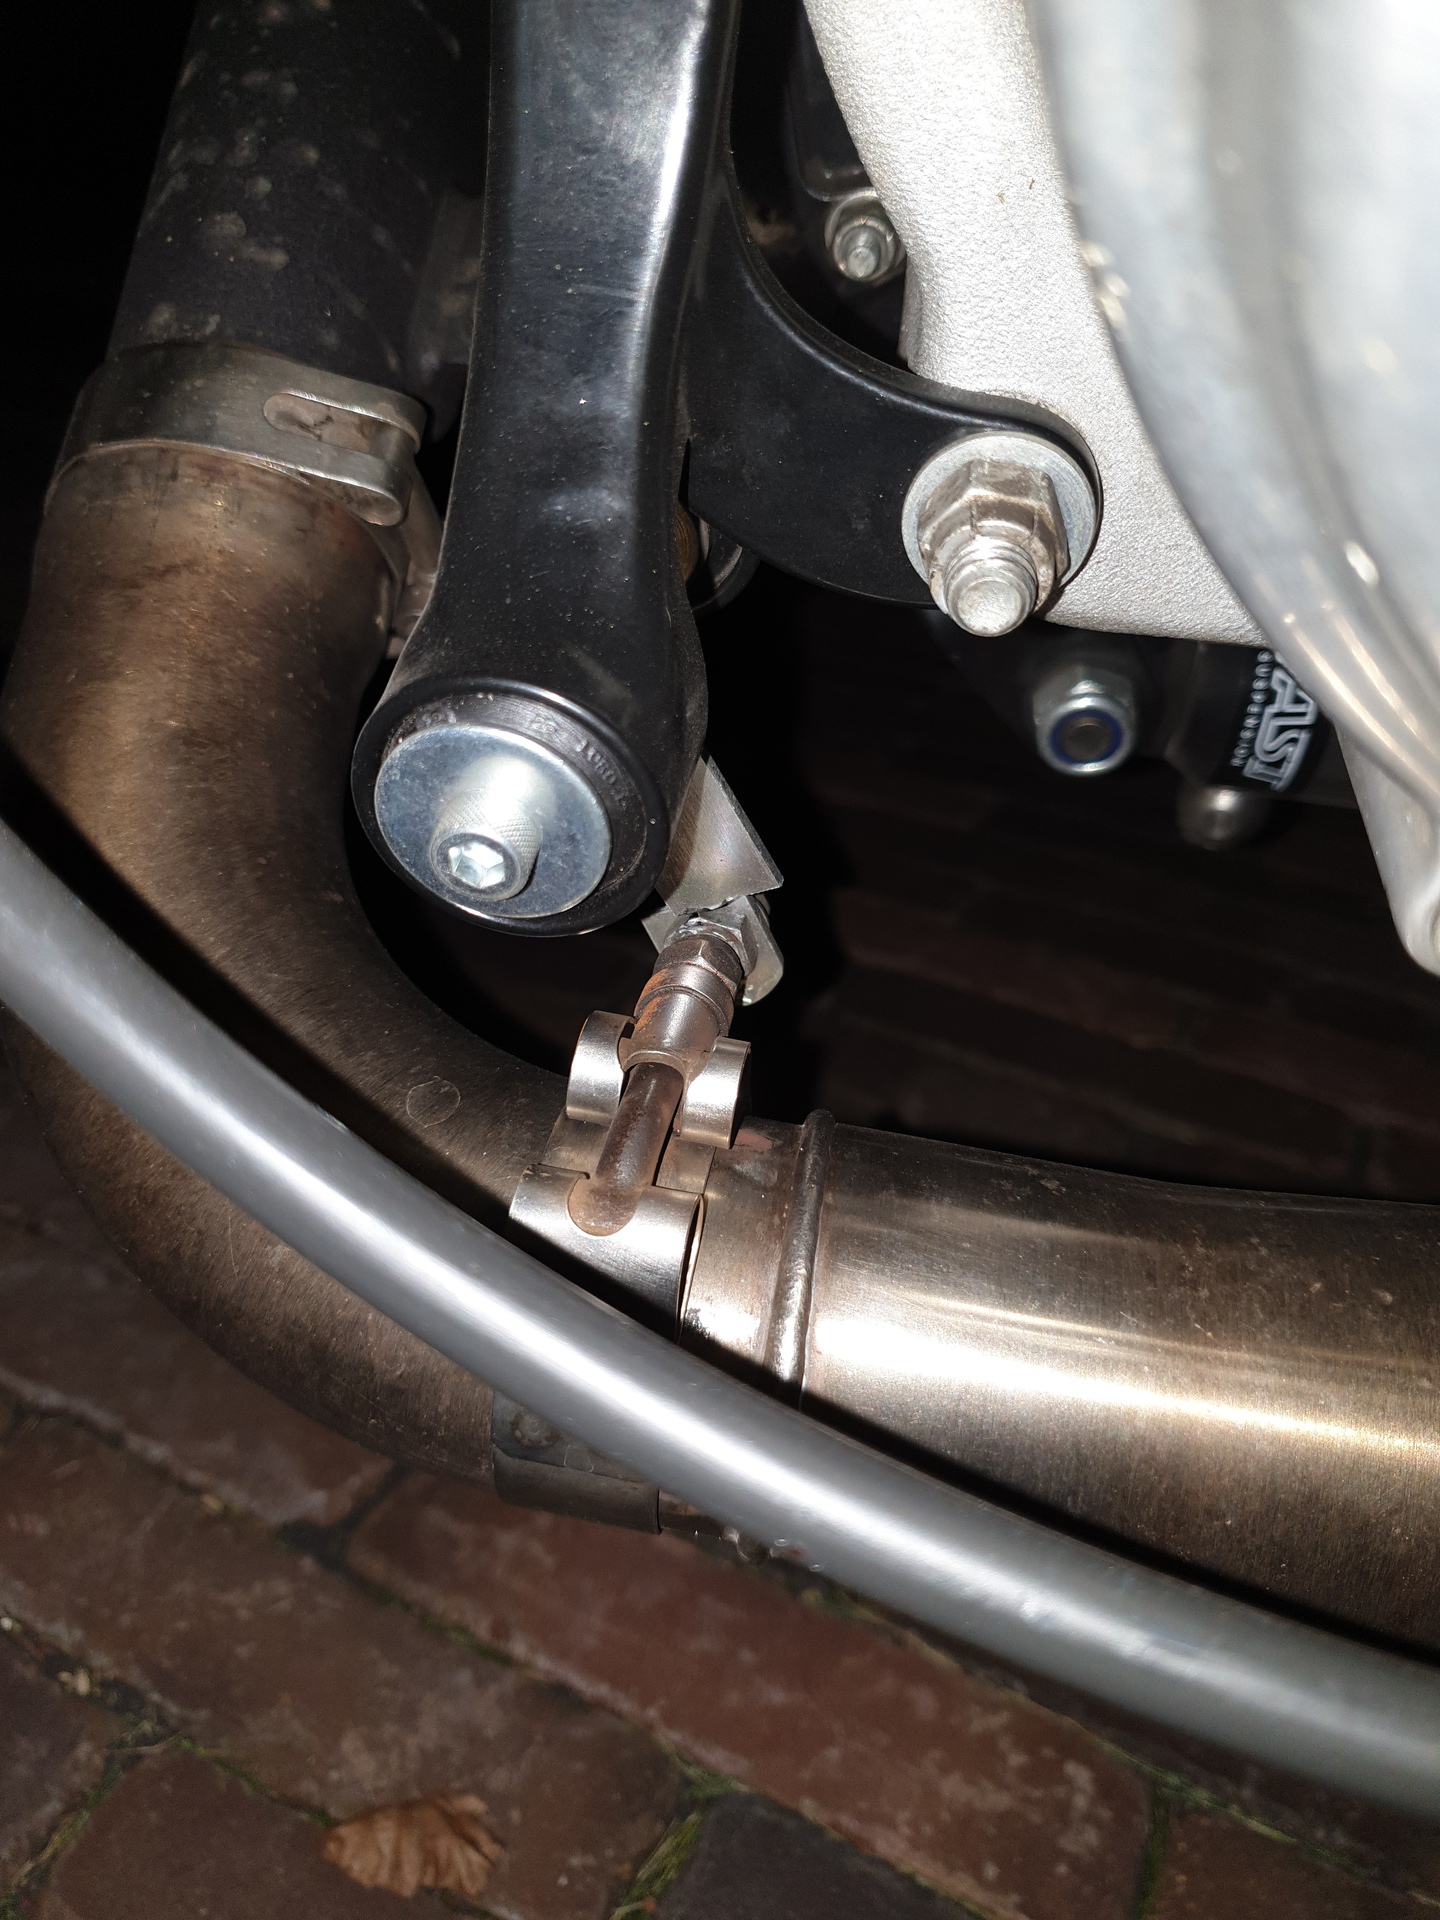 Three issues to solve: - the weird feeling in the front end, probably the motor mount - the bottom pushrod cover gaskets are leaking (shit) - fashion a sturdier exhaust bracket that uses both parts of the Y hanger | ||
Mike_lee |
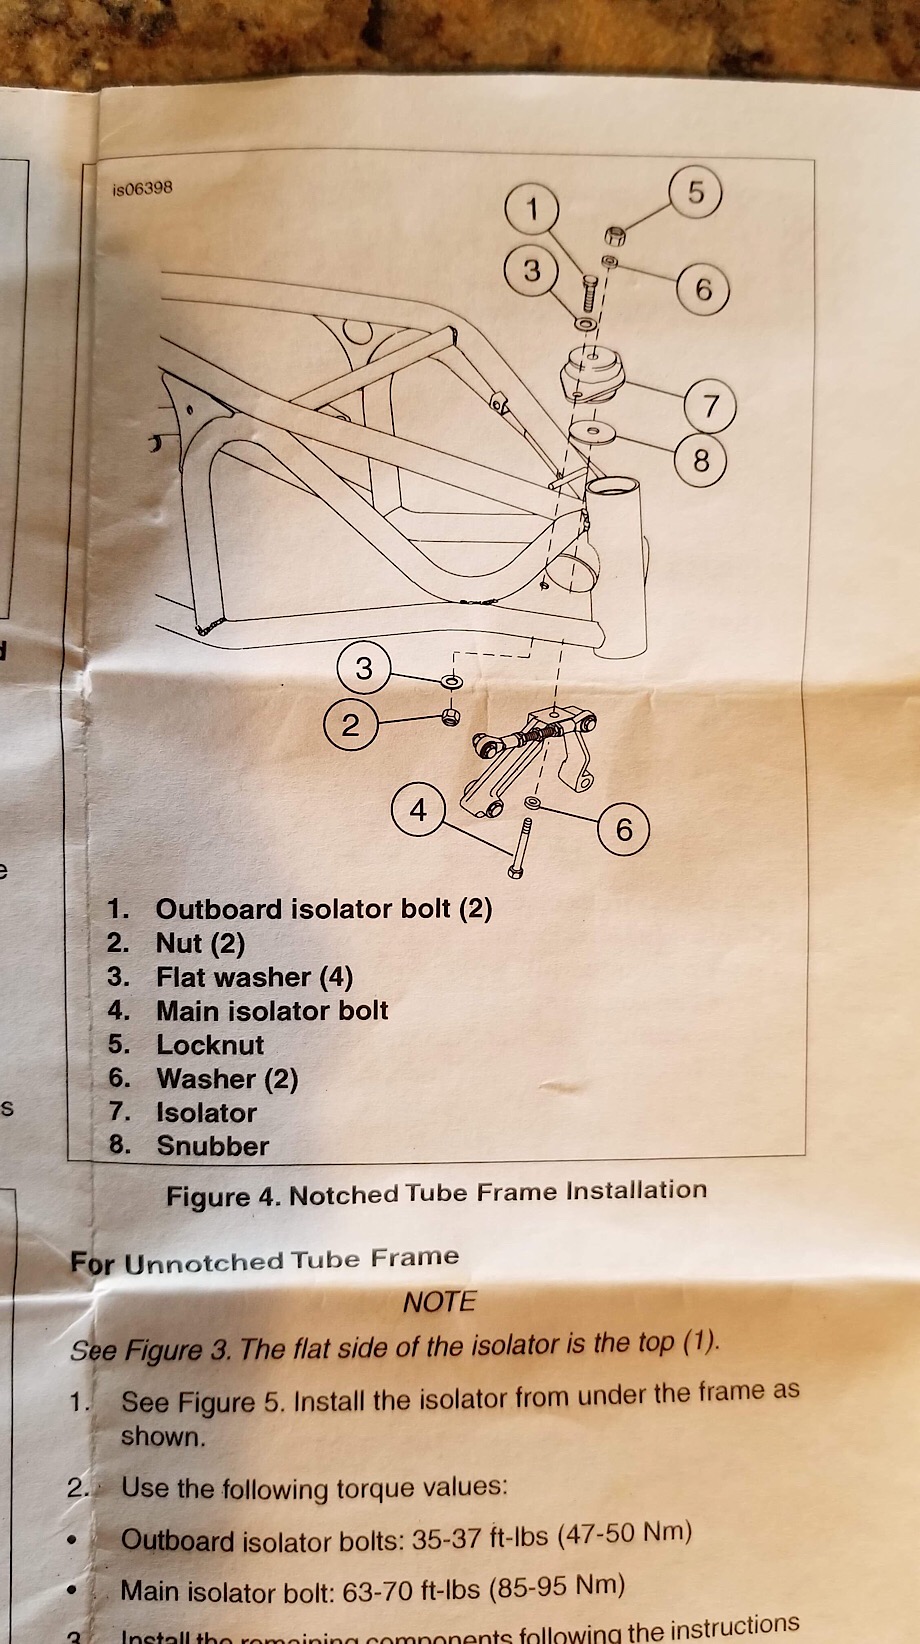
I say have a decent welder weld a tab onto the header and use a spacer. Does is matter which way the bolt is installed? I dont think so but its backwards from instructions. Its torqued properly? Also...washer #8 is the correct size? It looks small in diameter and large in thickness. I used super glue on the bottom gaskets and let them sit overnight before install. Congrats on break-in being over. 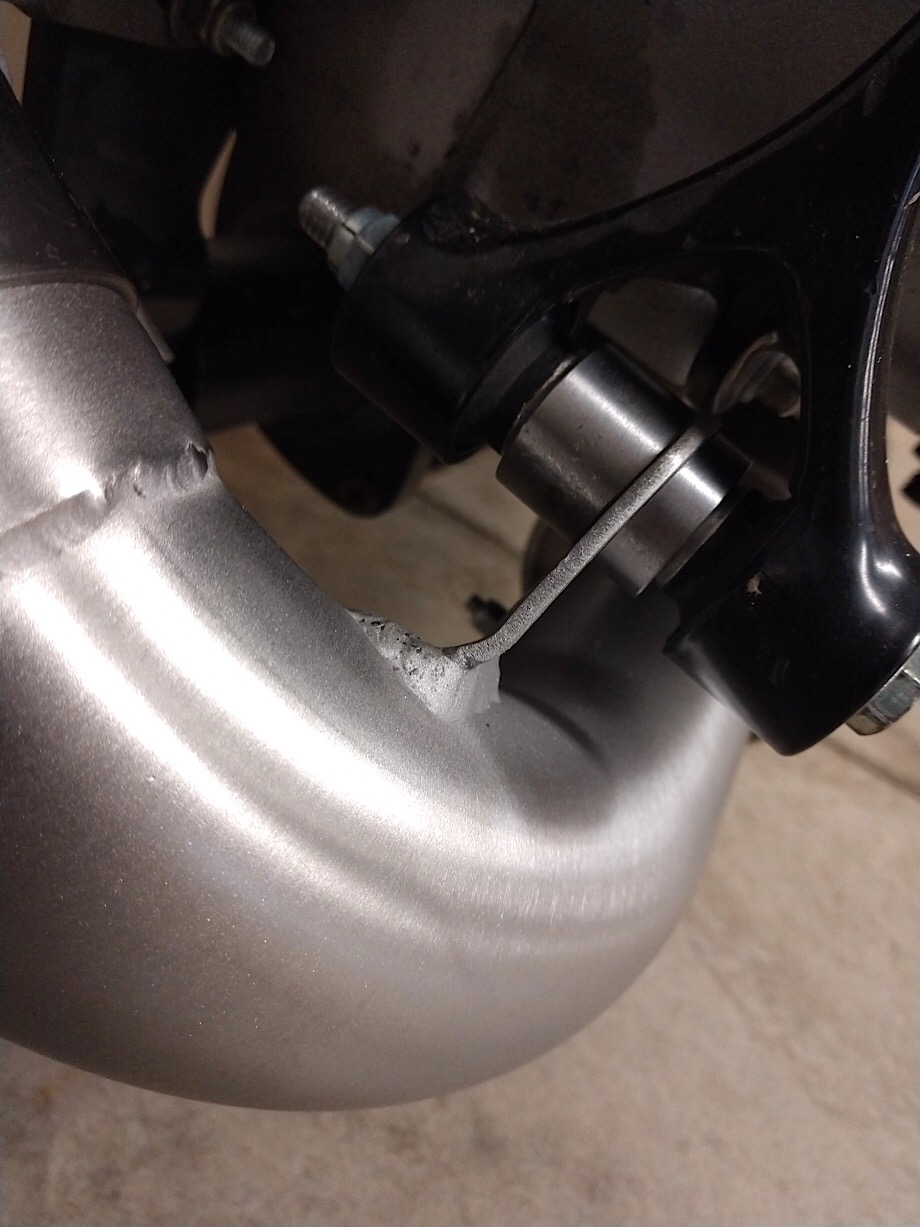 (Message edited by Mike lee on July 28, 2019) | ||
Mike_lee |
 | ||
651lance |
Vance & Hines welded their mounting tabs on like that at first. They saw a high failure rate with the tab blowing out the steel around the weld and cracking the pipe. On there second round they made more of a Y tab welding it to a larger area on the pipe keeping the harmonics from braking it off. Just FYI. | ||
Mike_lee |
Mine cracked on the header where the twisted piece of metal attaches. Had a welder repair and reinforce it. The above pic is the drummer pipe. However, ive had no issues with the previous V&H system. I changed it out only because i wanted a better/more reliable system. | ||
Williamscottrobertson |
Iíve installed 4 of the new front mounts so far. I didnít use a reducer on any of them. I figured it was designed that way for a reason. Also the large fender washer #8 in the diagram goes (counterintuitively) under the isolator and above the mount. It looks like itís sitting on top of the iso in your photo. I find that very strange and weird looking from underneath. However, again I rely on Buell engineers. Iím sure it was required and designed that way for a reason. Likely using computer stress modeling. My experience, I install exactly per instruction and it works as designed. I wonder how many of the VH pipe mounts have failed with the new y mount vs the old style. My money is that very few break with the new style. However, when I bought my new 09 XB9SX, I put a Jardine on with a similar set up and it cracked that mount in 2k miles. (Message edited by Williamscottrobertson on July 30, 2019) | ||
Falloutnl |
yeah our bolt didn't fit in the right way, it's top down instead of bottom up. Regardless, it needs closer inspection. | ||
_buelligan_ |
Since you don't have a notched frame, from what the picture looks like, the isolator is supposed to be mounted from below according to the instructions in the front isolator kit and it appears you put the larger washer on the top and that should be between the isolator and engine mount. 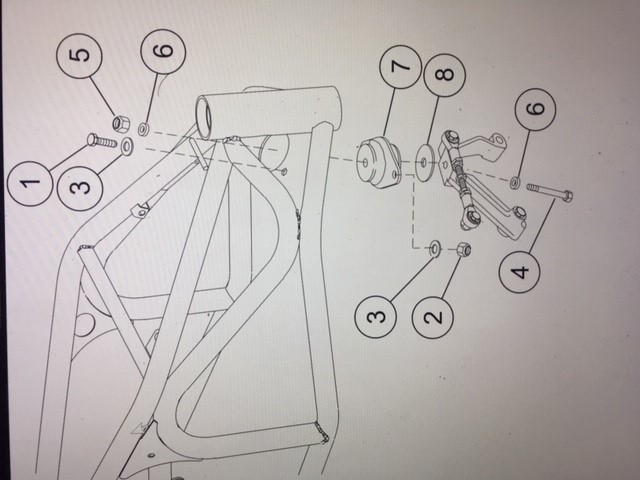 | ||
_buelligan_ |
Sorry, it does look like yours may be notched but not as much as the notch on my X1 frame when I was looking at it. Still may want to try mounting it the other way or at least swap the washers to their correct placement. | ||
_buelligan_ |
 | ||
Falloutnl |
Thanks for the input buelligan! I'll check it out. Also, just wanted to let all of you who post in this topic know: I appreciate it and I'm reading all of it / testing it out. I'll report back once the issue is solved and which (combinations of) solution(s) it took. |