| Author |
Message |
    
Reepicheep
| | Posted on Monday, August 01, 2016 - 10:22 am: | 


|
I wondered about that for a long time also.
The crank doesn't know an intake stroke from an exhaust stroke. It's a crank with a pin driven by pistons, and the relative postions of each to the other never change. So wrap your head around that first.
The cam's *do* know the intake stroke versus the exhaust stroke. But you time the whole system when you install them.
So until you install the cams, there is no intake or exhaust stroke, just top dead center. And once you install the cams, you have it right, because you put everything where it is supposed to be. I don't know if the marks on the cams are intake or exhaust stroke, so I don't know which you are lining it up on, but it is right for the position of the cam timing cup that triggers the cam position sensor.
So in other words, you set the crank at top dead center, and the moment you install the cams, you are then "declaring" the intake or exhaust stroke. And the marks are right on the cams relative to the later instructions to install the timing cup.
A lot of vehicles actually don't care. They fire the spark on both intake and exhaust. It only goes bang when there is unburnt gas in there, so the waste spark is harmless.
I assume the Buell's have to care because they are fuel injected, and there are probably advantages to be had based on when you trigger the injector during a cycle. I don't know if the XB's are waste spark or not.
(People that know more than me, please correct any of this I have wrong, I've thought a lot about this stuff and derived a lot of it from scratch, but I am self taught with regards to motors, and sometimes miss some fundamentals).
(Message edited by Reepicheep on August 01, 2016) |
    
Tootal
| | Posted on Monday, August 01, 2016 - 10:43 am: | 


|
Reep is right. Usually you are setting up for cylinder #1 which is the front cylinder I believe. Check your manual, it should say which cylinder is at tdc. The piston doesn't choose which stroke it's on, the cams do so set the proper piston to tdc and then set the cams as shown. The spark uses a sensor on the cams so it knows which stroke is compression. |
    
Reepicheep
| | Posted on Monday, August 01, 2016 - 11:16 am: | 


|
Good point.
When I said TDC, I meant TDC as marked on the crank, which you can see through a sight window, which is, um, whichever one that is right for the rest of the documented process.  |
    
Reepicheep
| | Posted on Monday, August 01, 2016 - 11:17 am: | 


|
By the way, what do they do for the 2008's and up, which don't have the sight window for the crank?
If nobody knows, I'll go look at the manual when I get home. All this 2008 and up is all still witchcraft to me, I haven't broken that part of the XT yet.  |
    
Teeps
| | Posted on Monday, August 01, 2016 - 11:23 am: | 


|
Dan_m Posted on Monday, August 01, 2016 -
About the gear cams, I am trying to understand logically,
Dan_m,
I have set cam timing on hundreds of engines over the last 50 years.
But, I have never timed a Buell (Harley/Davidson) cam set; a system that uses 4 separate cams to open 4 valves.
So, I would be in the same problem as you. That is not fully understanding what is pictured in the service manual.
That picture makes no sense, to me either, in that I don't know where the piston(s) are at in the stroke or where the valve lobes are relative to the pistons.
That said; I trust picture (above) in the manual is correct, and would set the cams timing exactly as shown in the picture. |
    
Dan_m
| | Posted on Wednesday, August 03, 2016 - 03:22 am: | 


|
Thanks for replies, i really appreciate. So in conclusion i will trust the picture from the service manual, and align the marks from the gear cams as shown. Also, when installing cams, the service manual doesn't say anything about positioning the crank to TDC. There isn't any sight window for crankshaft position like the 2006 and 2007 models.
Another question: when installing new piston rings, when starting the engine for first time is there any break in procedure for the rings?
Thanks! |
    
Hughlysses
| | Posted on Wednesday, August 03, 2016 - 07:19 am: | 


|
I did the cams on my S3 once and I remember it was a very fiddly process.
Whatever you do, I suggest you leave the spark plugs out and carefully turn the engine over by hand (put in 5th gear and turn the rear wheel or something similar) to make sure nothing is hitting before you try and crank it.
As far as break-in, the generally accepted process for the first ~500 miles is to (a) avoid "lugging" the engine, (b) avoid maintaining a constant RPM, (c) vary the throttle position and RPM often, and (d) periodically accelerate at wide-open throttle (not necessarily to redline RPM) for short periods. All this is beneficial to "seating" the rings, ensuring good sealing and minimal oil usage. |
    
Reepicheep
| | Posted on Wednesday, August 03, 2016 - 07:59 am: | 


|
I had that same question, but I see it now. That bottom center gear is keyed and on the crank, and is then lined up with everything else, so that is your timing mark on the crank. |
    
Reepicheep
| | Posted on Wednesday, August 03, 2016 - 08:07 am: | 


|
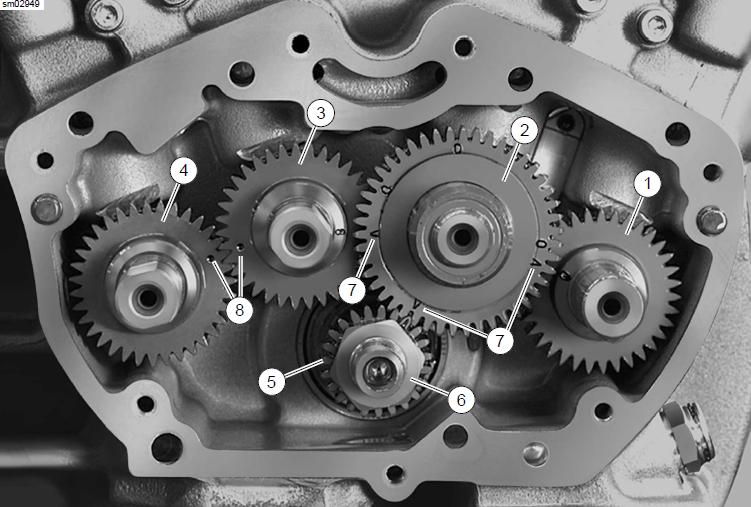 |
    
Tootal
| | Posted on Wednesday, August 03, 2016 - 10:10 am: | 


|
For break in I start an engine and let it idle for a minute then take off to a frontage road or someplace with no traffic. I roll the throttle on to 4000 rpm and let it coast back down to 2000 and then roll it back to 4000. After doing this 6 times I do it another 6 times but I'm at full throttle by 4000 rpm. After these 12 runs the rings are set.
After that just keep from constant high rpm's for 100 miles. With a roller bearing crank the break in is pretty easy with these engines. None of the ones I have built and broke in this way have ever used oil. |
    
Dan_m
| | Posted on Monday, August 08, 2016 - 02:48 am: | 


|
Thanks for replies! More help needed:
1. Does anyone have any experience with the Cometic C10115 gasket kit? (http://www.ebay.com/itm/COMETIC-C10115-GASKET-KIT- TOP-END-BUELL-/272318847884?fits=Make%3ABuell%7CSu bmodel%3AXB12X&hash=item3f6777db8c:g:y7gAAOSwZVlXl WRp&vxp=mtr) This is the kit that i ordered, and now i'm beginning to worry if this kit really contains everything i need to repack the engine. The picture from ebay is only representative, so i am not sure if the kit also contains the gearcover gasket, exhaust port gaskets and pushrod base gaskets. I've sent an message to the seller, asking for a real picture, but he said that he has available only the representative picture. So now i worry that when the kit will arrive to me, if i will not have all the gaskets, this means maybe two more weeks delay.
2. Piston oil jet: how can i check them without an air compressor? How easily does air should pass through the oil jets? |
    
Dan_m
| | Posted on Sunday, August 28, 2016 - 04:18 am: | 


|
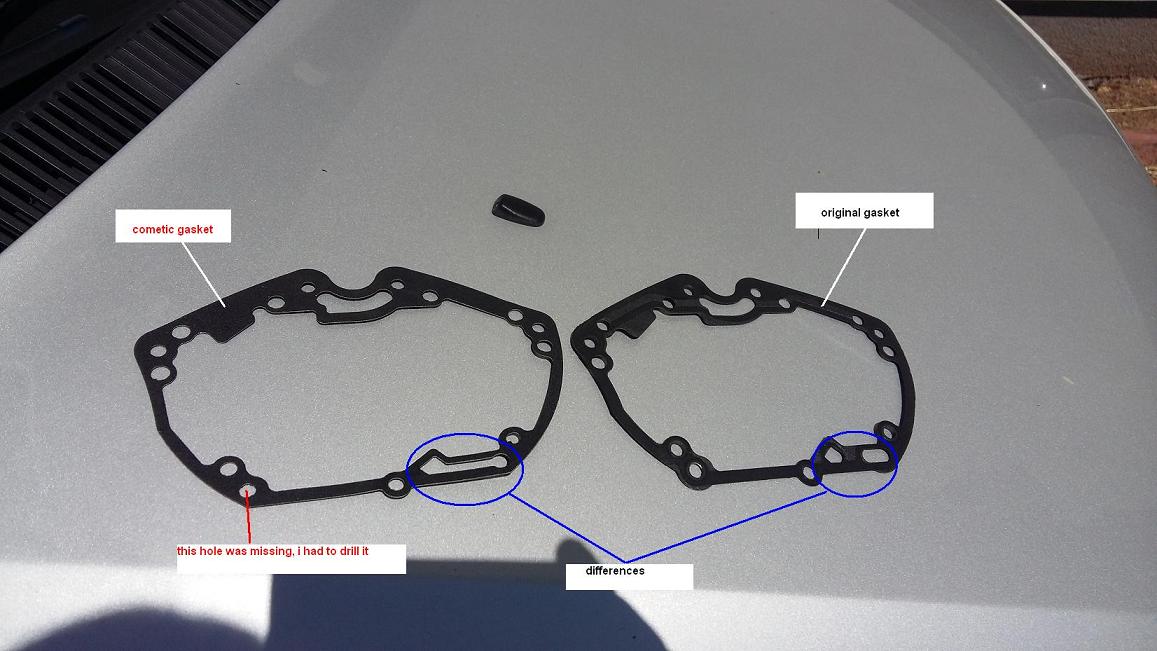
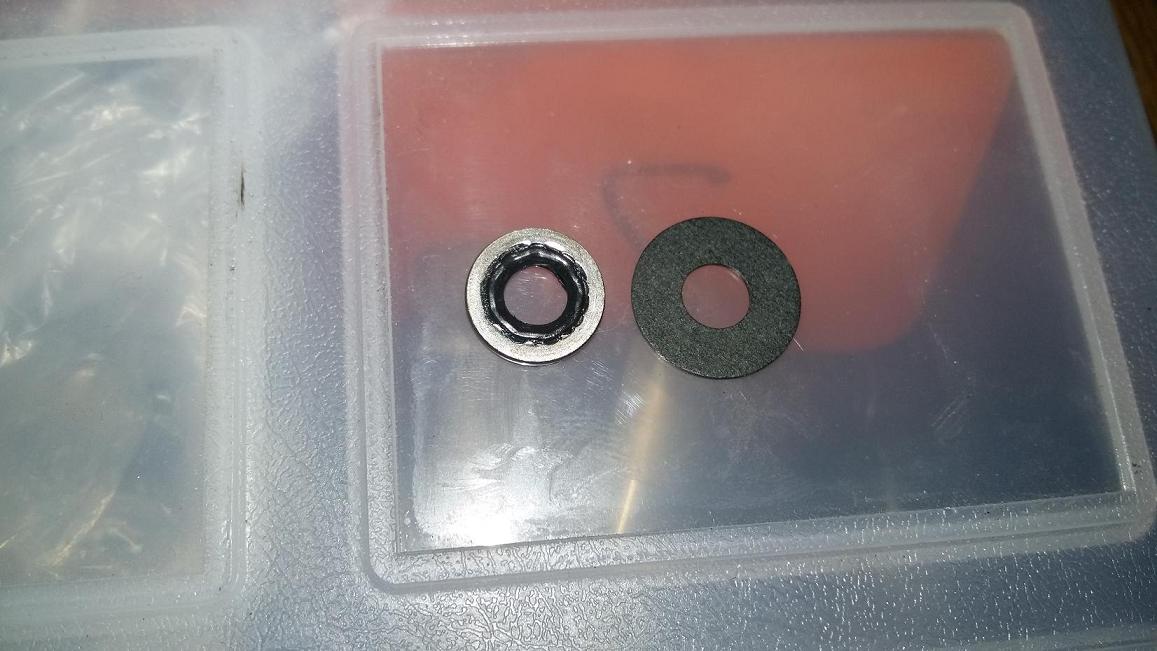
Ok, maybe others will be in same situation so i will post here some informations about Cometic C10115 gasket kit: The kit contains all the gaskets for top end rebuild (starting with the cylinder base gasket) except for pushrod base gaskets and oil pump cover gasket. Also the gear cover from the kit has some slight differences compared to original, and also fiber seals from rocker cover are different.
picture with the gear cam gaskets:
picture with te fiber seals - to left is original, to right is Cometic:
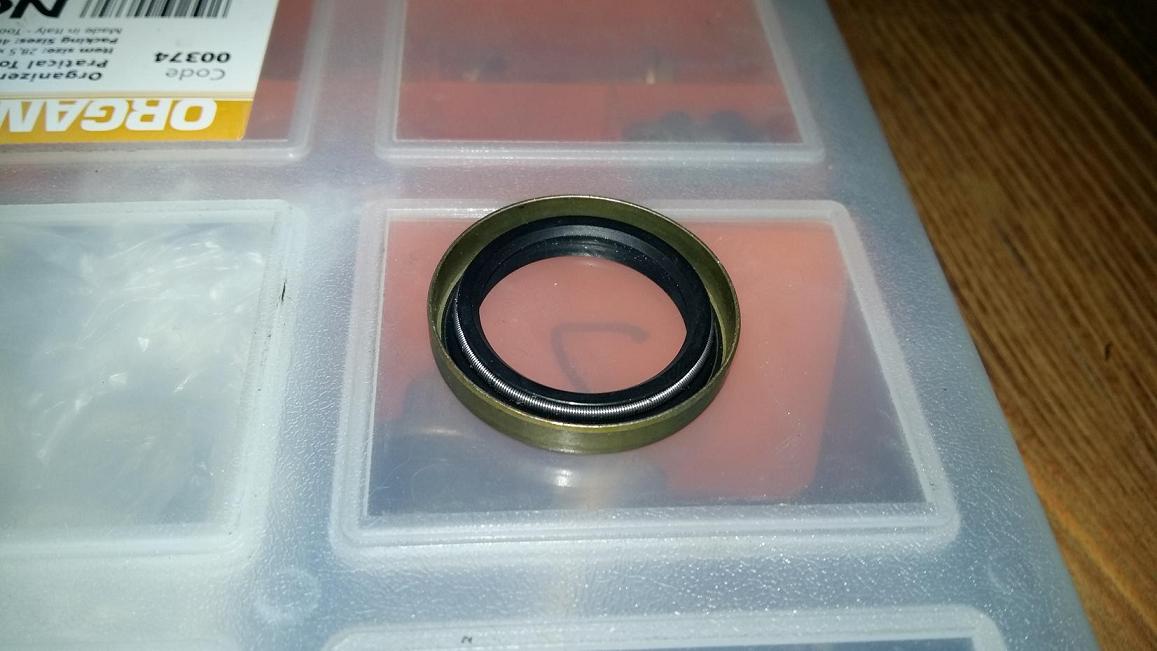
do you have any idea for what is this seal? it is also from the Cometic kit.
As for my bike, i'm still waiting for some parts to arrive (piston rings, pushrod and exhaust stud). For the moment all i did was to install the gear cams, oil pump and valve seals. |
    
Reepicheep
| | Posted on Sunday, August 28, 2016 - 09:02 am: | 


|
Crank seal? Shifter shaft seal? Hard to tell the scale from the picture. |
    
Dan_m
| | Posted on Monday, August 29, 2016 - 02:41 am: | 


|
the shifter shaft seal is smaller in diameter (i remember this because i replaced this seal on my bike). I made some search about the crank seal and you are right Reepicheep, this is it.
Thanks! |
    
Phelan
| | Posted on Monday, August 29, 2016 - 10:49 am: | 


|
That is the cam seal that goes in the cam cover for 03-07 XBs (same as 91-03 Sportsters). Cometic gaskets are very good, and I use them in all my builds. The exception is the pushrod tube gaskets. I don't use the flat metal cometic ones. I clean and reuse the stock rubber ones or order new ones if they are ripped up. The difference you point out in the cam cover gasket isn't an issue. |
    
Phelan
| | Posted on Monday, August 29, 2016 - 10:52 am: | 


|
I missed this thread somehow and don't have time to catch up at the moment, but I'll try to get up to speed soon and be of more help if I can. |
    
Reepicheep
| | Posted on Monday, August 29, 2016 - 01:30 pm: | 


|
Ah, so the other side of the crank.
I like the Cometic gasket kits. Got one with my head rebuild, and it was much less of a headache to use then the factory Harley kit (which was stupid expensive, and lumped together parts for a bunch of different applications, but didn't include good instructions on which parts applied where and which parts just got pitched). |
    
Dan_m
| | Posted on Friday, September 02, 2016 - 03:00 pm: | 


|
I dealing with a dilemma about cylinder head installation. The gasket kit from Cometic came
with instructions for cylinder head installation and it not the same as the service manual states.
In service manual the steps for cylinder installation are:
1. tighten screws (in sequence 1-2-3-4) to 96-120 in-lbs;
2. tighten screws to 13-15 ft-lbs;
3. loosen all four screws;
4. tighten screws to 96-120 in-lbs;
5. tighten screws to 13-15 ft-lbs;
6. using reference marks, tighten each bolt
90 degree.
Cometic instructions for cylinder installation are:
1. tighten bolts (same sequence as Buell service manual) to 9 ft-lbs;
2. tighten bolts to 14 ft-lbs;
3. tighten bolts to 22 ft-lbs;
4. tighten bolts to 35 ft-lbs;
5. tighten bolts to a final torque of 42 ft-lbs.
So i am confused, witch instructions do i follow? |
    
Teeps
| | Posted on Friday, September 02, 2016 - 03:17 pm: | 


|
Follow service manual recommendation, clean and lube threads of the studs and the "screws", lube the under side of the "screws", too.
The manual does not specify the type of "lube", I would use clean motor oil or anti seize.
Assuming tread friction is not abnormal.
Either procedure should leave the head bolts torqued to an adequate rate.
Are you using Cometic gaskets?
Yes: use their procedure
No: use service manual procedure
(Message edited by teeps on September 02, 2016) |
    
Reepicheep
| | Posted on Saturday, September 03, 2016 - 09:21 am: | 


|
I'd follow the service manual instructions. Unless the cometic instructions were something different that I wanted to do anyway. 
(That being said, I bet you could follow either, and both would work fine). |
    
Dan_m
| | Posted on Saturday, September 10, 2016 - 03:31 am: | 


|
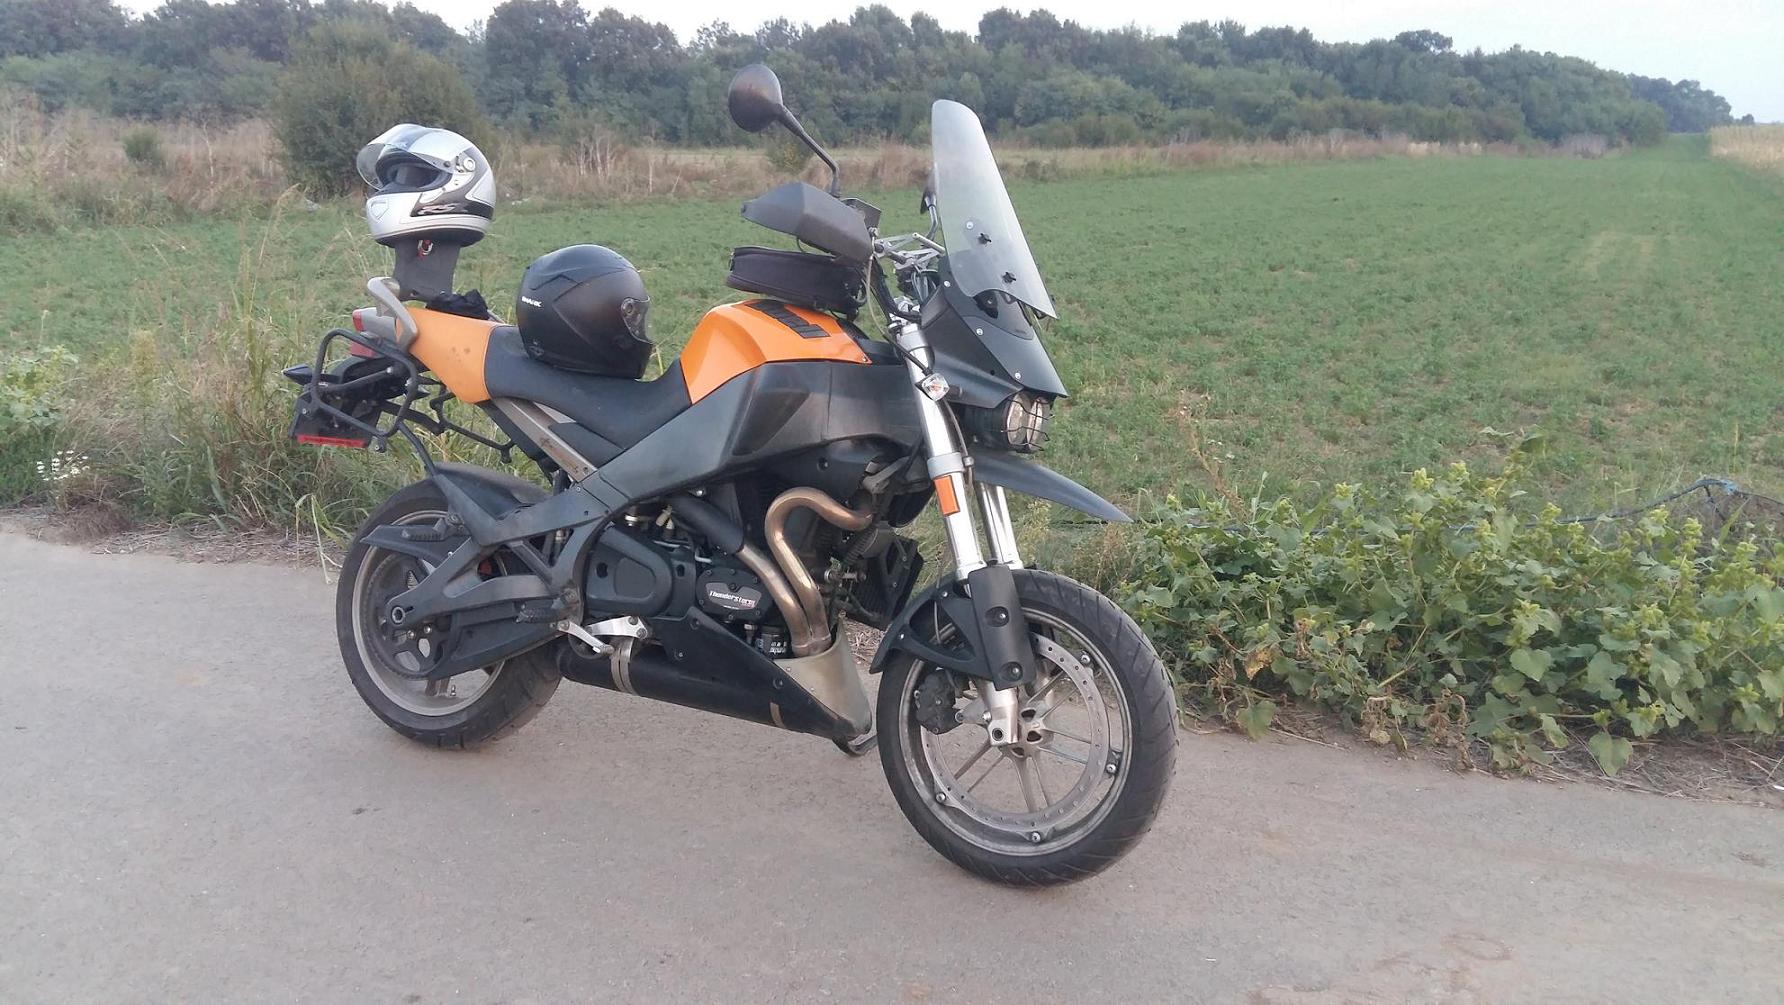
I didn't had time to make an update here, but i begun to enjoy this bike again from last sunday. Most important, the engine sound is gone!
Guys, i would like to thank you all for helping me. With you support i gain confidence that i will be able to repair this bike. Also, being first time for me when i dig so far into an engine, the satisfaction is great.
Now i hope i will enjoy this bike for a while without any issues.
|
    
Hughlysses
| | Posted on Saturday, September 10, 2016 - 09:38 am: | 


|
 |
    
Reepicheep
| | Posted on Saturday, September 10, 2016 - 11:27 am: | 


|
Excellent! Can you summarize everything you did? Did you find any smoking guns (like chewed up lifters)? |
    
Dan_m
| | Posted on Monday, September 12, 2016 - 08:41 am: | 


|
Sure, Reepicheep. So upon tearing down the engine, first i've noticed that from all of the 4 lifters, rear intake was the only one that could not hold oil pressure in it (applying finger force on the cup where the pushrod seats, it was the only lifter that i could push the piston in). Also on a flat surface rolling test, rear intake pushrod was slightly bend. Further, upon oil pump removal i found a small chunk of RVT sealant stuck at the scavenge gerotor gear set. As someone suggested here, the sealant is from the two crankcase halves. So i guess this is what caused the lifter issue.
What i did to the bike is:
- replaced all 4 lifters with Melling, switching the pushrod cups;
- replaced rear intake pushrod;
- cleaned carbon buildup from piston, cylinder head, valves and throttle body;
- lapped the valves;
- replaced piston rings;
- replaced valve seals and also intake seals (i used James gaskets here);
Other things i did, not related with the engine problem:
- did the breather mod;
- applied aluminium foil tape on the inside of frame;
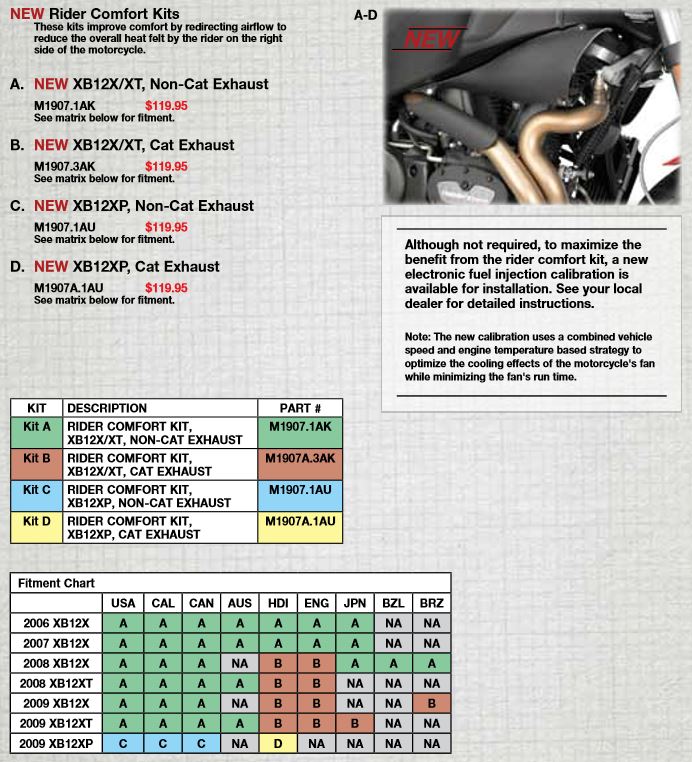
- installed comfort kit (except the ride side air scoop);
- painted the muffler;
- installed 2010 model turn signals.
So far i did almost 900km since the engine repair, no issues. |
    
Arry
| | Posted on Friday, September 23, 2016 - 12:20 pm: | 


|
Sounds like a job well done. Interesting, the way you were able to test the lifters.
I'm curious as to why you've decided not to use the "right side air scoop", with the comfort kit. |
    
Reepicheep
| | Posted on Friday, September 23, 2016 - 12:58 pm: | 


|
Thank you! I had a knock as well, and did pretty much exactly what you did (though I did not have a bent pushrod and did not have to replace it). Except my knock kept knocking. 
Glad it worked for one of us!
The old lifters make great desk art once you clean all the oil off of them. They are amazingly complicated for a $11 part. |
    
Dan_m
| | Posted on Monday, September 26, 2016 - 04:01 am: | 


|
Arry, because my bike is an european model, the front header has a different bend, compared to US models. Thus, it is impossible to install the right side scoop from the comfort kit. |
    
1313
| | Posted on Monday, September 26, 2016 - 06:52 am: | 


|
|
|