| Author | Message | ||
Mark_weiss |
A disadvantage of the Ulysses is that it does not have a centerstand. Because of this, it takes a while to notice that the steering bearings are going bad because you don't have daily occurrence to note that the steering does not swing freely. A few months ago, as I was changing my front tire, I noticed that all was not well with the bearings. It has taken 'til now for me to get around to installation. I surmised that I could probably remove the whole front module, intact, rather than disassembling as is described in the manual. I just needed to figure out exactly how the module attached. On older BMWs, it is possible to remove the equivalent parts and just suspend them from overhead.  Remove the two beak screws  Then dig through the wiring for the four module screws. There is one socket head screw on each side and then two in the middle which secure the ignition switch. The ignition screws are T30 tamper resistant screws and a universal joint was necessary to get at the lower screw. Have your suspension system set before removing the final screw.  If I had a set of normal replacement screws on hand I would not have re-used the T30s. I did not want to run out to the store, so those screws will be replaced at a later time. With all of the screws out, the module pulls away, freeing the steering lock pin from the upper steering yoke.  | ||
Mark_weiss |
Before removing the handlebars from the upper yoke, mark the handlebar position. Barely visible here are black marks at the yoke/bar clamp gap.  It is also a good idea to take a few shots showing wiring and cable routing. It is easy to forget.   Running another strap up to my ceiling hook worked to keep the handlebars out of the way. If I had not marked the handlebars for the clamp position I am certain that It would have never remained stuck in place like this.   | ||
Mark_weiss |
Now, remove the front wheel and slide out the forks and I'm ready to remove the upper yoke and the lower yoke/stem combo. A few shots to show how everything lays out.    | ||
Mark_weiss |
Loosen the center pinch screw and remove the steering stem cap nut.  Keep one hand under the lower yoke as the upper yoke is tapped (with a soft faced mallet) off. While I would have preferred to be able to take the upper yoke completely away for cleaning, leaving the yoke hanging from the clutch cable was convenient, if not annoying.   A few sharp hits with the soft faced mallet and the steering stem slides out. There was some light corrosion at the upper bearing.  Some quality time with a heat gun somewhat loosened the frame's hold on the bearings. A long drift and alternating hits to both sides of the bearings slowly drove them out of the frame. Those notches in the bearing seat greatly facilitates bearing removal. Maybe some other manufacturers could learn from this.  New bearings pressed into place. Be patient as it is pretty important that these settle in straight. Be absolutely certain that the driving apparatus contacts only the outer race. 36mm sockets worked nicely.   After that, everything goes back on in reverse order. It was really pretty straight forward. | ||
Dave |
Nice write up! DAve | ||
Etennuly |
Interesting. Good job on the step by step and photos. I like me a good time saving method.  BUT, mostly I like not disturbing things that function well. BUT, mostly I like not disturbing things that function well. | ||
Lornce |
Is that a sealed roller bearing and not a tapered roller bearing? | ||
Phelan |
Indeed it is, Lorence. XBs don't tapered roller bearings. | ||
Court |
I love this stuff. I have a habit of printing these out and placing them in my Ulysses Service Manual. My Ulysses hasn't been ridden in well over a year but I'm finding part of the attraction of keeping it . . .the fact that it is so easy to work on and that folks far brighter than I have chronicled and generously shared their experiences. Well done. Didn't we, at one time, have some sort of an archive to store these "self help step-by-step" procedures.? | ||
Mark_weiss |
I have not dislodged a seal, but from the bearings' appearance I would guess them to be ball bearings. This follows in that there was no need to carefully set bearing preload, something that is essential on tapered rollers. Tapered rollers may be quite strong, but they take some doing to set up properly and can cause problems if they have too little preload. Tapered bearings are necessary on some bikes because they need drag from the bearings to damp out steering oscillation. With good steering geometry, ball bearings allow there to be nearly no bearing drag which results in better feel. | ||
Mark_weiss |
Forgot to note: 68,000 miles. The old bearings were in surprisingly poor condition. My BMWs would have had quite notably poor cornering with bearings that bad but the Ulysses had only lost it's edge. | ||
Lornce |
Good intel, Mark. Thanks. Had no idea they weren't tapered roller bearings. Were yours original at 68k miles? As others have mentioned, thanks also for taking the time to share your efforts in such a helpful manner. I like your tankbag attachment points. | ||
Ramman4x4 |
Thanks for sharing! I'll have to use some of these tricks when I finally get around to installing the '08 triple trees that are sitting in my garage on my '07. | ||
Tootal |
They are a ball bearing but they have a "high" side and must be installed "back to back". They are designed to take a load from the side like a tapered roller is. The official name is angular contact bearings. 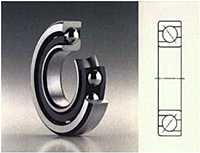 | ||
Ourdee |
Very nice write up. I used a slide hammer to remove my lower bearing, because, I had the slide hammer bit to fit the bearing. I don't know but think that the driving out from above may be just as easy if not easier. There was a lot of corrosion on my bearings. I painted the tar out of the new ones with silver anti seize prior to installing them. I am pretty sure all my bearing problems have been due to water infiltration. The "Knowledge Vault" towards the top of the forum is where these how to threads used to get put. A lot of good info up there. Better than sleeping at Holiday Inn. | ||
Mark_weiss |
These were the original bearings. Lifespan is about the same as I see with tapered rollers in similar use. The bearings could have been easily removed with a slide hammer. I refrained, mostly because my front support was not as solid as I would have liked. I do not know if the bearings were corroded internally. Have not looked yet. The corrosion I found was where the inner race of the upper bearing contacts the steering stem. The new bearing got anti-corrosive grease at that interface. | ||
Motorfish |
Just thought I`d throw this out there: http://www.badweatherbikers.com/buell/messages/142 838/744633.html http://www.badweatherbikers.com/buell/messages/142 838/709786.html I have not done this myself, but it looked interesting. Happy New Year, ride safe. | ||
Lornce |
Thanks, Tootall. That makes sense. Anybody have the numbers off those bearings? | ||
Lornce |
Thanks for the links, Motorfish. That's good intel, too. Already have several Timken tapered roller bearings suited for Toobers sitting on the shelf, think I'll go that route when the time comes to replace steering head bearings in the Uly. Guess I'm kind of Old School. Prefer a tapered roller bearing in a preload critical thrust load application. | ||
Dtaylor |
Hi Lawrence -- I replaced my clicking head bearings with tapered a couple of years ago. I used All Balls labeled bearings, but they offer plenty of cross-distribution numbers. It also appears that the tuber bearings are the same as the XB: http://www.allballsracing.com/22-1032.html While I had the front end apart, it seemed a good time to do a a preemptive repair to the ground wires in the wiring loom at the steering neck. | ||
Reepicheep |
Court is correct, this should be in the knowledge vault, this is a great write up! We can move this thread, or you can create a new clean thread there in the right place with a cut and paste cleanup the same content but less of this discussion. Thanks so much for taking the time to document the effort and post the pictures. Great stuff. | ||
Mark_weiss |
I have machines with both ball bearing steering heads and tapered roller steering heads. I cannot say that I see any significant advantage to tapered rollers. They don't last longer and have critical setup. A little loose or a little tight and steering problems manifest. The ball bearing bikes are very, very, easy to set up properly have notably less drag at the steering head. I've never had to fine tune a ball bearing setup and almost always find the need to make a second adjustment to the tapered roller bikes. | ||
Mnrider |
Thanks Mark. Are the new bearings from an HD dealer. | ||
Mark_weiss |
I ordered my bearings from American Sportbike. | ||
Lornce |
Most failures of a tapered roller bearing in a steering stem application are either from incorrect preload or insufficient lubrication. Stay on top of those two items and they'll last almost indefinitely. Yes, sealed rollers install more easily and maybe even more cheaply (I haven't priced them). They're certainly cheaper at time of production - no preload set-up time or required technique - which is likely why we're seeing them here. | ||
Mark_weiss |
I think that a steering stem is a difficult application for a rolling element bearing. I probably replace close to twenty sets each year and I've yet to find any that were worn out. Peening is the fate that these suffer. Hardly any movement and continual impact loading creates "notches" in the races. Once this develops there is no saving the bearing and there is no real preventative measure. BMW does a pretty good job of protecting the steering bearings from the elements and still, the bearings are generally ready to be replaced in the 50k to 60k miles range. | ||
Lornce |
Mark, I'm guessing that's why a tapered roller bearing may have a slight edge with a greater total bearing surface area to distribute the load. In any event, as you suggest, the difference is largely academic. Thanks for an excellent procedural. Cheers and all the best of 2016 to you. Lawrence | ||
Mark_weiss |
I've realized that I left out a few key steps that begin re-assembly, but I'm not taking the Uly back apart just to get those photos. Here's the list: Before inserting the steering stem/lower yoke, grease the areas of the stem where it will contact the bearings. I used anti-size at the upper contact because there had been some light corrosion in this area. Insert the steering stem at tap lightly to ensure that it is fully seated into the lower bearing. Slide on the upper yoke and retain with the cap nut. Only finger tighten the cap nut, the yoke needs to be able to move until it is fully aligned. The next step is to install one (or both) of the fork legs to align the steering yokes. Insert the fork leg through the lower yoke and install the snap ring. Slide the fork leg up into the upper yoke until the snap ring seats. At this point, snug the upper yoke's fork pinch screw(s) but leave the lower yoke screws slack. This is to allow the forks to slide through the lower yoke as you tension the steering stem cap nut. If fork(s) are clamped in both yokes, the cap nut could reach the specified torque setting without fully seating the yokes against the bearings. Eventually, this will result in clicking (usually associated with braking). | ||
Ratbuell |
Forgive me because its been a long time since I did stem bearings...but could the instrument cluster not be simply left attached to the upper triple tree for the duration? Unbolt the beak and the rest should migrate fine with the top tree...? | ||
Mark_weiss |
Could be. There was not enough wiring harness to allow the front module and upper yoke to be lifted off of the forks and stem, but if the forks were removed first It might have been possible to move the yoke forward as the steering stem was withdrawn. Working space would have been pretty tight as the upper yoke cannot be moved far because the clutch cable is routed through the yoke. Next time I change the fork oil I may give it a try since I'll be 95% of the way there anyway. |