| Author | Message | ||
Jolly |
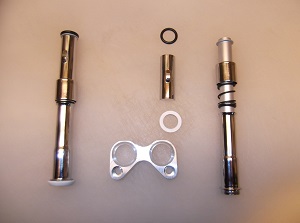
My Push rod tube bases on the rear cylinder I was sure it was a base gasket. I cleaned and dried the motor, started it and watched for leaks, had to do it several times to figure out it was the push rod tube bases. I did a bunch of rookie research since I had never taken apart the push rod tubes before and found a solution I was willing to try. first thought was just buy the gaskets and replace, lots of frustrating stories out there about getting the stock design seated properly and eliminating any risk of a leak. after taking them apart I can certainly see why. the bottom gasket doenst seat against anything on the tube it just kind of "hugs" the tube at the bottom, no seat at all...which actually surprised me. Option 2 was to buy the one piece billet bases, after talking to both Al at American Sport Bike and Dan at NRHS performance decided that was going to possibly bring more frustrations than solutions, each had quit carrying the billet one piece base for stock tubes, it turns the jog into a bit of a juggling act for installation and any one tube fighting you means both will leak, and since they had received far too many phone calls about installation even from shops I decided if a trained "motorcycle mechanic" (insert monkey in some shops) couldn't get them right then no way it was going to work for me. Option 3...NRHS has a "new" product out that uses a heavy single base with true O-rings at the bottom of the base to seal against the motor, two bolts to hold in place with collapsible push rod tubes (using stock push rods). this looked like the best solution, a single base, held in place with two bolts, and push rod tubes that go in as single push rod tubes one at a time with O-rings at every separation that seat against a mating surface instead of just "hugging the wall" of the tube and a spring pushing both ends apart to push into the O-rings. PART NUMBER 13-417120 made by ZIPPERS performance and sold by NRHS. $164.95 http://www.nrhsperformance.com/partsvalvetrain.sht ml | ||
Jolly |
 | ||
Jolly |
bottom view of push rod tube base with O-rings that seat against motor. 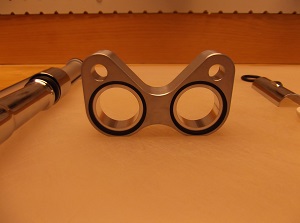 | ||
Jolly |
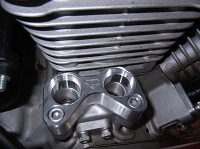
Removal of stock push rod tubes. Rabbit hole!!!! might as well call Al at American Sport Bike and buy a xb rocker box conversion and a catch can.... PURCHASE: exhaust gaskets/ exhaust studs (just in case you find a bad thread)/ new washers for top rocker box cover bolts / XB rocker box conversion kit from American Sport Bike (if not previously done) / kit from NRHS / collapsible push rod installation tool from motion pro / beer / rent - friend..I needed an extra set of hands.. remove seat remove gas tank remove air box or air filter remove exhaust remove rocker box assemblies one at a time - I started on the rear cylinder since that was where my leak was. I found TDC by rotating the rear wheel (see friend needed) and watched the intake push rod, when it drops there is no load on the rocker assembly ( I also pulled the timing mark plug and saw the dots) then pulled the rocker box. No nead to pull the head bolts to raise the head to do this job. then I pulled the single bolt and raised the stock push rod tube base up above its alignment pin which allows the push rod tube and base to pull forward and out. once both push rod tubes and bases were pulled I pulled the alignment pins per direction from Dan at NRHS as they are no longer used. the base with the o-rings installed set right in and bolted them in place..no juggling or magic voodoo like stock tubes as I've been told. | ||
Jolly |
 | ||
Jolly |
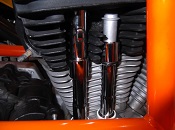
the bases seat against the motor with an o-ring and the push rod tubes seat into the head with an o-ring and into the base with a beveled "flange ring"? the taper lets the seat in any position as the tube sort of "self aligns" as you install it. the spring inside the assembly pushes down and a removable retainer is inserted between the upper lip and the lower "bell" that covers the spring, (even this part has an o-ring against a flange to seal) this holds pressure to force the push rod tube to push against both mating surfaces. | ||
Jolly |
 | ||
Beardo |
There is a time honored way of removing stock pushrods if you don't want to spend your day disassembling half the motor...BOLT CUTTERS And yes, a product like that really makes one wonder what took so long... | ||
Jolly |
 | ||
Jolly |
after you do the rear cylinder to include the XB style rocker box covers it gets really easy to get very comfortable and do stupid stuff, after a few hours in the garage remember to go slow or you end up with something like the front rocker box installed and.......push rods sitting on the bench...ouch! | ||
Jolly |
so, everything back together, fire the bike up...I bumped it through the cycle a few times without letting it start AFTER waiting about 20 minutes post assembly to let everything pump back up. bike started up and rand fine...no leaks. prior to this job it leaked within about 1 minute of running. rode the bike through the neighborhood last night to get it up to temp and ... no leaks! checked it this morning...no leaks. going to ride for a bit today and see if it still doesn't leak after a long ride. at this point though I completely recommend this product!!! | ||
Ratbuell |
These are actually a stock big twin design pushrod tube setup. Nice that they're available for the 1200s now too. NRHS makes good stuff. And the bolt cutter method only works if you are using adjustable pushrods. This kit (and Jolly's install notes) uses the stock one-piece pushrods. I prefer stockers - adjustables are just another PITA step in regular maintenance. Crack open the tubes. Check pushrod tension. Make sure they haven't loosened any. Adjust them anyway while you're in there and hope you lock the jamnut tight enough so they don't come loose this time around. Just...a pain. | ||
Jolly |
TRICKS: 1)Find TDC for the cylinder you are working on by placing the rear of the bike on a stand and rotating the rear wheel and watching for the intake push rod to drop...jiggle each rocker, if they have play, there is no load on them. (top cover removed of course...gotta see what's going on in there) 2) buy the rocker box wrench...its worth it for the rear cylinder right rear bolt 3) buy the motion pro collapsible push rod tube installation tool..it pushes up against the head for leverage and down on the bell to collapse the tube enough to insert the retainer 4) front cylinder does not have enough clearance, use a friend and two wide blade screw drives to compress the bell and insert the retainer 5) don't forget the push rods when installing the rocker boxes...obviously 6)plug the holes for the tappets when you use vise grips to pull the alignment pins and don't mar the mating surface 7) the rocker box covers are not marked, the breather holes are easier to insert the PVC style breathers if the holes are sitting on the intake side of the cylinders instead of the exhaust side of the cylinders. the frame gets in the way of the front cylinder if you install with breather holes over the exhaust side.... 8) plan to do an oil change...the exhaust is already pulled so might as well take advantage of it! | ||
Jolly |
all in all this was actually an easy job, the parts are pretty simple to understand, absolutely no significant tricks or WTF moments...time consuming cause you have to pull exhaust to do it....and the rocker boxes however I have been needing to do the conversion any way so it was a great day in the garage that I am sure anyone could do and if you are getting ready to do a rocker box conversion...I recommend this, I suppose its not a matter of if the stock push rod tubes will leak, but more of a question of when...... I think the entire gig took me about 7 hours or so.....that includes washing and degreasing the bike and parts that had a cover of baked on oil from the long period of leaks......could have shaved some time off the job for that part of the work for sure! well that and not forgetting the push rods for the front cylinder and having to re-accomplish that.... quote of the day from friend..."hey, when do we put these in?"..."9 bolts ago and 4 steps....." | ||
Jolly |
more photos available and much bigger if anyone wants to PM me for the complete set if they are getting ready to do this job. I cant seem to load big photos here.... | ||
Jolly |
Time for the fun part of the job...TEST RIDE up to full operating temps...finish coffee and go ride!!! | ||
Splatter |
"These are actually a stock big twin design pushrod tube setup. Nice that they're available for the 1200s now too." Ratbuell all Sportsters used to come with collapsible tubes too and the Motor Co didn't change to the standard tubes until 1991 when they went to the 5-speed. "NRHS makes good stuff." That's a Zippers kit and it's been available for about 20 years now nothing new about it. | ||
Splatter |
Oh and one more thing over time the bottom seals on those collapsible kits harden and start leaking so watch for that. Collapsible tube kits for XL's are known for leak issues generally. If you need new lower seals it's a Volkswagen part or Zippers sells a seal kit for them. | ||
Jolly |
much better than stock! test ride complete and no leaks! the kit by zippers claims to be the best one out there, NRHS stated that they have used many different versions and this is the best....yeah, new to me is still new! | ||
Oldog |
Congrats on your fix I hope that it works good for you. Note: The stock rubber part fits around the base of the tube because the cylinder grows with temperature changes, this will allow the tube to shift as needed, the bottom mount squeezes the ring on to the tube,so the tube can move relative the motor. I removed the top end out of my motor at IIRC 42K miles, I assembled jugs / heads THEN the tubes I have had no issues, using stock parts, its a matter of paying attention. I'm with Rat, the fixed length push rods are one less thing to worry with as are 1 piece tubes. | ||
Jolly |
That's why I decided not to cut with bolt cutters, keep it simple and less additive maintenance! | ||
Coxster |
Remember with those stock pushrods to watch for the color bands! (ALMOST made that mistake . . . caught it just in time ) | ||
Jolly |
couple of test rides and no leaks so far....long weekend get-a-way next weekend for a serious test...and a bachelor party long weekend ride  | ||
Littlebuggles |
Nice write up and interesting input from others who've dealt with similar issues. Thanks for posting this up! | ||
Tpehak |
Where can I buy the collapsible push rod installation tool from motion pro? The only place I found is ebay offer for $1,125.99 https://www.ebay.com/itm/172745140938?chn=ps&norov er=1&mkevt=1&mkrid=711-117182-37290-0&mkcid=2&item id=172745140938&targetid=1262749491542&device=c&mk type=pla&googleloc=9061294&poi=&campaignid=1259456 0350&mkgroupid=123555687778&rlsatarget=pla-1262749 491542&abcId=9300522&merchantid=7891874&gclid=Cj0K CQjw78yFBhCZARIsAOxgSx1U-yrepF0qKQym1Nnlr_LWNS8_Ec WE6jftDEqcQOY5YBKkbLEeRD8aArdFEALw_wcB | ||
Victory |
https://www.ebay.com/itm/334274684802?epid=1038239 069&hash=item4dd452e782:g:UasAAOSwwL1hz1TP $27.00 used. FYI I reused my 20 year old pot metal parts and superglue method. OEM tubes. No leaks so far. If you have to do something to help the breathing system you can drill the drain hole to 1/8. That will help get the oil back down. Never been sold on the XB conv. (Message edited by victory on December 31, 2021) |