| Author | Message | ||
C818919 |
will this take the stator rotor off? http://www.bikebandit.com/dennis-stubblefield-flyw heel-rotor-puller-42mm-x-1-5 | ||
Roadrash1 |
Christopher, That is the one that fits the 1125. I ordered one and after removing the nut with my makita electric impact, the flywheel slipped off without needing the puller. I tried a large breaker bar on the nut, after heating it, and man, I could not get it to budge. I will add that I am not small man! I did check to see that the puller does in fact fit the threads just now. It does. You also need a 32mm deep well socket for the nut & one of those special tools they have on the EBR site to lock the crank. That thing must be very hardened to withstand the torque of the nut R & R! The EBR kit does not include a cover gasket, so you may want to order one of those too. Any questions or issues, PM me, as I just did this job & it's all pretty fresh to me. -Michael | ||
Duphuckincati |
Roadrash, thanks for the info. What method to tighten did you use? Any more comments on the job? And did you get the new ebr $900 kit? (Message edited by duphuckincati on November 19, 2011) | ||
Roadrash1 |
I did get the EBR kit. I ordered it the day it went up on their site. A couple days later, they added the machining for the oil hole. I got one that was not machined with the hole, cuz I ordered so quickly. I contacted them via email, and asked if I could return it new & unused for a machined one (oil hole) & they happily agreed. So my first part just got back to them yesterday, and I'm betting they send another one out Monday. My electric makita torques @ 250 foot pounds. I might just go with that, and the locktite. I don't think the nut is coming off with that much torque on it. | ||
Roadrash1 |
One other comment...I used the factory repair manual. There was no need to remove a spark plug to find TDC. I lined up the Balancer Shaft Concentric to the rotor teeth, as illustrated in figure 3-145 (page 3-75) of the 2010 manual. I used an inspection mirror and flashlight to look up into the access hole for the tool. The crankshaft locking tool is amazing. I was reefing on an 18" breaker bar with both hands and couldn't budge that nut. Even after I switched to power tools, I thought, "there is no way the tip on that thing is gonna NOT break"' but it held on. The only other thing that was out of sequence with the manual, I found the turn at the top of the stator lead too sharp to pull it out the bottom cleanly, without loosening the air box baseplate. It should pull back in easier, thanks to lots of silicone spray on the plastic wire shielding. | ||
Duphuckincati |
Your comments are much appreciated. Thank you. | ||
Roadrash1 |
No trouble @ all Larry. If there's anything else I can help with, feel free to PM me. I'm excited to get mine back together next week, but that is somewhat tempered by the weather here in the 57108 zip code .  | ||
C818919 |
Just so Im clear thats the nut I need to remove and that tool will do the job or just a deep well socket to take the nut off? 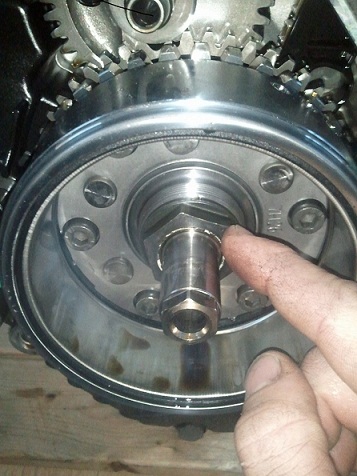 (Message edited by c818919 on November 19, 2011) | ||
C818919 |
So....just a deep well will take off the nut got it....now for those that did the 08 transfer did you use the 08 stater gear and sprag clutch housing or did you transfer the 09 stuff to it? | ||
Roadrash1 |
I responded to your email before I saw this pic. Yep, that's all that is holding the rotor on. 32mm deep well. You should be able to use 08 gears. You'll know once you put it back together, as you'll see if the teeth match the starter gear. I haven't heard from anyone that they won't match. | ||
Cycledoc59 |
Flywheel puller wise, I have this set; http://tinyurl.com/75kgcx4 which fit about anything. I've used a couple of the pullers, but not on a Buell (yet). They seem well made/sturdy...for little $ | ||
Nillaice |
do you guys have any other tips/tricks for re-building these motors? i surely would appreciate help. i've been making very slow progress with the teardown thus far, and am not even that deep into it yet | ||
C818919 |
What's the problem nillaice? | ||
Nillaice |
me. reading stuff like using an inspection mirror to check see the locking tool indention makes me realize how much others know and are familiar with these motors, and how little i do. i am beginning to doubt my skill-set/tool-set capability i've rebuilt some small block v-8's but never a rotax or a transmission. and dad (in OR) has most of the good tools | ||
Dcmortalcoil |
Roadrash1, Could you post Fig. 3-145? Don't have '10 manual, but have - '09. Are you aligning the timing marks? If so, how were you able to see them with the rotor mounted. | ||
Roadrash1 |
I don't have a scanner, & just have the paper manual, but it is pretty easy to discribe. You'll see the small gear shaft over the top of the rotor. If you pull the thin thrust washer off with your fingers, you'll see a crescent shaped edge on the outside of that shaft lip. The manual calls it the concentric edge. You just rotate the 32mm rotor nut (crankshaft) anti-clockwise until that edge lines up with the rotor gear. You'll know it when you see it. The manual then suggests that you rock the crankshaft back and forth slightly as you insert the locking tool. I didn't have a helper, so I used a mirror & flashlight to look up into the hole before I put the tool in. If you look very closely, you can see what you're shooting for. It looks like a little notch. If you want to pm me your cell, I could text you a pic. - Michael | ||
Dcmortalcoil |
pm'd | ||
Dcmortalcoil |
So the crescent shaped edge is the flatter part shown in Fig. 3-156? The flatter part appears to bisect the timing mark.  | ||
C818919 |
that makes perfect sense but with the rotor still in place how do you see the lower gear? | ||
Roadrash1 |
Upper gear shaft. With the rotor still in place, and thrust washer removed from upper shaft, the concentric (crescent shaped) edge lines up with edge of rotor.... | ||
C818919 |
pretty sure thats what you mean?  | ||
Dirty_john |
gents please see my other post, I found that a Suzuki factory tool ref 09930-33720 does the trick |