| Author | Message | ||
Seanp |
First let me say that I'm an electrical half-wit. I've installed the voltage minder light on my Uly, and about a month ago it went from green to red as I rode to work, (over a 25-minute ride). I stopped to get gas and the bike wouldn't start up again, due to a dead battery. The garage where I gassed up put it on a tender and it charged up enough for me to ride home, (25 minutes) and it was red again when I got home. This weekend I finally had an opportunity to work on the bike, and I pulled a bunch of stuff apart to try to get to the connectors on the right side of the engine. I pulled the 77 connector (I think) and it had a little bit of charred area, but not too bad. I scraped off some of the black stuff and plugged it back together. I went for a ride, about 45 minutes, and the light stayed green. I got home, picked up the wife, and we went for another ride together, and about 45 minutes into that ride it went from green to red immediately, and then went pretty quickly to flashing red. We rode straight home and I parked the bike. I checked out the voltage on the battery, and it says it's about 12.20 volts. When I start the bike, it drops down to about 6-9 volts, then comes back up to 11.85 volts. The bike starts, but it has trouble turning over. Is this just a bad battery? If so, why did it go so suddenly from green to red while I was riding? I don't want to buy a new battery if I don't have to, but I also don't want to start tearing everything apart again if I can fix it by buying a new battery. | ||
Hughlysses |
It's almost certainly your 77 connector. If the lugs have the SLIGHTEST indication of burning/corrosion that's enough to prevent it from charging the battery. Either replace the connector with the updated connector from Buell (difficult) or with your choice of standard electrical connectors (easier) or solder the wires together and tape or insulate with heat shrink tubing. | ||
Seanp |
What're the disadvantages of soldering the wires together? I'm no engineer, and the guys who designed the bike are. Why wouldn't they have soldered it together in the first place? Just for ease of removal? | ||
Natexlh1000 |
One thing to worry about with solder is that it is more brittle than the wires. If it's strained or vibed too much it can crack. Personally, if I was doing it to my own bike, I would solder it. If you're going to solder it, remember that the solder isn't like welding steel; it's not structural. You need to establish a good mechanical joint before you apply the solder. AND REMEMBER TO ADD THE SHRINKTUBE BEFORE YOU SOLDER THE WIRES!!!! CAPSLOCK! I always forget the shrinktube and have to redo it. | ||
Etennuly |
I soldered mine when it started to melt down about three years ago. The reason for the factory plug is ease of replacement for a separate component. Makes a handy place to un-plug for testing also. Soldering works fine for the individual owner. | ||
Johnboy777 |
I used butt connectors, then two layers of heat shrink. This was based on failed 77 connectors reported here. I can see no reason for a connector, of any type, in this case. Personally, I chose crimping over solder. Crimping vs. Solder You might want to read this first: http://www.rbba.us/documents/crimping.pdf | ||
Paul56 |
I crimped on ring lugs that take a #10 machine screw with a lock nut then covered with tape and shrink tube. 30-odd thousand miles ago. The one on the stator wire won't have to be replaced again (thus shortening the wire each time) and the connection will remain mechanically tight (minimal heating). Cheap and effective. | ||
Ourdee |
I have a kit number Y1312.02A8 . Voltage Regulator DC Connector Assembly Kit With instruction sheet REV. 2008-08-19 . In plain words; a 77 connector kit. Sean, PM me an address if this is the way you want to go. | ||
Andymnelson |
My perfectly good 77 connector and failing stator acted the same way. If your 77 connector looks normal, I would do the stator tests in the manual- there are 3 simple tests you can do to test it. | ||
Yjsrule |
Yeah my stator was putting out amperage but was grounded. It acted much the same as you describe. I replaced regulator and battery and it was still the same, although I rode 300 miles at At one time without loosing the battery completely. I have a digital meter that shows voltage output so I knew pretty quick something was up. Just took me a few days to figure out what as I was on vacation and didn't have proper tools | ||
Seanp |
I'll try the stator tests. I thought I'd done them but I honestly don't know if I did them right. The diagrams and stuff get confusing, and I wasn't sure I was hooking up the multimeter to the right places. Ourdee - is that the "new" 77 connector or the same one I have? | ||
Andymnelson |
Don't be too intimidated by the tests- they are fairly simple. Once you locate the stator connector, disconnect it and the 3 tests that you do on the stator side are: - resistance (ohms) test between the 3 pins - resistance test from each pin to ground - A/C voltage test between the 3 pins | ||
Ejbeert |
do a 77 connector search american sport bike has them based on the info on this site if the connector looks bad change it mine sill looked good and i still changed it but thats who i am good luck | ||
Ratbuell |
the 77 connector (I think) 77 in green, 46 (stator output) in red: 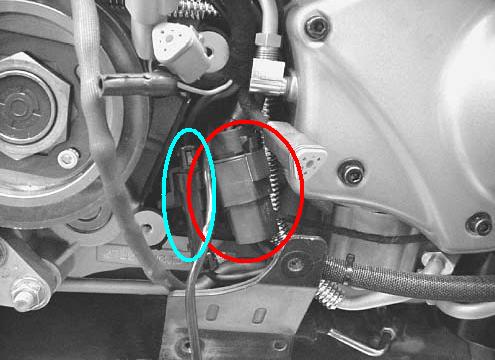 My fix, from Home Depot. I can still "detach" the components should the need arise, but it is one solid connection. After the photo, I put heatshrink on each connector. 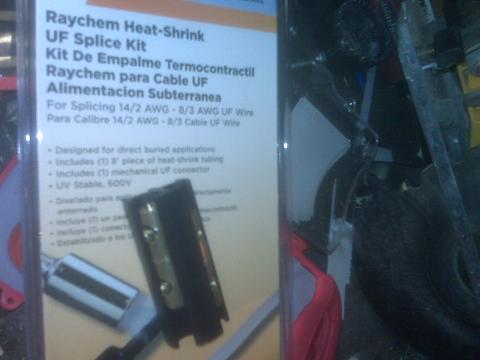  | ||
Johnboy777 |
I think Ratbuell's solution is the best of all the ones I've seen - I wish I had done mine like that. |