| Author | Message | ||
Squidravioli |
Replacing the crank seal (oil-seal) on my 00 X1. Does anyone have that seating tool that I can borrow? I will gladly pay postage both ways. HD-45206 Thanks!! | ||
Squidravioli |
If no one has one to borrow, could I get specs on how to make on? Thanks, | ||
Jramsey |
If you have lathe very simple to make. If you use the punch,dowel or socket method I highly recommend packing the inside of the seal with Lubriplate or similar grease to prevent the inner spring from jumping off on the last tap, all but impossible to get it back on once the seal is in place.DAMHIK http://www.badweatherbikers.com/buell/messages/476 23/625436.html?1302216346 | ||
Pkforbes87 |
I CAREFULLY installed mine with a deep socket or piece of pipe, can't even remember for sure what it was. It's never leaked. No doubt 90% of board members here know better and have specific examples of why such careless maintenance practices never last. Flame on. | ||
Hootowl |
No doubt 90% of board members here know better and have specific examples of why such careless maintenance practices never last." I used a piece of 2" pipe with a pipe coupling to get it to the right width. I eyeballed the seating depth. Hasn't leaked or rubbed the bearing. Flame on. | ||
Buellistic |
BUELLers: Most exciting part of the SEAL problem is the REMOVAL .... Before you start make note of the depth of the OEM SEAL ... The motor sprocket can be used as a seal starter ... A notched punch will get the depth measurement correct ... "THINK" about what you are doing, being CAREFUL and IMPROVISE !!! Replaced mine early on on my 1997S3T and it now has a 110,548.5 miles as of the last ride ... If you run your primary chain TOO TIGHT, it helps to KILL this seal ... PRIMARY CHAIN ADJUSTMENT Class 101, just PM me if you want a copy ... | ||
97s3tcolorado |
I took the new seal to ACE with me and walked the PVC isle, I found an adapter that fit the the seal. I went home and trimmed it so it fit into the lip like the tool does. I then went SLOW when cranking it in. I stopped every 1/4 turn and checked the seal depth and to make sure it went in square. I used a some assembly lube around the entire seal. As stated before the goal is to go to deep! That's all the tool is for really, to control the depth of the seal. Good luck | ||
Alfau |
Drill a 1/16"hole through the old seal.inspect the new seal and you'll get the idea exactly where to drill. fix a hardened self tapping screw into the 1/16"hole about 1/4" in then vice grips to the screw will make easy work of pulling the old seal out. pvc pipe joiner as mentioned makes a great seal installer. You'll need a washer to fit over the crank shaft for the crank nut to push the lot into place. Have a spare seal on hand just in case. It's so easy you'll wish you did it sooner.To remove the Primary drive is the worst part but that is easy too. check the 2 detent plate retaining clips while you are there, they like to break and the pins work their way out. | ||
Reepicheep |
Good tip on seal extraction Alfau, thanks! | ||
Fullauto |
Somewhere in the knowledge vault is the dimensions of the part. I had a mate machine one up and used a piece of pvc pipe as a spacer. The only problem is stopping the part from turning on the seal and damaging it. That is why the factory tool has a Nice bearing in it to stop the part from turning. Mine's been in for probably 50,000km now with no problems. | ||
89rs1200 |
I found and purchased the 3D printed HD45206 / HD-45206 / 45206 Sprocket Shaft Seal Installer. * Only $16 for two, and yes, it is plastic, but it worked great without deforming! * The taller tool is just the right height as no spacer washers were needed. * It worked! Could not have properly installed the seal without the tool. The seal sits out a bit from flush with the opening. I would have seated the seal too deep without this tool. https://www.thingiverse.com/thing:1784320 This taller one will not need spacers as it is just tall enough to use the stock nut to press the seal in; 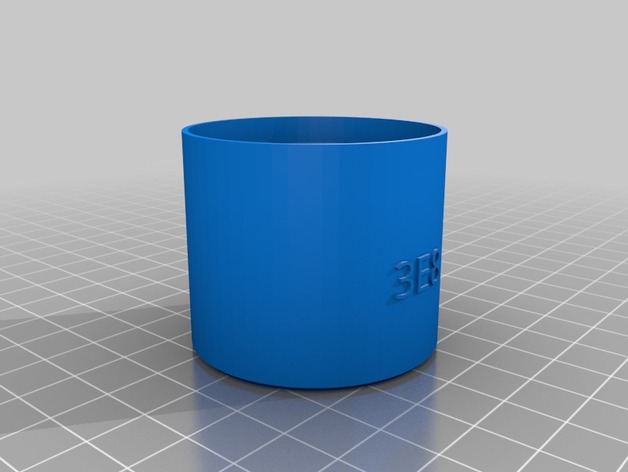 Copy of the Harley tool HD45206 / HD-45206 / 45206 Sprocket Shaft Seal Installer; 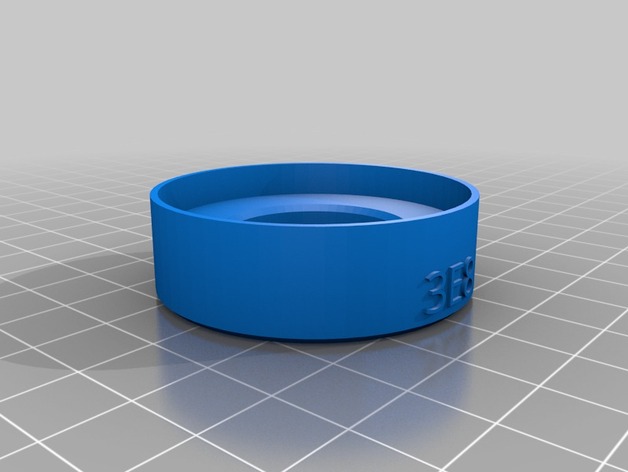 | ||
89rs1200 |
To complete the discussion as to how to get this part printed: 1) Download the file from the above link. I recommend printing the extended tool, (HD45206_ext.stl). 2) Go to this site to upload the file and select someone to print it; https://www.treatstock.com/my/print-model3d |