| Author | Message | ||
Scottorious |
So I am nearing my first valve adjustment. I am seriously questioning doing it myself. I have a hard time letting the dealer take care of it when i wasnt too happy with the previous warranty work I had done. I am waiting on my service manual to arrive but in the meantime, are there any special tools needed? Are there any tricks that could be shared from those of you that have done it? | ||
Pwillikers |
Good subject. I also am nearing this maintenance chore and would very much appreciate guidance from those who have have gone on before. Pictures, hints, tips, to rotate or not to rotate. Please. | ||
Avalaugh |
Me too, this should be documented and put at the top for reference. You have to rotate engine, reading it in the manual looks straight forward, just a bit fiddly. | ||
Rogue_biker |
From what I've read, and from reading the Service manual, the most time consuming part is the removal of all the stuff to rotate the engine. Once rotated, it's as simple as putting a shim in there and measuring, then replacing a shim here and there if needed. San Diego H-D/Buell, probably one of the best Buell dealers in my area, charged my friend $600 for the 12,500 mile service where they checked the valves. Like any Buell, you just need to do it once and learn the tricks and certain tools you need to use to make the job easy. Personally, I think this "rotation thing" is a royal PITA but is dictated by inherent design (the frame and 72 degree V-twin). Buell/Rotax gave us the finger followers but took it all away by making us rotate. | ||
Cmmfiremedic |
Doing the valve adjustment wasn't very difficult to me. It takes alot of time though. I learned alot about the bike. The biggest thing is being careful when rotating the engine cause the bike tries to fall over if it isnt secured and make sure you change the shims with a magnet because if you drop one in the engine you are taking it apart. | ||
Rogue_biker |
Can you tell us how you secured the bike when you were rotating the engine so it didn't fall over? | ||
D_adams |
I strapped mine down, eyebolts in the garage floor.  The follower on the front cam is shifted over to the left, do NOT rotate the engine over with it out of place. You might get lucky and not do damage, but I'd advise just putting it back in place.  } | ||
Scottorious |
cool already learning some stuff that will make it go much smoother. Anybody else have any ideas?...keep them coming. How long did it take you guys from start to finish. | ||
D_adams |
6 hours maybe, don't remember for sure. I spread it over 3 days, one was just to go get shims and spark plugs though. I took my time doing it, took some pics and loafed around in general. I might do the frame removal method next time. | ||
Cmmfiremedic |
If you can't strap it to floor place some weight on tail section such as bags of sand. | ||
Luisemilio25r |
I removed my frame to ceramic/powder coat it. I found that when doing this, it is very easy and painless to adjust the valves. This is in my opinion better than rotating the engine. The only part that is a bit tough is the main harness. You have to remove it from the tail along with all the connections. All connectors are different and is very easy to put back together. Plus if you do it your self, you will lear a ton about your bike. While you have it disassembled, ceramic coat your headers and insulate the frame. A bit more work but worth it. | ||
Oldmanriver |
Guys, I would definitely do this job yourselves. This was the first valve check/adjustment I ever attempted on any vehicle, and found it to be fairly simple. A bit time consuming for the tear down, and being overly cautious, it took a bit longer. Get the manual, read it till it makes sense, and do a "valve adjustment" search on this board. There has been a number of good threads with pics to help out. And as previously stated, be sure to secure the bike so it can't move when you rotate the engine, or else it will. Don't ask how I know.  | ||
D_adams |
One thing I did find was that even with both a front and rear stands, it wasn't super stable with the jack under it and the motor down. The pivot point makes it kinda weird to work with to me anyway, almost like it was too light or something like that. I'll end up building a small jig to cradle the engine if I pull the frame off the next time. An actual bike lift with a wheel clamp would make it a lot better. | ||
Duphuckincati |
Are there any other Rotax engines that use the same shims? I'm a long way from any dealers but the local mc shop has the three wheel Spyder Can-am things w/ Rotax motor. (pardon me while I go puke). | ||
D_adams |
V-rod shims are the same. Any HD dealer can get them. | ||
Duphuckincati |
Hey, that's good to know. HD dealer 9 miles from home. Thanks. | ||
Luisemilio25r |
If you own a motorcyle jack, strap the engine to it. Then remove the rest of the bike, instead of removing the engine (if it makes sense). I diid this and had 0 problems with stability. Have lots of pictures but I suck at loading pictures. | ||
Scottorious |
luise- are you better at emailing them?...possibly I or someone else could upload them | ||
1125rz |
just about ready for my valve adjustment also & do regular feeler guages work or do you need special ones?how easy do the follower spacers come out? | ||
1_mike |
I did the work slowly over a coupla days. I've done it twice now. Didn't need any shims the second time...but it will when the third time comes around..! The only thing I found is I believe the speed sensor on the right side on the upper part of the crankcase below/beside the rear header tube. It's got (mine does) a chrome wire harness protector on it.. Mine became VERY tight as I rotated the engine. Good thing I took a second look around the engine as I lowered the engine. "Take it out...". Oh yea...on my CR..I had to loosen a lot of the main harness that goes to the back of the bike the first time...I rerouted it slightly so not as much had to come loose the second time. Another thing that helps, loosen the rear engine mounts so it rotates down and back up easier. Mike P.S. Have a SMALL magnet close at hand...! | ||
Duphuckincati |
1-mike, whaddya make of the rotate vs lift- chassis-off-motor choices? And thanks for your posting. I'm two-hours plus away from any Buell techs. | ||
Zac4mac |
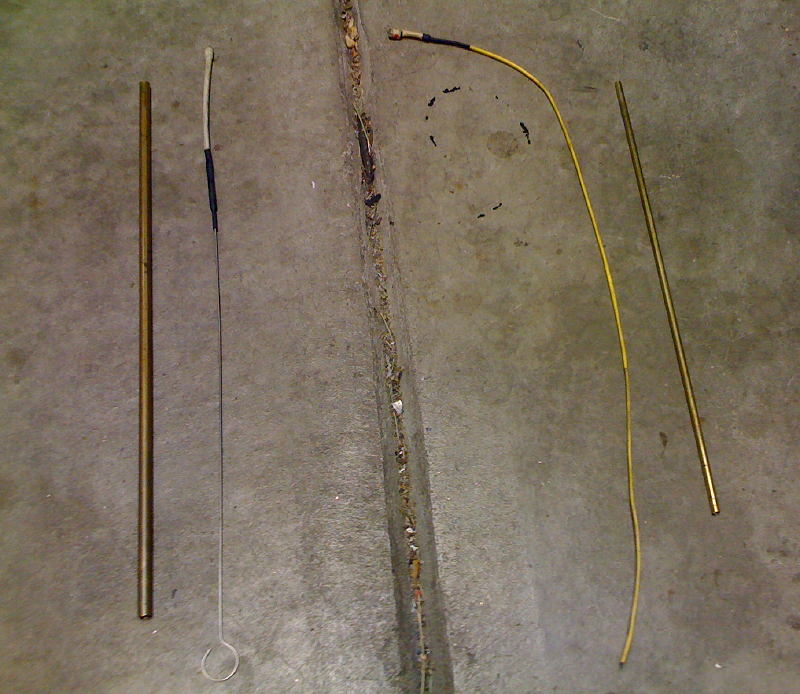
I've done mine twice also. Haven't tried lifting the frame off, but will soon for paint. I put ~150# of lead and steel on the tail with Loretta on a swingarm stand. a jack under the motor drops it down. If you have to handle shims, be VERY CAREFUL don't drop any in the motor. I had to hunt for a couple of days with laparoscopic viewers to find one that "got away". I made a tool, a magnet on a stick in a brass tube, that makes installing the shims a breeze. Here's the 2 tools I made - left is the one that the magnet slides into the tube. The one on the right is on a curved spring so I can "go around corners" depending on how much sticks out of the tube.  Just for grins, here's my optics -  This is somebody else's motor, getting a water pump seal, but this is where I found my shim that dropped in the motor. I fished mine out the top.  Zack | ||
Scottorious |
nicely done...thanks for the detailed pictures. | ||
1_mike |
Duphuckincati - Mmmm...don't know. While the actual removal and replacement of the shims would be MUCH easier in the front with the frame off...it would seem a lot of extra work for little gain. Maybe just the forks (or one side even) would make things a snap for the front cylinder. My hand size makes the front shim removal and replacement a bit of a pain. When I do the measuring...I have to do it by "feel". I can't see a thing once I get my hand in there. The only thing I forgot to mention in my first post...stuff a clean..as "lint free" as you can find, rag down into the cam chain cavity. I dropped a shim and it headed toward that direction. Luckily, it landed on a small flat spot or shelf. One of those small pencil style magnets pulled the shim out easily. Go slow... Mike | ||
Duphuckincati |
Thanks 1_mike. As far as big hands being in the way, I always thought that the only reason to have kids was to have someone around do small hard to reach stuff on the bikes! |