| Author | Message | ||
Goldtooth |
Got one awesome ride in today with my wife on the back. One of the best rides I have done, just the two of us, no kids! Well it is going to rain for the next week or so and it is a great time to start the next phase. XB forks XB wheels/brakes XB headlights/flyscreen (maybe) paint extra plastics to compliment the wheels. front went on well. just need to make a spacer to raise the crossroads bars 1/2" to clear the xb forks. need to make the spacers for the rear wheels next week. 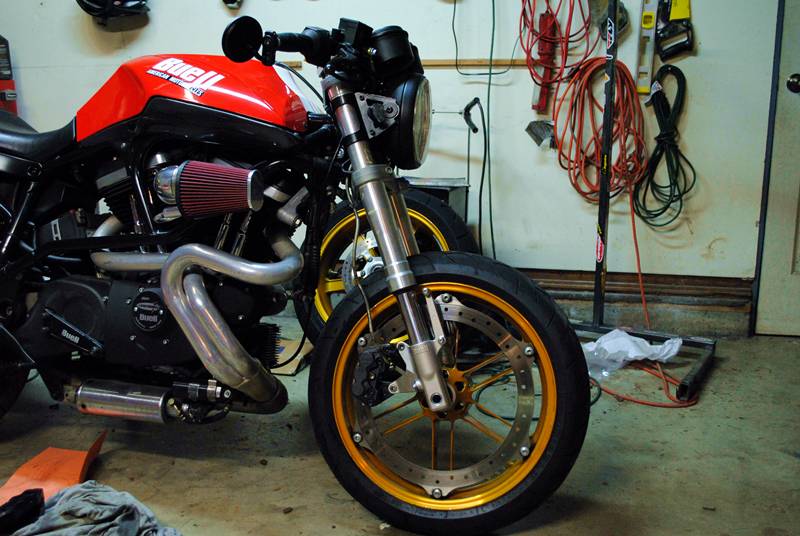 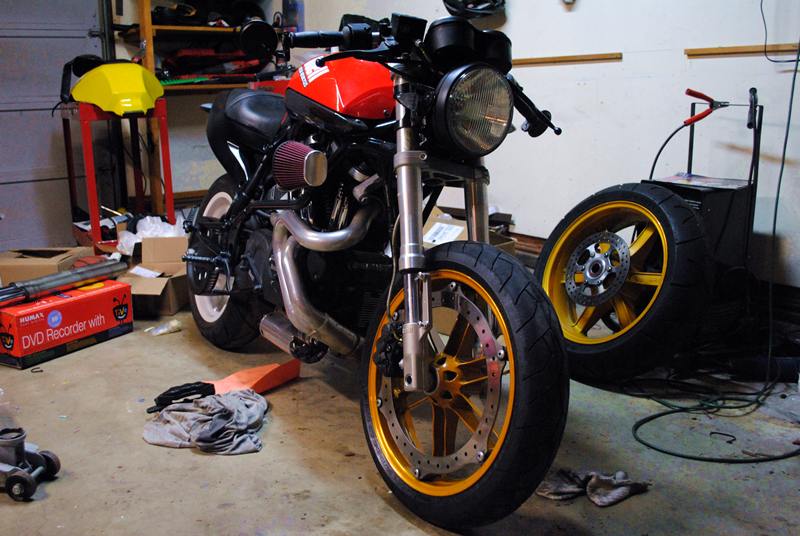 | ||
Matrim |
That looks sick! I've been wanting to do all those mods to my own bike. I'd love pics (with step by step instructions if you're feeling generous)with everything finished. Do the forks swap with all the same hardware? | ||
Texastechx1 |
your bike looks great man! for some reason those gold wheels look great with the red and black. have fun with the rear wheel swap... thats what i've been tackling the past few weekends. | ||
Purpony |
Hey Goldtooth, could you post a close-up pic of the forks in the top triple? | ||
Goldtooth |
Purpony, I will try and get some pics later today. Texas, did you run into a problem making the spacers? I figured it would be pretty easy to machine some up. nate | ||
Phelan |
I ran into a problem with mine, though you may not have the problem with yours, since you have an aluminum swingarm with a different caliper bracket. There wasn't enough room for me to put a place-holding sleeve on the left spacer without cutting back part of the caliper bracket itself, if that makes sense. | ||
Goldtooth |
Yes it does. I have heard you may have to mill down the caliper bracket a bit to make room for the spacer. We will see next week. Nate | ||
Phelan |
BTW, I think it looks way better with the headlight you have now over the XB setup. I think the XB-S lights look good on XBs, not so much on tubers IMHO. | ||
Phelan |
Also, the pulley bolts are supposed to be VERY close to the swingarm. | ||
Goldtooth |
i haven't decided on the lights just yet. i have the xb lights on the shelf and will mount them when i am done to see how it looks. they look awkward without a flyscreen so i will have to get an xb one. i will keep an eye on the pulley bolts. may hit them with a grinder if i have to. got the brake bled and took it for a quick spin. so far so good. nate | ||
Goldtooth |
well for the rear, looks like i will need to remove the steel insert in the caliper bracket and mill off about 1/8" or so of the other side to make room. the spacer will be .125" wide and insert into the bearing. the other spacer is pretty simple with a 25mm id, 30mm od for the bearing and the spacer being 1.75" diameter and about 10-11mm wide spacer. sound good?   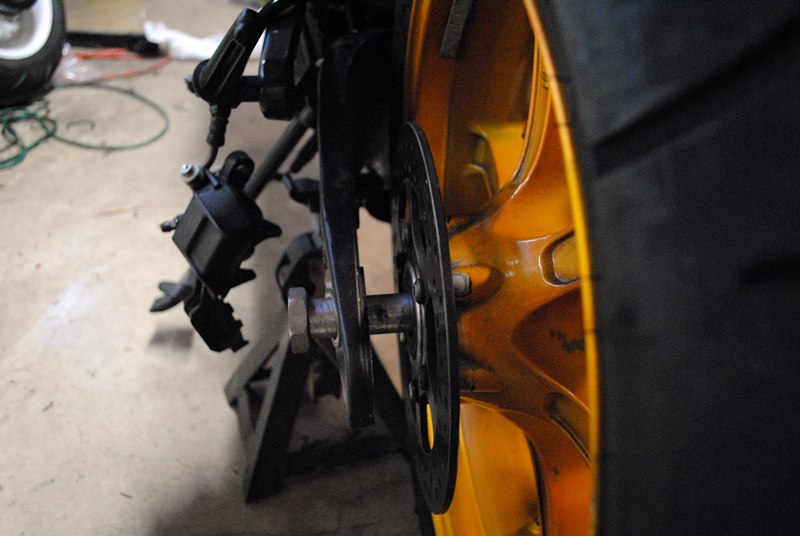 here is the bar pic. ignore my spacers and bolts, had to move the bike around! i am making a spacer to move the crossroads up which actually makes them a bit more comfortable. i am going to rest the bars on the tops of the forks to help brace the flexy bars. at this height, the bottom clamp is barely on the 54mm part of the forks. 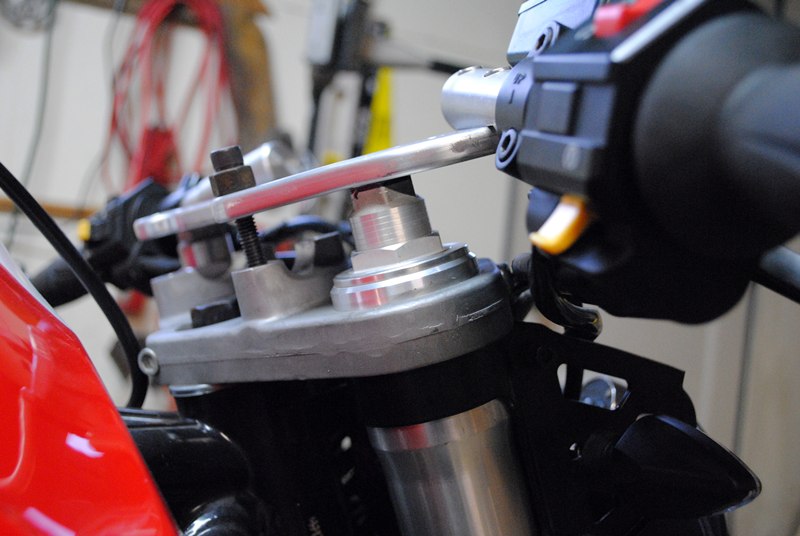 (Message edited by goldtooth on March 07, 2010) | ||
Texastechx1 |
yes, the back spacers are giving me a headache. either i mill a little off the caliper bracket and make it easier to machine the spacers. OR i leave the bracket be and one off my own spacer for that side practicly from scratch. decisions, decisions, decisions | ||
Phelan |
I'm thinking about making a single spacer that runs through the center of the wheel as a sleeve to make the axle bigger, and space out the right side. That way I could run an unmodified rear caliper bracket. | ||
12mpghwy |
how does the xb wheel weight compare to the stock cast wheels? | ||
Firebolt020283 |
I am not sure about the back one but the front wheel should be a lot lighter than the tuber wheel. | ||
Phelan |
The front end conversion, between the forks, brake, and wheels saves about 4 lbs. | ||
Rjn |
found on a Dutch site this Buell M2, also conversion with XB forks, triple trees and rear wheel conversion to chain. 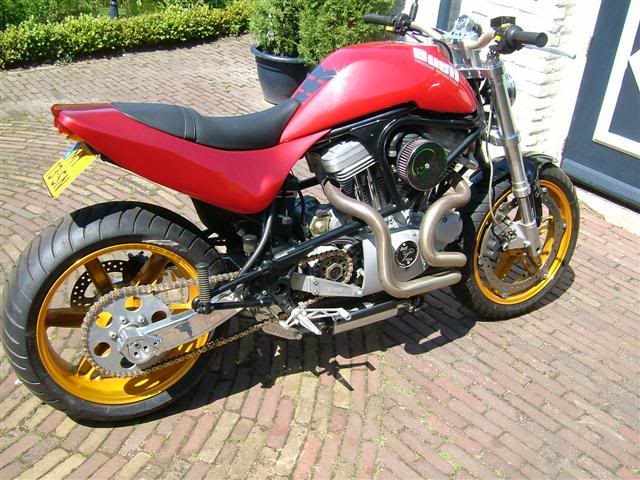 | ||
Purpony |
thanks for the pic goldtooth. I have all my rear spacers already made out of plastic since i work at a prototype shop. I made them to test fit first. I found that the rear caliper bracket needs to be machined, unless you use the method Phelan mentioned... which i like! However, i am changing my rear brake around anyways during this conversion, will post when its finished. My swingarm is at my friends machine shop getting modified a little and heading over there tomorrow night to turn my spacers. | ||
Goldtooth |
how much did you machine off of the bracket? some off both sides? nate | ||
Purpony |
im not using the stock bracket, so i didnt machine anything. Using a ducati bracket i just modified with a brembo dual piston rear caliper and MC. (Message edited by purpony on March 08, 2010) | ||
Texastechx1 |
^ nice! ^ | ||
Goldtooth |
i put the wheel on with the stock brake caliper bracket and it pushes the wheel too far towards the drive side. the pulley bolts hit the swing arm. i will need to remove some material from both sides of the caliper mount to make it fit. 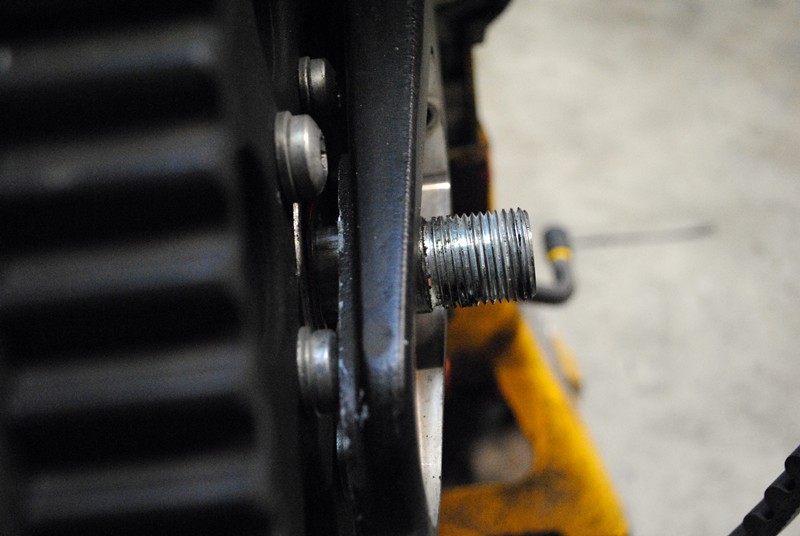  | ||
Phelan |
Sorry, I didn't think to mention machining off both sides. You have to do that to get the caliper to line up with the rotor as well. | ||
Phelan |
I also had to trim the caliper bolts to permit clearance. | ||
Goldtooth |
Phelan how much did you machine off both sides? i am thinking about .125" nate | ||
Phelan |
That sounds about right. I don't know exactly how much, as I did cut and test fit (trial and error). | ||
Goldtooth |
cool, i will do it this week and post some pics. trying to get some of this documented so it is easier in the future. nate | ||
Mplsx1 |
Goldtooth - Did you powdercoat the tail or is that paint? Everything looks great! | ||
Goldtooth |
It is just rattle canned for now. I will be buying another tail to mod up soon. Have the spacers machined and will test fit tonight! pics to follow. nate | ||
Goldtooth |
Well, i have the rear wheel on and I think it is done. Haven't rode it yet as I have not finished the bars but it appears to be ok. I had to file down the caliper carrier where it goes over the rotor, on the inside. hard to explain but maybe it was the dimensions of the spacers I used but it wasn't much. the spacers worked out well and I had both sides of the caliper bracket machined down .125" to make room for the brake side spacer and so I could push the wheel towards the left to clear the pulley bolts, still pretty close. The rotor bolts are also very close to the caliper bracket. I will be doing a full write up with a drawing for the spacers here soon, after I ride it and work out any bugs. Pics    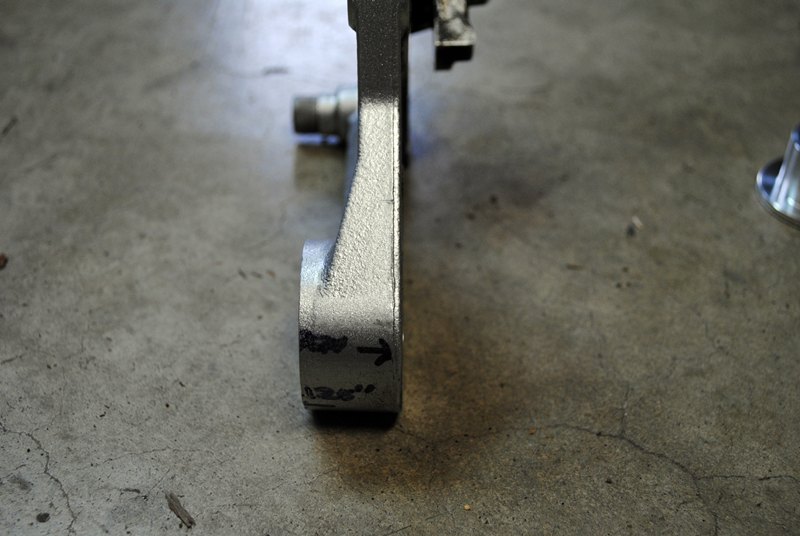 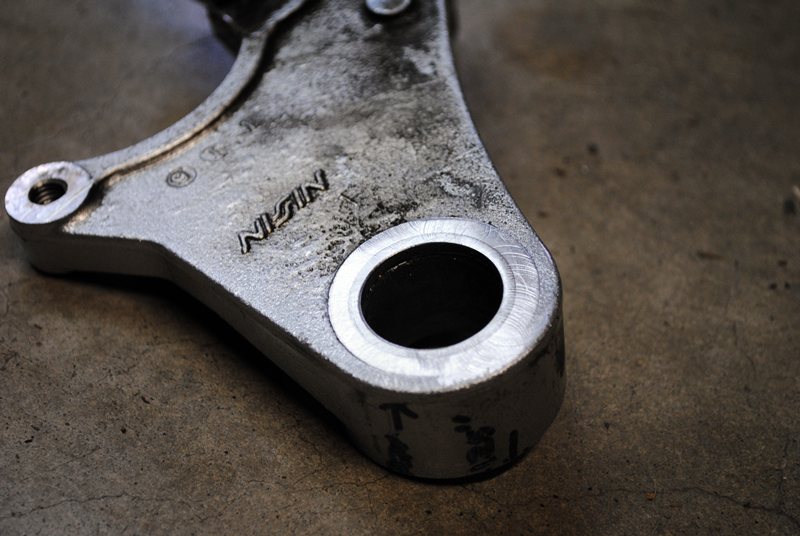 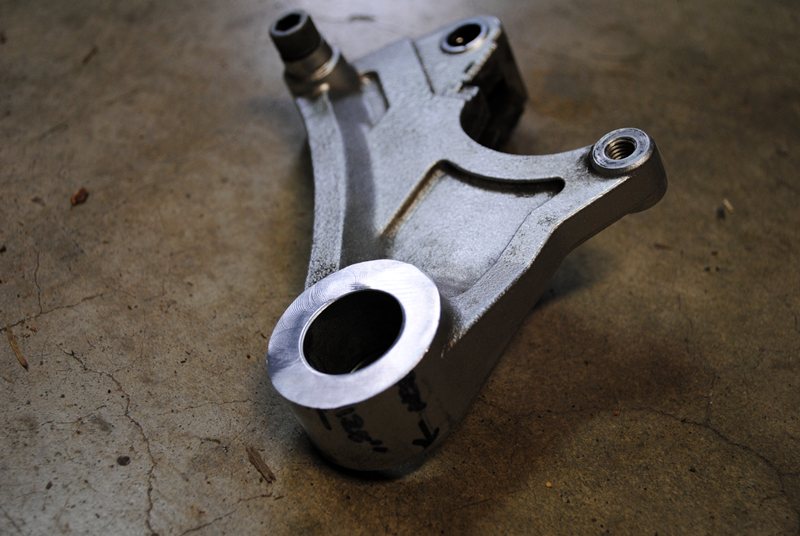 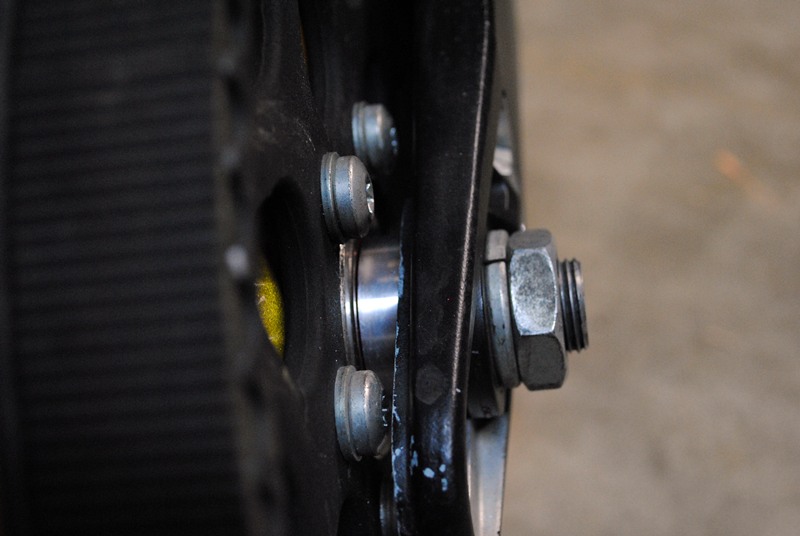 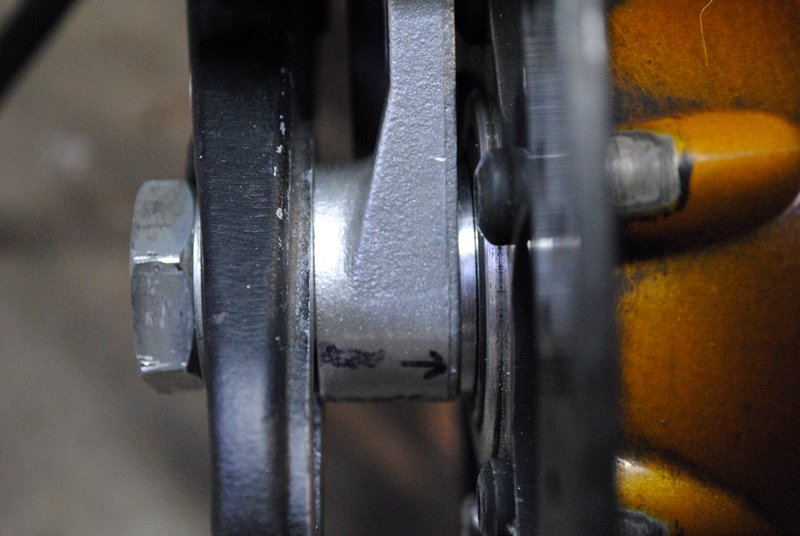 |