| Author | Message | ||
Spike |
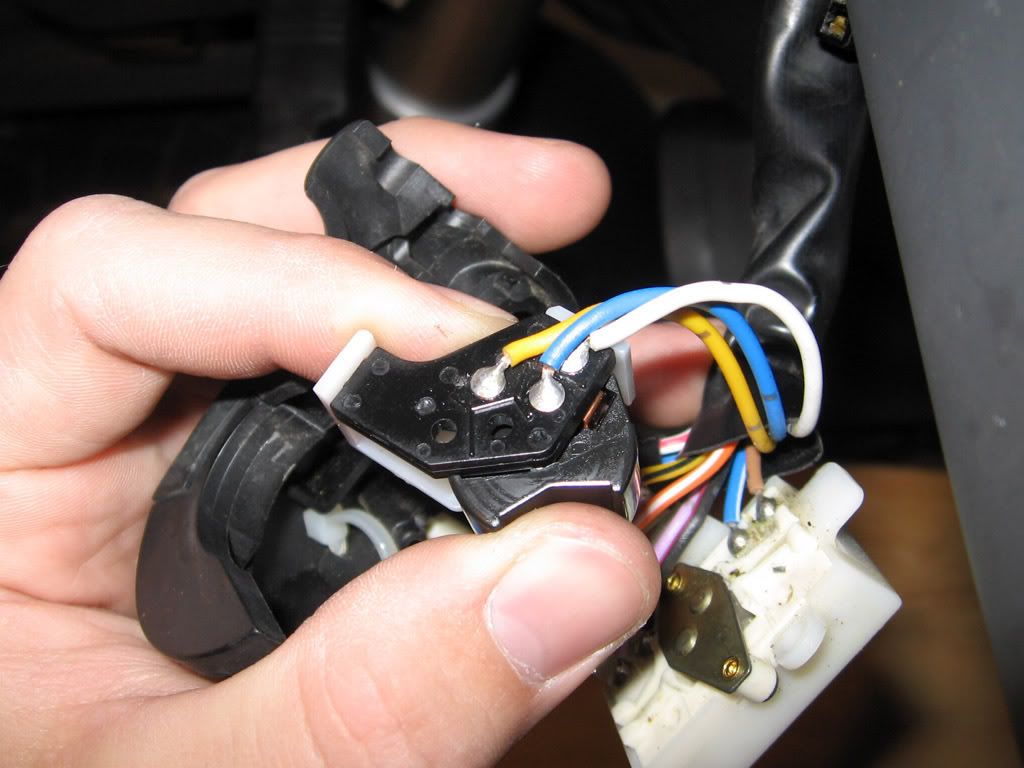
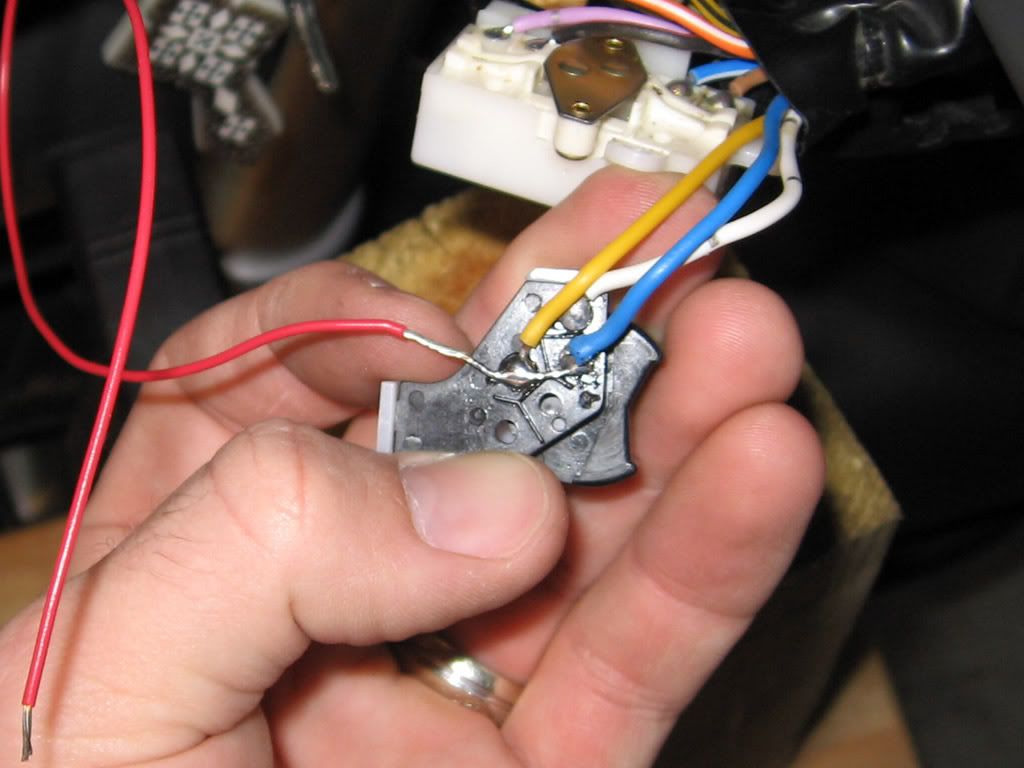
The common method for keeping the low beam on when switching to the high beam is to reverse the running lamp and low beam wire in the white headlight connector, but I read in Maximum's thread that he had soldered a jumper on the high/low switch to accomplish the same thing. Maximum had warned that this was a tedious operation and not recommended for those with limited soldering experience, but I'm a bit arrogant and thought it sounded like a cleaner solution so I figured I'd give it a shot. You'll need to disassemble the left hand switch housing to get to the high/low beam switch. Remove the two allen-head screws to get the housing open and off the handlebar, then remove the three phillips-head screws holding the high/low, turn signal, and flash-to-pass switches in place. Be warned that the FTP switch is holding a spring and a contact in place, both of which will come loose when removing the three phillips-head screws. You should then be able to pull out the high/low switch which has three wires feeding into it:  You'll then need to solder a jumper between the blue and yellow wires. The tricky part here is that the switch is now in mid-air and held in place by the rest of the wires from the switch housing. You'll need to find a way to support the switch and relieve the strain from the other wires before you attempt to solder the jumper in place. Once you get that done the soldering isn't so bad:  I found it easier to solder in a longer piece of wire than needed rather than trying to hold a small jumper in place. Once the wire was soldered to both contacts I just cut off the excess. All that's left is to reassemble the switch housing and go ride. | ||
Johnboy777 |
Doesn't this mod make both the high and low beam always on together?? EDIT: Never mind... my bad! . (Message edited by johnboy777 on January 11, 2008) | ||
Maximum |
Spike: Great description and pictures (plus well manicured nails)! I agree that it is a clean mod, while maintaining the use of the running/parking light if you choose to add a bulb in the empty socket. Even though I had that spring pop out and the switch fall apart into multiple pieces (taking me a while to figure out how to put it all back together), I would would still do the headlight mod this way again (hopefully avoiding the whole spring mishap). | ||
Nopork |
Couldn't you just use a waterproof crimp connector on the blue and yellow wire down a ways from the switch, to tie the two wires together, and not have to take the switch apart? I don't know if there would be room to do that near the switch as I have not looked at mine, but just thought. | ||
Chrisgrant |
Great idea and seems very straight forward. I was a little concerned about using the smaller gauge wire. I've heard of people adding different color bulbs in the running light. Has anyone got pics? | ||
Spike |
Just two minor corrections: There are actually four phillips-head screws inside the switch housing that need to be removed, I forgot the one that holds the cluster of wires in place inside the switch housing. The spring-loaded switch that wants to fall out is actually not the flash to pass switch, but the horn. Both use a similar spring and contact, I had mixed them up from inside. It won't make a difference in performing the mod, I just wanted it to be clear. | ||
Wrongway2 |
Nopork: Couldn't you just use a waterproof crimp connector on the blue and yellow wire down a ways from the switch, to tie the two wires together, and not have to take the switch apart? I don't know if there would be room to do that near the switch as I have not looked at mine, but just thought. Yes you can. This is a clean fix, but I soldered a jumper between these same wires behind the fly screen. I suggest solder instead of a crimp connector, but it would probably work. | ||
Whitj |
Bump +1 those nails. Good mod & great pics! | ||
Jimmy_in_nc |
Thread resurrection here but how do you get the turn signal piece, white, out of the switch to allow the high low switch out? Does the yellow button and black switch simply pull off?? | ||
Djz |
try this you will like Description: A simple mod that allows one light to stay on for low beam as normal and both beams when you switch to high. There is a center bulb socket in the headlight unit of the XBS/X that is not used on the US models (running light for the Euro models). Looking at the (white) headlight connector plug, you should see 4 wires; Black = ground, Yellow = low beam, White = high beam, and Brown/yellow = running light. Insert a blunt probe (or dart, or needle nosed tweezers) into the male end of the connector plug to release the small tabs for both the yellow and the brown/yellow wires � the wires should �pop� out. Swap the two wires, making sure they �click� back in place and you�re pretty much done. The running light circuit will now light the low beam and stay on all the time. The high beam circuit will no longer interrupt the circuit powering the low beam light. Running both headlights on Lightning models -------------------------------------------------- ------------------------------ I found a simple change to make that allows one light to stay on for low beam as normal and both beams when you switch to high for even better lighting. There is a center bulb socket in the headlight unit of the Lightnings that is not used on the US models. It serves as a running light for the European models. The wiring for the light is already in place and can be switched out for the low beam circuit. There are four wires that are housed together in the harness for the headlight. The black is a ground, the yellow is low beam, white is high beam, and brown/yellow is for the running light. If you swap the yellow with the brown/yellow in the harness the running light circuit will now light the low beam and stay on all the time. The high beam circuit will no longer interrupt the circuit powering the low beam light. __________________ There is a 1st for everything!! | ||
Jimmy_in_nc |
Djz- I appreciate the info there but what I am asking is how does the turn signal switch come out of the housing. Seen in the pictures above as the "White piece" in the first two pics. I have had all of the screws out but couldn't figure out how to get that piece out. Before forcing it I was looking for some input. | ||
Natek |
Did this mod yesterday, but used a roughly 1" long jumper on the switch. It took me a sec to realize that the turn signal switch is 2 pieces, the actual switch part, and the part that you slide/cancel with. Just have to grab the white "switch" part inside the box, and pull it up. |