| Author | Message | ||
Endoman33 |
my belly pan is going to work the drummer pipe I have, so I would think it will work on the Buell race pipe as long as the head pipes do not extend out past the stock head pipe distance | ||
Bikejunky |
Endo - With your side fairings mounted, is the head pipe touching the stick on heat shield? | ||
Bott |
looks good. I will probably buy them next year. That being said,and I guess I'm just nit-picking....but true to Buell's normal, the lines just don't match anything. My 2000 m2 with s3 nose is the same way,just like s3's in general-no lines seem to match anywhere....ok, I will shut up now and start keeping a piggybank to buy 'em anyway.  | ||
Bikejunky |
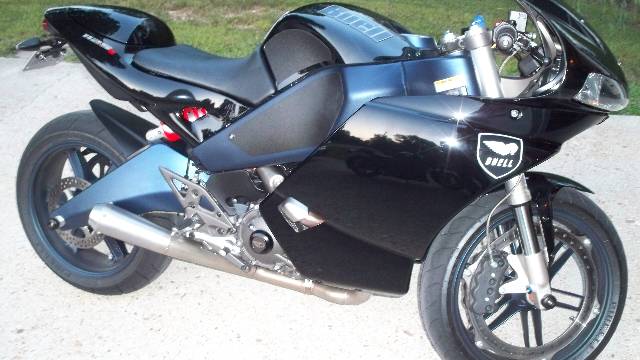
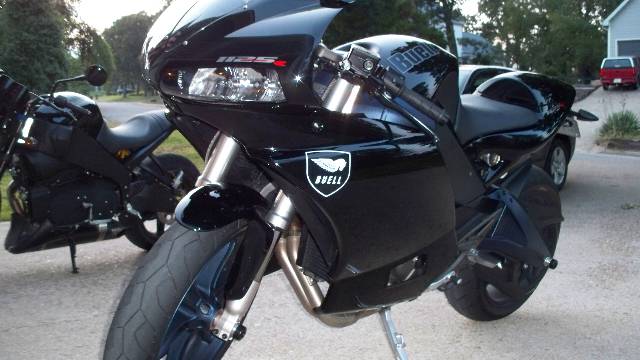
some quick info for those of you looking at purchasing and installing the fairing kit from Buell - The install was very easy. I would rate it about a 3 on a difficulty scale from 1-10. The supplied brackets have stops on all but one so the initial alignment went very quickly although I had to do a double take to make sure I had the correct front bracket on the correct side. A ratchet with a 5mm long ball end allen, a T30 torx head, a 4mm allen and a 2.5mm allen are all the tools you will need. The instructions are ok but lack some description when it comes to the direction the spacers need to be placed when bolting the upper mounts to the upper fairing bracket. All in all it took me about 45 min to get everything installed. When installing the front lower brackets it is handy to have someone who can hold the fairing side up to get the proper alignment of the brackets. With a long ball end 5mm allen on a ratchet you can reach the left front bracket bolt to tighten it down once aligned. The right side front bracket is a little trickier as you have to align it, hold the bracket and then tighen it down without the fairing in place. The spacers that fit between the upper fairing and the side fairings were the only other part where a little clearer description could have been helpful. The spacers have the ends turned down to fit snugly into the mounting holes in both the side fairings and the upper fairing. One end is turned down to be longer than the other. I found that it worked best to put the long end to the outside as it mounts up much more solidly than puting the long end to the inside. The only issue that I am going to address tonight is to see if I can get the alignment a little better on the right side to see if I can get a gap between the heatshield material and the header as I am not sure if it was intended to be so close to the heat shield. All in all, the install was easily accomplished and looks factory! The finish of the side fairings also perfectly matches my black 2008 stock bodywork! Awesome Job Buell! | ||
Endoman33 |
yes bikejunky mine is right up against it | ||
Bikejunky |
Endo - just and FYI - I put the spacer for the 2009+ left front bracket on the right front bracket and used a longer bolt tonight. It gave me just about 1/16th inch of space and didn't mess up the look of fairing alignment. I could smell something funny and when I spaced it I could see where the pipe was starting to char the heat tape. Hopefully this takes care of that, as I didn't want it to start on fire or melt... | ||
Badlionsfan |
Might be a good idea to use some headder wrap under the side pannels. | ||
Endoman33 |
bikejunky that's what i'll be doing today then Thanks for the heads up | ||
Endoman33 |
double check your clearence on the headers some spacers may need to be used because of wind pressure | ||
Bikejunky |
Endo - You having issues with the heat tape? How much clearance do you have? How's the belly pan working out? Any pics? | ||
Endoman33 |
bike junky the heat section blew up like a ballon on the way to work this morning. One of the guys at work dose heat and air work and had some aluminum tape it fixed that right up. Had to space out the bottom rear bracket on the throttle side noticed that going down the road wind pressure was pushing the fairing cut out into the the rear head pipe just a little melting nothing to bad. Haven't got the belly pan finished just yet maybe this weekend. As soon as I do I'll get the pics up. Sorry for the delay on bellypan pics | ||
Geforce |
I just got mine today and will be installing them tonight. Do I need to add heat tape or anything extra to that side so it doesn't bubble up? BTW, did you guys get two of the new stickers in with your kit? I did and I thought it was mega sweet. | ||
Endoman33 |
yes I got the stickers and they are cool | ||
Geforce |
Ok, in the instructions provided, it says in step 9. 9. See Figure 5. Install the insulation pad to each fairing lower in the location "scribed" on the inside of each fairing lower. My question is, there are two white stickers that look like price labels on each. Is this it? I do see an outlined box, and I believe this to be the one, but it does not at all match the picture figure. Any help? EDIT: I also noticed the heat shield was a tad different than the picture, no big deal, I just want to make sure I get the right spot for foam pads. (Message edited by Geforce on September 02, 2009) | ||
Endoman33 |
i didn't read the instructions, i just looked at the pics | ||
Geforce |
Well snap. To the best of your ability, where did you end up putting those foam spacers at? | ||
Geforce |
I just went with the "scribed" location (very subtle raised box on the inside). Seems to work ok. The upper fairing bolts were a PITA to get lined up right and my heat tape is ever so slightly touching and I added the spacer and longer bolt to the bracket there to give it a bit more room. Now I just gotta figure out where to put these new logos at. I think I'll do that tomorrow, time to test ride. | ||
Bikejunky |
Geforce, Yeah mine wasn't really hard but not butter easy either, to get aligned in the upper mounts, but I did leave the bracket mounts a little under torqued until I had the uppers mounted in. | ||
Geforce |
I got everything on, and this is how it looks with the D&D... waiting on the dealer to fit the Buell Belly Pan to their demo bike before I snatch one up...but that is next.   | ||
Dobieg2002 |
anyone have a picture with one of the belly pans held up to it? I'd like to see the grandstand designs one and the buell Racing. Not installed just held up under the bike. | ||
T_man |
Quick question(s): Is the the Buell belly pan color matched ABS like the fairings pictured above? Secondly, are they made to bolt directly onto the lowers? Lastly, how much is the belly pan only? I have the lowers coming and would like to add a belly pan too. Thanks fellas! | ||
Geforce |
T_man, I am pretty sure the belly pan is fiberglass, is not painted and you have to attach it to the bike... I could be confusing this with something else...but I am pretty sure about this. My dealer has one coming and they are putting it on the demo, so I will find out. | ||
Zac4mac |
IIRC, the Buell bellypan specifically does NOT work with the BMC lowers. Z | ||
Dobieg2002 |
Zac4mac, It doesn't work? I know it will require modifications, cut out for side stand, mounting, etc. Unless you have other info it should work with some work, just not plug and play out of the box. | ||
Badlionsfan |
It has to be possible, as the AMA pace/ safety bikes have the buell side fairings and a belly pan. | ||
Geforce |
+1 Bad... I was thinking the same darn thing. I wonder if a plastic belly pan will be offered? Or is this all we are getting? If more is to come, I can wait. | ||
T_man |
I hope they'll offer up a 'street' belly pan but I can why they might not. Simply; the stock exhaust. I don't know if the buell belly pan would fit over it (the pace bike wears a performance sys). For all of us with slip-on's though (or full systems - bless your lucky hearts!) the belly pan should be a no brainer IMO. Anyways - a color matched street plastic piece would be ideal - if anyone is listening in  | ||
Froggy |
The AMA pace bikes use these side fairings, you can see the regular scoop under them too. It appears to be the normal belly pan used, but with the Buell race pipe. Not sure if any modifications were made to the belly pan. | ||
Teach |
I have looked at the Buell side fairings and I have a GSD belly pan/side fairings. Because of the mounting bolt location at the bottom of the Buell side fairings and the way it is shaped could make this a difficult install for a belly pan. Might be easier to go with the GSD side fairings and there belly pan. | ||
Buellishxx |
I'm guessing the pace bike uses the buell racing, body / fairing kit, which is about $1400. I'm waiting to see if anyone has tried the buell race belly pan with these side fairings as it's a cheaper way of going. |