| Author | Message | ||
Teach |
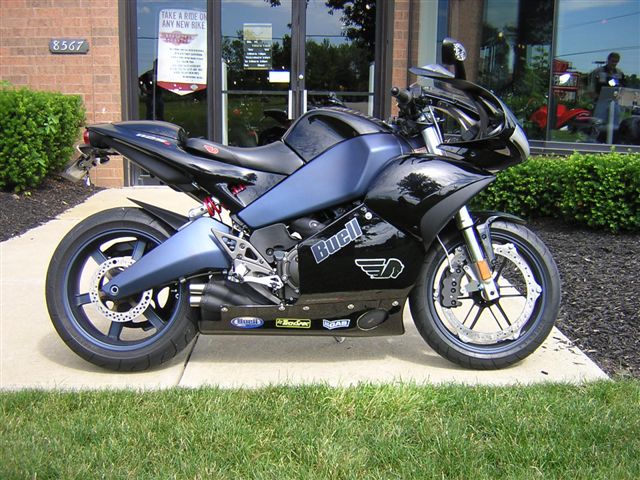
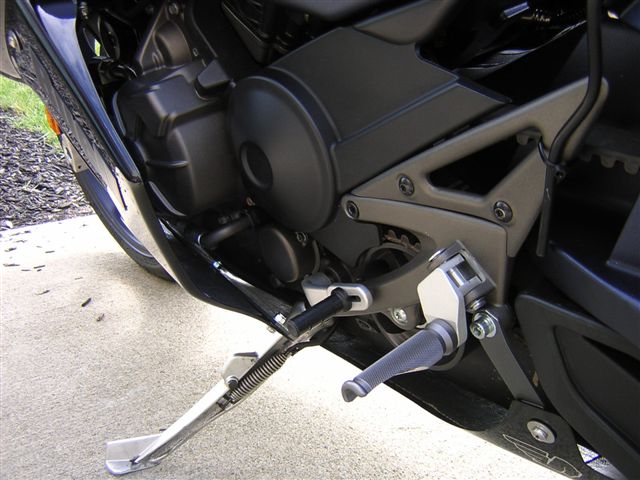
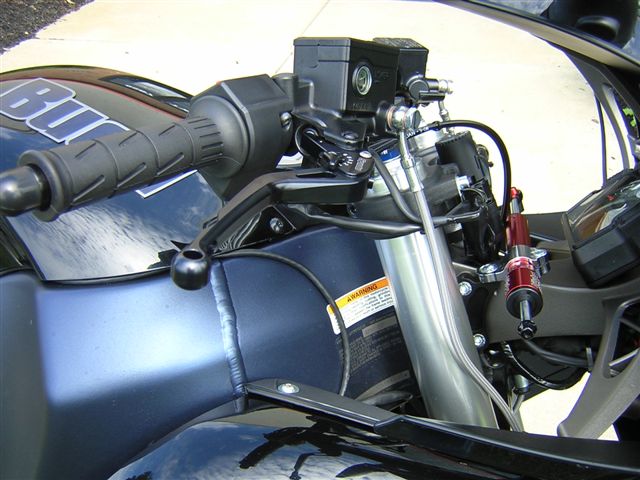
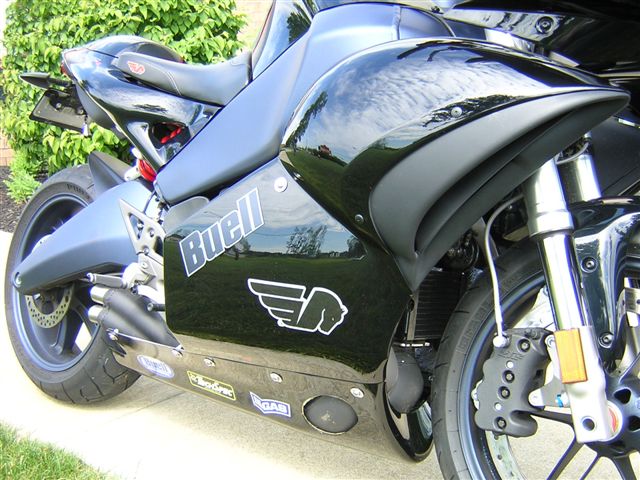
This is our "prototype" fairing install. I have sense found that the belly pan did not have to be "clearanced" on the right front for the pipe. I will soon order a new belly pan and have it painted. I have included other photo's of some of the stuff I have installed. Also, this set-up uses the original pod air deflectors. All the bracketry is 1/8th x 3/4 aluminum from hardware store. You also have to cut for the sidestand and clearance at the rear of the belly pan. Use a dremel tool with a cutting tool, it will save you a lot of time and the job will look better. A course file will help also. Foot pegs, dropped brackets and extended brake and gearshift pegs - American Sport Bike Steering damper and license plate kit - Adrenalin Moto CR accessory bar install - Patrick, Western-Reserve Buell/HD Parts install (except fairing) Marc, Western-Reserve Buell/HD Hand control levers - Spiegler Thermotec heat barrier - American Sport Bike Fasteners - Bikebolts and hardware store. (All stainless.) Rubber backed stainless washers - Austin Kayak Tuning - Dave Fairing - Grand Stand Designs Decals put on crooked - Jim (never put decals on while drinking beer.) Fairing Brackets and install (including cutting the hole in the belly pan when not needed) - Jim Richards Painting - Larry License Plate - Evil (138 HP is at the rear wheel) AGAIN, the belly pan will work fine the way it is but clearance is pretty close so when fabricating the brackets make sure the belly pan does not touch the pipe. I have lined the right side fairing with the adhesive backed heat protector sheets.          (Message edited by teach on June 13, 2009) (Message edited by teach on June 13, 2009) | ||
Marcodesade |
Great look! | ||
Hitman44139 |
GOSH ITS ABOUT TIME!!!!!!! LOOKS GREAT. | ||
Dtx |
NICE! | ||
Rockstarblast1 |
jim this is lookin good! you didnt have alot of that back when the buell meet was, did you? how muchdid the steering dampener? and will it work with the normal 25r bars or did it only work because you are using the cr bars? thanks chris | ||
Garrett2 |
what is that GAB or GAS sticker all about? | ||
Teach |
No clue, but it looks kinda neat. Actually, it was left over from my ...... Honda Repsol 1000RR. Sorry. I think it is a racing gas. Maybe someone can help.... By the way, the plans are for a new belly pan and a completely radical race-type paint job. | ||
Garrett2 |
not trying to be a jerk - but you put stickers on your bike for a company that a) you dont support b) you dont know what they do ok...... its your bike, whatever you want... | ||
Bob_thompson |
Nice job Teach, looks a lot like my Catalyst lowers except mine are one piece and it looks like your belly pan is separate. Nice work on fabricating mounting brackets, everything fits well. I'm looking forward to seeing the new one when its ready. Did I say I love full faired bikes? Bob | ||
Teach |
No, Garret2, you are not a jerk and your observation is totally accurate. As mentioned earlier, this is a "prototype" and I have decals on the bike just to see how they would look. This is not a race bike and the decals do not reflect sponsors. | ||
Teach |
CONTEST TIME!!! A nice Buell T-Shirt to the first person to find "something missing" on one of the aftermarket parts installation. Can you find it? | ||
Eaton_corners |
Right rear bellypan bracket? | ||
2kx1 |
Two bottom bolts on license plate. Xtra large please. | ||
Teach |
Keep looking.... The right hand belly pan bracket to the engine is the second bolt from the left. Eaton Corners....that was not what was missing (what I was looking for, but your are correct) but PM me with your name and address and I will send you a shirt. Keep looking!! | ||
Naiguy |
the front brake line reroute/ recall | ||
Naiguy |
I mean spring thingys on pegs | ||
Dentguy |
Hanging down in front of the tag. What is that? Tag light? It's also missing a real tag number.  (Message edited by dentguy on June 13, 2009) | ||
Teach |
Naiguy got it, pm me your address! | ||
Naiguy |
I think the bike looks complete with the lower. I'm most likleh goin to end up putting a lower on my cr. thanks for the contest too! | ||
Captain_sensibuell |
Great looking mods there. For those who were wondering, the Gas logo pertains to an Italian jeans manufacturer. | ||
Teach |
Thanks Captain, I was so off base on this one!! | ||
Dave_bogue |
This looks like a prototype for a future sports-touring model: raised bars, full fairing, & lowered pegs. Well done! Is the handlebar conversion done with all 1125CR stock parts? Dave Bradenton Fl | ||
Teach |
Handlebar conversion is top triple clamp from CR, modified a little for mounting of the ignition switch. (Fork lock works), wiring is extended, Buell cr accessory handlebars, clutch line and brake line and throttle cables. | ||
Mr_incognito |
Looks pretty good....maybe I missed it, but how much are these gonna be running? | ||
Duggram |
Teach, your install looks good. I especially like the way you handled the scoop inlets. I trimmed mine to the edges. A big mistake. But I'm due for a new set this off season and will mount mine using the method you did. I think it's important to point out that these side fairings do a great job of protecting the engine cases. My track bike has been on it's side a couple of times. Each time I put another layer of glass on each side of the area around the covers and smooth it out. Works great and looks good too. Thanks for posting. | ||
Duggram |
Inconito, why don't you just go to the Grand Stand Designs' Web site? Left Side Panel Right Side Panel |