| Author | Message | ||
Easy_rider |
I'm getting my butt kicked trying to remove the last two bolts out of my frame. I've spent a couple of weeks spraying Liquid Wrench from the back side (wish I had realized I could to that before I started!) and another couple of weeks spraying a different brand - PB Blast but with the same results. Over the course of the effort I've finished mangling the hex head and been trying to drill for an EZ-out. I'll drill for a bit, grind a new edge, drill a little longer, but it's pretty slow going and the end result with EZ-Outs always carry the possibility of busting one off in the bolt. I've been wondering if it would be easier/possible to just drill out the old bolt without regard for the threads of the frame insert and have a new insert installed. I've also thought about taking a dremel to the bolt heads and grinding them off, but I'm real afraid I'd get into the isolator plate before I knew it. Any ideas? BTW, Do I need to keep the heat away from the plate? What's it made of? | ||
Buellistic |
A simple rap with a hammer on the bolt head was all you needed to do FIRST which has always does the trick for me ... Now the fun begins ... PB BLAST is good stuff !!! "i" do not know what to tell you as "i" have never got myself in such a fix ??? | ||
Easy_rider |
I wrapped it pretty good early on. Used a hand impact driver while the heads were still good. Occasionally I try it using the next size up hex socket. Still no joy. I'm starting to wonder if the real problem is the bolt heads are bonded to the isolator plate. I'm no mechanic, but I've been into plenty of stuff and this one's beyond anything I've had to deal with! Meanwhile, someone 6 hours away is using their S2 frame with 3500 miles on it to build a chopper.... | ||
Buellistic |
All they do is round the hex head or round out the screw/allen ... HOW about a PICTURE of the PROBLEM/PROBLEMS ??? | ||
Phelan |
I saw that Easy Rider, it made me quite sad. As rare as they are, you would think people would have more respect for them than that. It's not even a hot motor. They should use an X1 or an XB for something like that. | ||
Pkforbes87 |
"They should use an X1 or an XB" Hey now.. that hurts. I agree that S2's are rare works of art and should not be chopped, but there's just something about a 440 lb. streetfighter.. 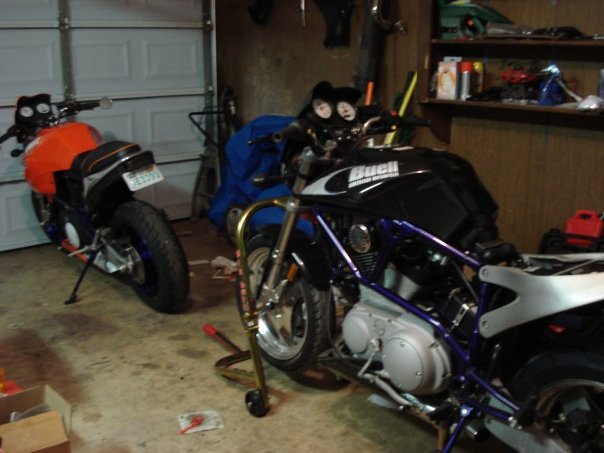 | ||
Easy_rider |
I understand, PK, and respect what you're doing. I wish I was making half the progress you are. You probably wish you had half the good engine parts that I have. I think it's just easier to understand the desire of a 100 hp motor in a chopper instead of the S2 motor, especially when the production quantities are considered. Someone was about to chop an S2, thought he'd offer it up for sale saying he couldn't quite do it. Problem was, he wanted a bit much. I briefly considered offering my S3 in trade. It's a salvage title at this point. He'd get a better motor and I'd most likely end up ahead financially. Couldn't bring myself to do it, though. | ||
Firemanjim |
If you cannot get them out drill off the head and remove the plate,then grab the threaded piece with vicegrips to remove them, should come off easy. | ||
Bluzm2 |
What Jim just said... I've had it happen on both of my S2's. Just drill off the head and pull the side plate. They are countersunk heads so you don't have to drill very far. DON'T use an easyout, you will regret it. when I reassemble them, I put antisieze on the back of the screw head, none on the threads... No problems so far. Brad | ||
Easy_rider |
Thanks, FMJ/B2. I had thought about it, but wasn't sure how much material would be there to grab, and the thought of hitting the plate is more than a little scary. It may be next weekend before I can give it a shot. Meanwhile, the threads are soaking for another week. By now you'd think the bolts would just fall out! | ||
Bluzm2 |
You may want to try a left hand drill bit. If you get lucky it may back out while you drill. | ||
Easy_rider |
A buddy and I were joking yesterday that I might try drilling from the back side and the drill might catch and push it out. The way this it going I'd probably break a bit. For those that are curious, you can see the bike assembled in the S2 pics thread in November/December timeframe. The bolts in question are visible, one completely rusted on top and the other only rusted on one half like something was covering it. I didn't expect any real problems and started on the hard one first... | ||
Easy_rider |
The isolator plate is finally off!!! Thanks to FiremanJim and Bluzm2 for the drilling out advice. I apparently needed better bits than the cadmium plated. It took 4 hours to get the first, three for the second. I didn't get up as often to sharpen the bit today, so that may be why the second one went quicker - confirming that the sharpening wasn't really helping other than making me feel like I was doing something. The first bolt has had a week after having PB Blaster sprayed on it and came out without a problem. The second is still frozen, so I think I'll let it set overnight. As much as I sprayed in from the backside you'd think it would have soaked through. I'm now three months behind schedule and need to hustle if I'm going to make the reunion! Next is to remove the swingarm. Any advice as to powdercoat vs paint? Has anyone done anything other than the original gray? I'm better at copying than envisioning options. Lemme see what you've got!!! | ||
Pkforbes87 |
polish! 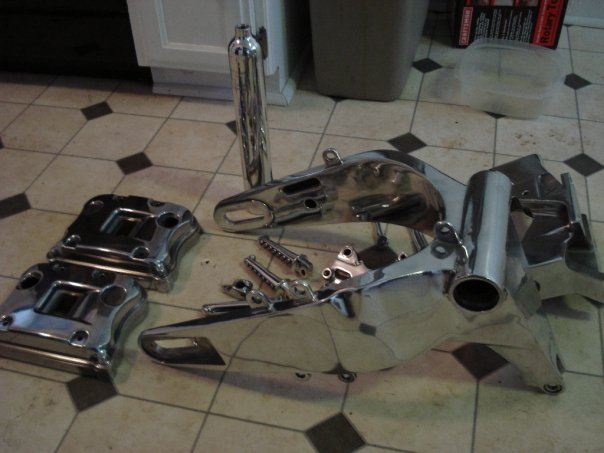 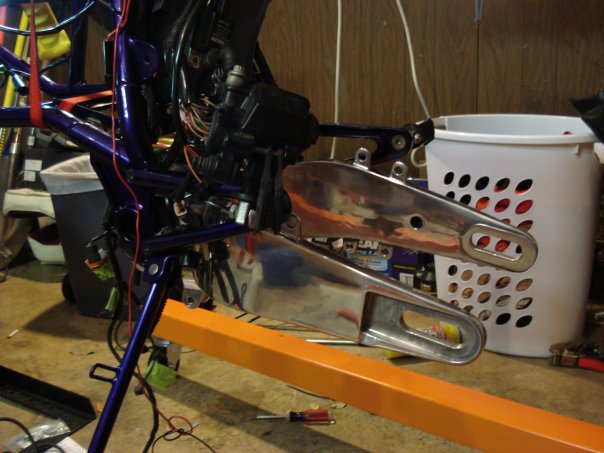 | ||
Easy_rider |
I actually have an extra that's intended for the S3. From what I've seen, it looks nice on an S2! I don't think I'm willing to live with the potential interference potential, at least not yet. I may change my mind at the last minute. I'm not sure how a polished S2 swingarm would look, or if the metal underneath is suitable for polishing. If it's a good look I'd probably go for it. | ||
F_skinner |
Roger, if you are using a regular S2 swing arm I would say have it powder coated. I had one done on my S1W but I had it done a non-stock color. If you are using a swingarm like PK I say polish it. It looks great. I use a local powder coater and the prices are better than having it painted. They should be able to come close in matching it. | ||
Easy_rider |
Thanks, Frank. I need to remove the wiring harness and a few parts, but I should be taking the frame and wheels to the powder coat shop this week. I'm looking through pics now. I saw an S1 with a polished swingarm. Enough to make me think about it.... | ||
Bluesboy |
I painted mine white to match the frame.  | ||
1313 |
There's 2 things that I've picked up over the years that have made me successful in removing the sideplates on my S2 repeatedly without any problems. One crucial element is heat. Just the heat of a propane torch held on the inverted hex of each bolt about 30-45 seconds is enough to break 'em loose. Your results may vary depending on how much red loctite was applied to the bolts the last time they were out. The most important item however is, hands down, the tools that you use. What was used to install the sideplates on the majority of the S2's built were allen bit sockets that were rated for an impact tool. After about a dozen successful attempts at removing and installing (with the prescribed red loctite - applied sparingly...) my S2's sideplates I finally had one of these bits fail on me. Since I was recently thwarted in removing the left sideplate (to replace the clutch and primary chain) by inferior tools I decided to get some replacement bits of the tool I knew would do the job. 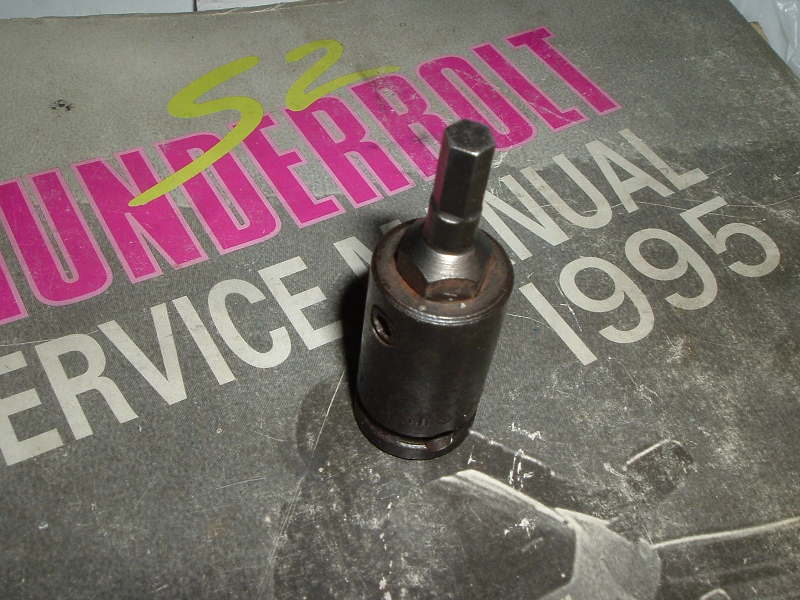 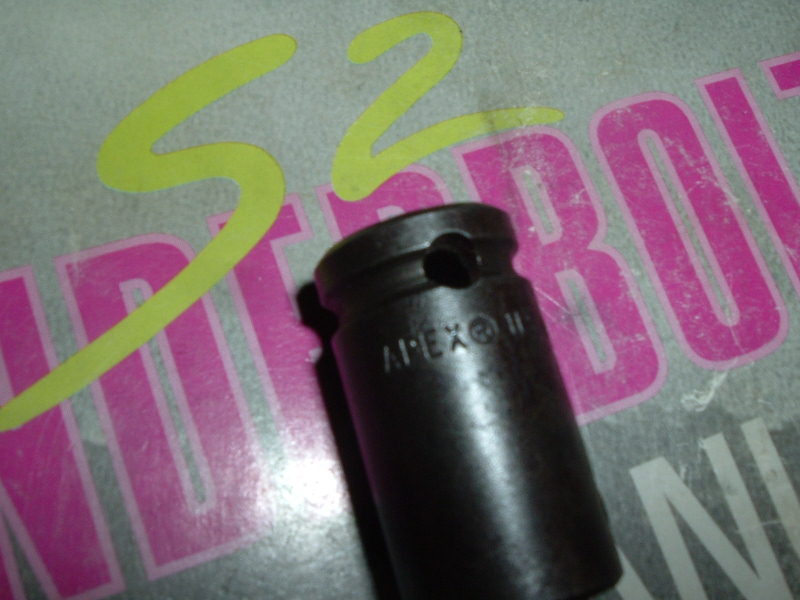 With my replacement APEX brand 7/32 allen bit I was able to remove all 3 bolts (only 1 had gotten the propane torch treatment) to allow me to remove the primary cover, and reinstall the 3 bolts (with red loctite applied sparingly) without a hitch. And if this one breaks on me 12-15 years down the road, I now have 3 spares in my tool box. Here's where I got mine! Obviously the image isn't accurate, but since I had the old bit I just googled the part number and found a multitude of sources online. And, BTW, they arrived amazingly fast as well. If you don't want to be forced to buy the socket body, since it's a 7/16" hex that interfaces with the socket body any form of 7/16" tool (box end or open end wrench, or socket) will do the trick. Problem SOLVED! If you don't believe me, bring me your S2 and I'll be like the SHAM-WOW guy (except, maybe, for the getting arrested for bitch-slapping a hooker that is) and show you just how easy it is. No more drilling the head off the sideplate bolts, no more broken lesser bits, and no more motorcycle-fixin' drama. With the right tools you can do anything, and with the wrong tools you can •••• up a lot of shit! 1313 | ||
Ztferrari |
"With the right tools you can do anything, and with the wrong tools you can ���� up a lot of shit! " - Amen | ||
Easy_rider |
After several nights of heat and ice, with repeated baths in penetrating oil, the bolt let loose. A neighbor started stopping by each night just to help out, and it gave while he gave it "one more" try. The "right tools" line is classic! I've taken the tact over the last few years that working on cars/bikes is easy, fixing it when things don't go right is the hard part. 1313 - I'll be ordering the socket before I reassemble, just to be sure. After what this took to take apart, red loctite is a little scary. | ||
Easy_rider |
Now I'm at the next hurdle. When it comes to removing the swingarm, is there an alternative to the "Pivot Shaft Adjuster Tool"? | ||
Gowindward |
I replaced my rear isolators yesterday. After reading Roger's and everyone's horror stories I was very prepared. With torch in hand and a new Proto 7/32 impact Allen socket on an impact driver I went to work. Easy breezy! Praise the tool gods! It took longer to drive to town and find a 1/2" Allen socket after removing the first side plate than it did to do the whole job. I installed new fasteners in the side plates as a precaution for future work, and put anti-sieze on the head and outer 1/4" of threads and red lock-tite on the inner 1/4" of threads. (Message edited by gowindward on April 06, 2009) | ||
Firemanjim |
Easy,I used a "pickle fork" I had in my tool bin, the forks just needed a little grind to fit right in those big slots. Used a big wrench to loosen. | ||
Easy_rider |
Loren, I also went to town to get a socket. Had to settle for a true allen wrench, though. Glad to hear the rest of your job went well. Mine spent some number of months outdoors. One side came off easily, so I'm guessing that it was leaned just right so that water was able to enter from the back side and get those babies good an rusted while the other side stayed "clean". FMJ - I've got a couple of those myself that haven't been used in quite a while. I take it these are threaded in, and both are lefty-loosey? | ||
Sportyeric |
Ready-rod couplers work as Allen sockets. $1.29 at Home Depot. And just to go on record: the front mount nut and bolt was soaked in WD40 twice a day for a week, heated with a torch, rattled on with an electric impact wrench at the bolt end while reefing on the nut end with a 4' snipe and I bent the head of a Craftsman 3/4" box end. So I cut the mofo off with a dremel. California rust is the best rust! | ||
Easy_rider |
I'm glad it's not just me struggling. Not that I want to see anyone suffer, I just don't want to feel completely incompetent! | ||
Easy_rider |
Well, I couldn't bring myself to grind a perfectly good tool, even though I'll probably never use it again. I actually borrowed it from my dad a couple decades ago, who I think has told me he doesn't want it back because he never wants to use it again... I talked to the local independent shop to see if he had the tool or could order an off-brand for me. I removed the mounting block from the case, took it in, and once he saw it he tossed me a tool for an old sportster primary plug (I think). Told me to bring it back when I'm done. Gotta love a place like that, and I can't even think of anything major that I've ever bought from him. Talked about a kit bike once, but ended up getting a Buell instead. :-) Anyway, the frame, swingarm, and wheels are in the car ready to go to the powder coat shop. Time to work on the body parts, decide what I'm going to do with the motor, and get some parts polished up. Spent an hour with a medium 3m pad today on the pipes. Didn't get a chance to get a before pic, but I'm close to where Phelan is. Hit myself in the head focusing on a spot and turning the header over, but if that's the worse it gets from here I'm doing fine. Medium leaves some marks. Most come out with 220 grit. I expect it to wet sand smooth. Sure is tough ignoring the bling out there when everything is already apart!!! | ||
Essmjay |
I needed to pull the primary apart over the weekend, thanks to all the heads up on potential problems getting the sideplate off. A torch worked for me, just got it all hot enough to soften the loctite and the bolts gave way no problem. | ||
Doninrenogmailcom |
Currently replacing rear tire, drive belt, L/H and R/H isolators (including installing new retainer bolts), all side plate screws, seat cover, etc. on my red/white 1995 S2 Thunderbolt. Only had to use heat on ONE of the six side plate polts, but have chased all threads and will install new screws/bolts with BLUE locktie and NOT RED!! Anyone know where I can get a nice rear "hugger" (also has the belt guard as part of it) or also maybe called an inner fender?) 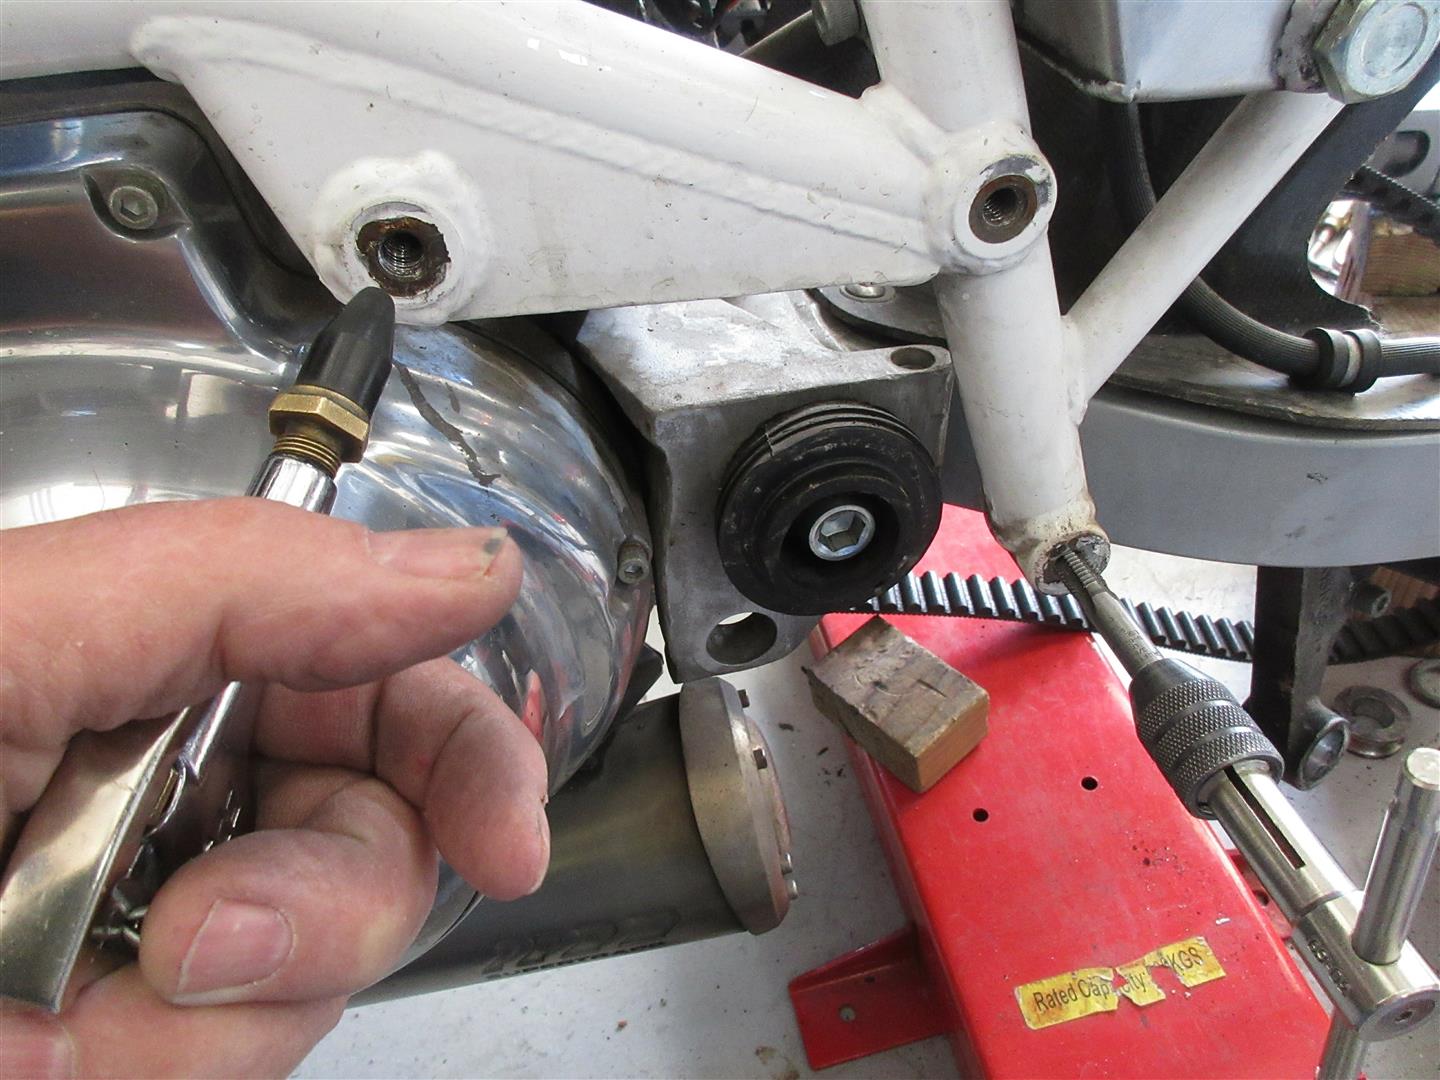 | ||
89rs1200 |
Ah, Doninrenogmailcom, Red Loctite is used so that those plates never come off. Remember these plates hold the swingarm/motor to the frame! Therefore, I believe using blue Loctite may create a safety hazard. Besides, using a torch to liquefy the red Loctite is not a problem, causes no damage, and is easy to do. Those allan head bolts come right out without damage. | ||
89rs1200 |
FYI Doninrenogmailcom, Those rear "doughnut" old style motor mounts can be replaced by the new style rear motor mounts with the metal "Wings". In my experience, the new style are much stronger and have not split and filed like the old style you have. New style rear motor mounts fit all tubers built from 1989 through 2002. |