| Author | Message | ||
Kttemplar |
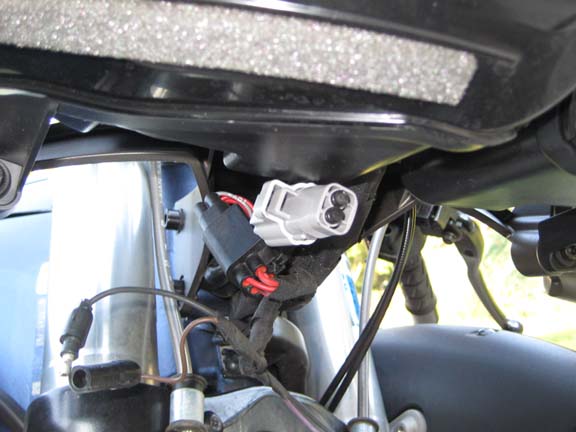
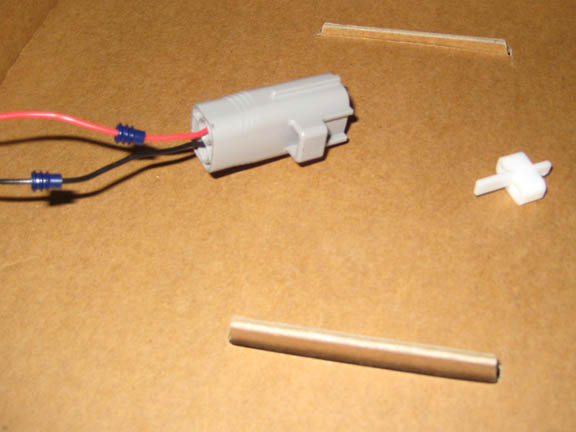
I found a place to get parts for the accessory plug. Everything needed to build the plug is already on the bike with the exception of two terminals and two wire seals, which cost $0.25 each for a total of $1.00 for a complete set. The terminals and wire seals can be purchased here. http://www.bmotorsports.com/shop/index.php/cPath/109_110?osCsid=ptescgb2er1eciaq3l6c0pubo0 Terminals part # CONN-00115 Wire Seal part # CONN-00119 You may have to take off the fairing to get to the accessory plug under the instrument cluster. The plug looks like this.  Remove the connector side without the wires connected and it looks like this.  Once you have that piece of the connector, two terminals, and two wire seals, you are ready to make a plug. Here are all the parts to manufacture a plug. The black rubber/silicone pieces are "dummy plugs".  Building the plug 1. remove dummy plugs from connector 2. strip end of wires 3. slide wire seal on wire with small end pointing toward stripped end of wire 4. place wire in end of terminal until it rests between tabs. 5. crimp tabs down using official sumitomo wire crimping tool, or if you do not have one of those, use needle nose pliers. IMPORTANT: There are three sets of tabs on the terminal. Do not flatten the tabs closest to the end that plugs in! Crimp the two sets of tabs on the end that is holding the wire. 6. Remove white retainer from end of plug 7. slide wires with terminals into end that used to have "dummy plugs" and push them in until you hear and audible click. I had to use a flat screwdriver. The terminals will only go in one way so don't force it until you are sure it is in the correct way. If you look in the plug you will see the place the tabs on the terminal slide in. 8. Replace white retainer and press it in until it seats in the end of the connector. I had to use a flat screwdriver for this. 9. push blue wire seals into connector around wire. 10. accessory plug is finished. 11. plug in and put the fairing back on if you had to take it off. here is a picture of the plug with the terminals in and the white retainer removed.  I hope that this info helps. Mike | ||
Kttemplar |
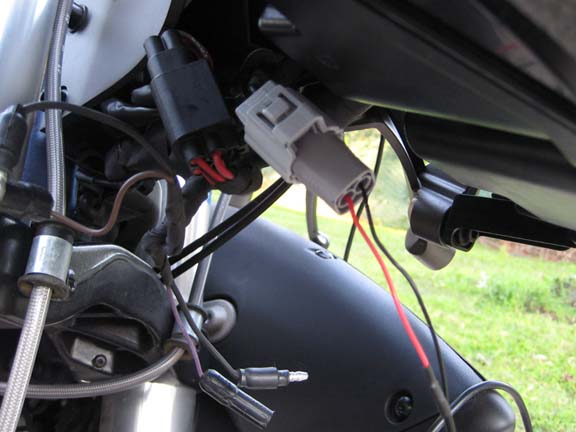
Here is the finished plug on the bike.  Mike | ||
Thereconscout |
Too easy  thanks photos help out bunches | ||
Funktron |
+1 rep for you. nice writeup. | ||
Chevycummins |
I went to my favorite Harley/Buell dealer and asked about the terminals so I could put the connector together and they had no terminals. Then I went to my local GM dealer and they had the sumitomo terminals and crimping tool. I got lucky and the terminals were not on their file so they did not charge me for them. My cost, a little time and $0. | ||
Kttemplar |
nice  . Wish I would have been that lucky. Trying to find this plug has been driving me nuts. Since it is similar to the Denso injector plug, I guess you could even go to a junkyard and clip one off of an injector for an extra plug/pigtail. . Wish I would have been that lucky. Trying to find this plug has been driving me nuts. Since it is similar to the Denso injector plug, I guess you could even go to a junkyard and clip one off of an injector for an extra plug/pigtail. | ||
Chevycummins |
Kttemplar, I worked at the GM dealer for some time so I thought they might have the terminals. They have a large amount of different terminals in pull out bins, and have the name of the connector style on the bins, Delco, Denso, Sumitomo etc. | ||
Kttemplar |
Chevyc, that is awesome. I also found this place. http://www.connectorsfast.com/ You can get 4 sets of NipponDenso connectors , which should work with the Buell plug,with terminals for $10 a piece but you have to buy 4 at a time. I guess some Buell owners will have to band together and split the set. Maybe I will have to start lurking around junkyards and dealers to find these plugs and re-gift them to Buell owners (for a nominal fee of course).  Buell does not even have the parts. I know, because I called to ask them. Buell does not even have the parts. I know, because I called to ask them. Mike (Message edited by kttemplar on August 22, 2008) | ||
Kttemplar |
This place has NipponDenso male pigtails for $7.25 each, which should also work. It is not the exact plug, but it is a similar plug by Sumitomo, which should plug into the female plug installed on the 1125R. http://www.fiveomotorsport.com/Injector_CONNECT.as p Mike | ||
Dalton_gang |
Great work!! | ||
Bobup |
GREAT JOB! about 2 months too late for me though....dang it all | ||
Buellerthanyou |
I believe the H-D part numbers for those are: 73190-96 (the terminals) 72099-06 (the wire seal) HellBuelly J | ||
Xl1200r |
Great write up! I just ordered those parts - should work a lot better than my old method for my GPS, which included finding a bolt for a ground and jamming the hot side into a fuse, lol. | ||
Zac4mac |
How the hell did I miss this one??? NICE!!! Z | ||
Mikellyjo |
So now that we have an accessory plug...what are cool things can/are we plugging in???  | ||
Froggy |
Heated grips, GPS, Race computers, video cameras, phone chargers, electric refrigerators, fog lights, heated/cooled cup holder.  | ||
Xl1200r |
This thread was archived before I posted to it - how did it get back into the main folder?!?! | ||
Froggy |
Magic  | ||
Sweenyboy76 |
Kttemplar, thank for showing us how to build the accessory plug. I made one and it works great. | ||
Plumpton |
I know this is an old thread now but thankyou for the very helpful information. It has allowed me to rig up a GPS connection. Ive had to order in the parts from the the USA so I reckon delivery to the UK is a couple of weeks away but it'll be a good neat job done. Thanks for your help on this... | ||
Xnoahx |
73190-96 (the terminals) 72099-06 (the wire seal) I checked out those teminals and they look correct. We didnt have any of the wire seals in stock so I cant comment on those yet. | ||
Arctic9r |
does anyone know how to build the other half/ the female portion of the plug that comes factory on everything but my 2003 9r... what is the ballenger part #? | ||
Xl1200r |
does anyone know how to build the other half/ the female portion of the plug that comes factory on everything but my 2003 9r... There's really no need. The reason for ordering these specific parts was to turn the blank plug cap into wired connection for an accessory. Since your 9R doesn't have this lead, you'd be making a plug from scratch, so you could use whatever plug you wanted (or just hardwire the connection). Tap into a switched 12v source (so if you leave your grips, GPS, what-have-you on it will turn off with the bike) and ground on the chassis and you're good to go. | ||
Arctic9r |
Xl1200r - this is precisely what I am doing. Unlike most people I like to duplicate factory when I have the option to. But since HD tech service can't give me the correct part # and nobody here can help. I'm just going to have to go with a deutsch connector setup. Why not use factory connectors with factory accessories? I'm not trying to be a pain, I just want the correct answer. |