G oog le BadWeB | Login/out | Topics | Search | Custodians | Register | Edit Profile

Buell Forum » Knowledge Vault (tech, parts, apparel, & accessories topics) » Electrical - Battery, Charg Sys, Lights, Switches, Sensors & Guages » Archive through February 23, 2011 » Headlight Mod - Both lights on w/ HI-Beam » Archive through May 11, 2010 « Previous Next »

Author Message
Top of pagePrevious messageNext messageBottom of page Link to this message

Speedkills
Posted on Thursday, July 17, 2008 - 04:05 pm:   Edit Post Delete Post View Post/Check IP Print Post    Move Post (Custodian/Admin Only) Ban Poster IP (Custodian/Admin only)

Looking for a way to have both headlights on instead one of only one on for LOW and the other for HI??
Tired of being told you have a light out??

This mod will have one light on for LOW, and BOTH lights on when running HI-BEAM.
________________________________

HEADLIGHT MOD

TIME TO COMPLETE: 15 minutes

COST: $0.00

STEP 1. Remove your windshield from the headlight bucket of the bike.


STEP 2. Find the socket for the headlight harness. Its white and has 4 wires in it:
black, yellow, white, orange.


STEP 3. Unplug the socket. (you will be working on the male end of the socket)


STEP 4. On the back side of the socket (the end with the wires running into it) there is a clip on the plug itself

that holds the wires in.

Unclasp it from one side and fold it open.


The black is a ground, the yellow is low beam, white is high beam, and orange is for the running light.

You are going to switch the yellow with the orange wires in the harness.

***If the colors are different on your harness swap the two that are not white or black***

STEP 5. To do this use a small pointed object (I used a very very small nail)


5a. Stick it in the male end forcing the wire out.
You may have to tug on the wire some wile pushing to get them out.


5b. It was a little difficult to get them out but not impossible to do so.
See plug detail below.


5c. You may have to remove more than just the orange and yellow wires in order to have room to move the wires

depending on your harness.


STEP 6. Replace the wires into the plug, swapping the position of the yellow and orange wires.
The new order should be:
black, orange, white, yellow.

Plug the harness back together.


STEP 7. Test the lights.

When you are on LOW BEAM you should have only one light on as usual.


On HIGH BEAM both lights should be illuminated.
Top of pagePrevious messageNext messageBottom of page Link to this message

Skifastbadly
Posted on Monday, July 21, 2008 - 09:01 pm:   Edit Post Delete Post View Post/Check IP Print Post    Move Post (Custodian/Admin Only) Ban Poster IP (Custodian/Admin only)

Hey SpeedKills

Thanks for the info. As you know there are several other places on BadWeb that describe the same procedure...BUT yours is the only one that points out that important step of folding back the clip. After being flummoxed on several occasions at attempting this mod, your extra step gave me the info that I needed and my Uly is now sporting two eyes.
Top of pagePrevious messageNext messageBottom of page Link to this message

Varhammer
Posted on Tuesday, July 22, 2008 - 12:48 am:   Edit Post Delete Post View Post/Check IP Print Post    Move Post (Custodian/Admin Only) Ban Poster IP (Custodian/Admin only)

Speedkills..

Once you do this modification will you still be able to use the flash to pass feature?
Top of pagePrevious messageNext messageBottom of page Link to this message

Speedkills
Posted on Tuesday, July 22, 2008 - 01:33 am:   Edit Post Delete Post View Post/Check IP Print Post    Move Post (Custodian/Admin Only) Ban Poster IP (Custodian/Admin only)

If you are running with low beams on and you hit the flash to pass trigger both lights will come on.

So yes.

Cheers.
Top of pagePrevious messageNext messageBottom of page Link to this message

Varhammer
Posted on Wednesday, July 23, 2008 - 11:19 am:   Edit Post Delete Post View Post/Check IP Print Post    Move Post (Custodian/Admin Only) Ban Poster IP (Custodian/Admin only)

OUTSTANDING!!!!!
I will be doing this mod this morning..
Thanks a bunch.
Top of pagePrevious messageNext messageBottom of page Link to this message

Spops
Posted on Friday, July 25, 2008 - 08:50 am:   Edit Post Delete Post View Post/Check IP Print Post    Move Post (Custodian/Admin Only) Ban Poster IP (Custodian/Admin only)

BRILLIANT! Many thanks!
Top of pagePrevious messageNext messageBottom of page Link to this message

Buellbill
Posted on Monday, January 05, 2009 - 08:47 pm:   Edit Post Delete Post View Post/Check IP Print Post    Move Post (Custodian/Admin Only) Ban Poster IP (Custodian/Admin only)

Thanks again for the detailed instructions. One question though? Can the electrical/charging system handle having both lights on for an extended period, not just high beam flash to pass?
Regards Bill
Top of pagePrevious messageNext messageBottom of page Link to this message

Greenman44
Posted on Friday, January 16, 2009 - 01:29 pm:   Edit Post Delete Post View Post/Check IP Print Post    Move Post (Custodian/Admin Only) Ban Poster IP (Custodian/Admin only)

Bill I think that it will with no problem run both headlights. There are ulysses riders that I have read about that run dual HID headlights, plus external lights, hand warmers, and a GPS unit and don't have problems. Its is a great mod, Im glad I did mine about 5 months ago, and have had no problemo-s.

Shawn
Top of pagePrevious messageNext messageBottom of page Link to this message

Lovedabueller
Posted on Friday, January 16, 2009 - 02:03 pm:   Edit Post Delete Post View Post/Check IP Print Post    Move Post (Custodian/Admin Only) Ban Poster IP (Custodian/Admin only)

this also works with tubers. you can make both elements light at once. . just thought id pass that also.
Top of pagePrevious messageNext messageBottom of page Link to this message

Troyyz
Posted on Friday, January 16, 2009 - 05:53 pm:   Edit Post Delete Post View Post/Check IP Print Post    Move Post (Custodian/Admin Only) Ban Poster IP (Custodian/Admin only)

one note of interest... in photo/step 5A be certain NOT to insert sharp pointed item (nail) into the actual terminal. There is a slot immediately above it to place the nail. This will "unhook" the terminal from the plastic plug. Otherwise you may inadvertently cause unrecoverable damage to the terminal. Mine ended up take about the advertised 15 minutes. Thanks again for this posting!!
Top of pagePrevious messageNext messageBottom of page Link to this message

Oldironsides
Posted on Friday, January 16, 2009 - 07:06 pm:   Edit Post Delete Post View Post/Check IP Print Post    Move Post (Custodian/Admin Only) Ban Poster IP (Custodian/Admin only)

Lovedabueller, where might I find the mod for the tubers. Specifically 01 X1. Thanks.
Top of pagePrevious messageNext messageBottom of page Link to this message

Bossies1
Posted on Sunday, March 08, 2009 - 09:33 pm:   Edit Post Delete Post View Post/Check IP Print Post    Move Post (Custodian/Admin Only) Ban Poster IP (Custodian/Admin only)

Thanks Speedkills! This is the way it should come from the factory. I had tried the middle position of the switch to turn on both bulbs, but found it very annoying. Your write-up saved the day! I used a small eyeglasses type screwdriver to release the little catch. This worked a little easier for me than the nail method .

Dave
Top of pagePrevious messageNext messageBottom of page Link to this message

Dgbuell
Posted on Monday, March 09, 2009 - 09:34 pm:   Edit Post Delete Post View Post/Check IP Print Post    Move Post (Custodian/Admin Only) Ban Poster IP (Custodian/Admin only)

Easiest thing I've ever done to my bike, thanks for the great details
Top of pagePrevious messageNext messageBottom of page Link to this message

Spicerack
Posted on Thursday, April 09, 2009 - 06:00 pm:   Edit Post Delete Post View Post/Check IP Print Post    Move Post (Custodian/Admin Only) Ban Poster IP (Custodian/Admin only)

thanks for the walk through. i did this yesterday, [using a paper clip] and was a snap. this is way better than balancing the switch in the middle the way i have been doing. your instructions were perfectly explained. thanks!
Top of pagePrevious messageNext messageBottom of page Link to this message

Ratbuell
Posted on Tuesday, April 14, 2009 - 07:49 am:   Edit Post Delete Post View Post/Check IP Print Post    Move Post (Custodian/Admin Only) Ban Poster IP (Custodian/Admin only)

I did this mod a while ago on my Uly, and love it.

For what its worth, for jobs like this I keep a set of dental picks in the garage that I got from a hobby store. Couple straight, couple curved, couple with a dogleg in 'em...they're more handy that I could have ever imagined. Strongly recommended addition to the toolbox. And, they hit the release tab perfectly instead of just pushing on the whole terminal in the housing : )
Top of pagePrevious messageNext messageBottom of page Link to this message

Mluds0379
Posted on Wednesday, April 15, 2009 - 10:32 am:   Edit Post Delete Post View Post/Check IP Print Post    Move Post (Custodian/Admin Only) Ban Poster IP (Custodian/Admin only)

Just did this mod the other day. Very simple, took 15 min.
I used a jewelers screwdriver to get to the release tab. Mod works great!
Top of pagePrevious messageNext messageBottom of page Link to this message

Hangontight
Posted on Friday, May 15, 2009 - 09:47 pm:   Edit Post Delete Post View Post/Check IP Print Post    Move Post (Custodian/Admin Only) Ban Poster IP (Custodian/Admin only)

thanks for the write up

one tip...take the white wire out too. it makes getting to the yellow one much easier.
Top of pagePrevious messageNext messageBottom of page Link to this message

Tnd2
Posted on Monday, May 18, 2009 - 09:14 am:   Edit Post Delete Post View Post/Check IP Print Post    Move Post (Custodian/Admin Only) Ban Poster IP (Custodian/Admin only)

FYI: The 2 light mod is the same for the 09XT's, so if you've been waiting, get in the garage and get to it.
Top of pagePrevious messageNext messageBottom of page Link to this message

Murf2
Posted on Thursday, October 08, 2009 - 11:32 am:   Edit Post Delete Post View Post/Check IP Print Post    Move Post (Custodian/Admin Only) Ban Poster IP (Custodian/Admin only)

Great write-up and pics! Is there any way to set it up to have two dual filament bulbs? that way it wouldn't have the "one eye winkey" on low either.

Thanks, Murf2
Top of pagePrevious messageNext messageBottom of page Link to this message

Balloyd66
Posted on Monday, November 02, 2009 - 03:12 pm:   Edit Post Delete Post View Post/Check IP Print Post    Move Post (Custodian/Admin Only) Ban Poster IP (Custodian/Admin only)

Took 5 minutes over the weekend to do this mod. Thanks to all who pioneered this quick "fix", and especially to the author of this thread for the awesome photos.
Top of pagePrevious messageNext messageBottom of page Link to this message

Gater
Posted on Saturday, November 14, 2009 - 08:24 pm:   Edit Post Delete Post View Post/Check IP Print Post    Move Post (Custodian/Admin Only) Ban Poster IP (Custodian/Admin only)

Once I complete this mod do I have to install a bulb in the socket located between the right and left bulbs?
Top of pagePrevious messageNext messageBottom of page Link to this message

Froggy
Posted on Saturday, November 14, 2009 - 08:53 pm:   Edit Post Delete Post View Post/Check IP Print Post    Move Post (Custodian/Admin Only) Ban Poster IP (Custodian/Admin only)

Nope
Top of pagePrevious messageNext messageBottom of page Link to this message

Gater
Posted on Saturday, November 14, 2009 - 09:47 pm:   Edit Post Delete Post View Post/Check IP Print Post    Move Post (Custodian/Admin Only) Ban Poster IP (Custodian/Admin only)

What is that middle bulb socket for?
Top of pagePrevious messageNext messageBottom of page Link to this message

Froggy
Posted on Sunday, November 15, 2009 - 12:42 am:   Edit Post Delete Post View Post/Check IP Print Post    Move Post (Custodian/Admin Only) Ban Poster IP (Custodian/Admin only)

Position lamp to meet Euro regulations.
Top of pagePrevious messageNext messageBottom of page Link to this message

Gater
Posted on Sunday, November 15, 2009 - 07:50 am:   Edit Post Delete Post View Post/Check IP Print Post    Move Post (Custodian/Admin Only) Ban Poster IP (Custodian/Admin only)

Is it worth making the socket hot putting a bulb in it?
Top of pagePrevious messageNext messageBottom of page Link to this message

Gater
Posted on Sunday, November 15, 2009 - 08:05 pm:   Edit Post Delete Post View Post/Check IP Print Post    Move Post (Custodian/Admin Only) Ban Poster IP (Custodian/Admin only)

I did the mod today. It worked fine. Very easy.
Top of pagePrevious messageNext messageBottom of page Link to this message

Tankhead
Posted on Wednesday, November 25, 2009 - 04:05 pm:   Edit Post Delete Post View Post/Check IP Print Post    Move Post (Custodian/Admin Only) Ban Poster IP (Custodian/Admin only)

Well I did the mod. I was very nervous about pulling the plugs out. While I was at it I connect the ZUMO to the ground and the orange. Again I was very nervous about damaging the internal cable while pulling the connectors out of the holes. I used toothpicks to push the release inside. Connecting everything and tried it out and it works. I hope the GPS connections stay in there for the long hall. This is the first time I have ever messed with electrics. Just like learning the nervous system. Did not interest me and somewhat intimidates me. tanks for the mod. Seems great.
Top of pagePrevious messageNext messageBottom of page Link to this message

Fubar
Posted on Tuesday, May 11, 2010 - 04:36 pm:   Edit Post Delete Post View Post/Check IP Print Post    Move Post (Custodian/Admin Only) Ban Poster IP (Custodian/Admin only)

Big fan. Been running this way for over a year without any side-effects.

GREAT instructions!
Top of pagePrevious messageNext messageBottom of page Link to this message

Union_man
Posted on Tuesday, May 11, 2010 - 06:21 pm:   Edit Post Delete Post View Post/Check IP Print Post    Move Post (Custodian/Admin Only) Ban Poster IP (Custodian/Admin only)

I did the headlight mod over a year ago and love it!

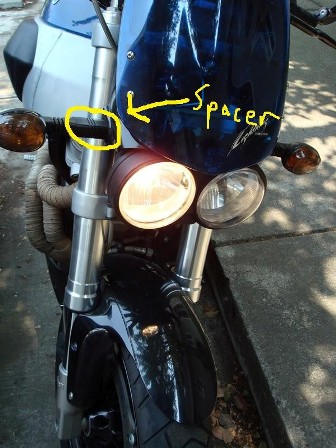
Another free mod...

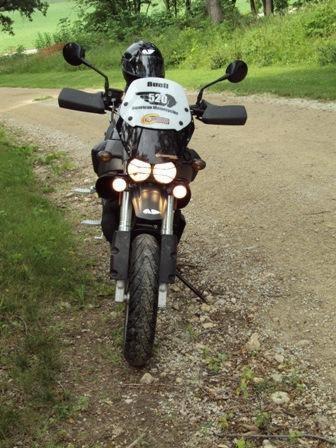
Shorten your front turn signals! Free!!!

1 Take off flyscreen

2 Pull apart front turn signal connector

3 Take off nut from signal stem

4 Remove signals

5 Put it all back together with the "spacers" on the inside of the flyscreen.

Done!!!!!

The shorter signals look better and shake less!
Top of pagePrevious messageNext messageBottom of page Link to this message

Union_man
Posted on Tuesday, May 11, 2010 - 06:28 pm:   Edit Post Delete Post View Post/Check IP Print Post    Move Post (Custodian/Admin Only) Ban Poster IP (Custodian/Admin only)


(Picture stolen from above)


(Mine with signals shortened and all lights ON!)
« Previous Next »

Topics | Last Day | Tree View | Search | User List | Help/Instructions | Rules | Program Credits Administration