| Author | Message | ||
Puls4521 |
So this weekend I tackled a preemptive crank seal replacement on my S1W project. Everything was going fine until I got to the point of removing the old seal. I spent a good hour and a half fighting that damn thing until I remembered reading about someone on here using a technique of gently taping a wood screw into the seal (not screwing it in to avoid creating metal flakes). I thought I would give it a shot. It worked like a charm! Taped the screw in and pulled the old seal right out! I was really excited until I saw that the screw had actually gone too deep. As it turns out, as I was trying to get the seal out originally I ended up pushing it further in, so when I put the screw in it went to deep. When the screw went in it actually bent the inner cage on the crank bearing behind the seal. At this point many profanities were used. After I calmed down, I attempted to straighten out the cage, with pretty good success. So I'm posting this for some advice, and maybe a shoulder to cry on while I'm at it. I realize how important this bearing is which is why I'm concerned about it. However, , I also know replacing it would be splitting the case and having a shop install a new bearing at a cost so far outside my budget it's not even funny. The inner cage was bent toward the center not inward toward the rollers, which is a better case. So any thoughts on this are welcome! I feel ok leaving it and running it as is but I would like some thoughts. Thank you! | ||
Kalali |
This is perfect example where a picture is worth a thousand words... | ||
Reepicheep |
A pair of drywall screws (very sharp and pretty thin) can be screwed in, perhaps through a very small pilot hole drilled in the seal if necessary, Easy enough to clean out all the debris. So it sounds like you bent the cage that keeps the bearings spaced appropriately. Hmm. A dimple is probably fine if it still spins freely. The cages shouldn't see significant loads. | ||
Puls4521 |
Reepicheep, that is exactly what happened. I will take pictures this coming weekend. Thanks for the responses. The rollers spun free, so I feel pretty ok about it, I just wanted to check with people who know far more than I! | ||
Essmjay |
I did that once on a Sportster. I carefully bent it back with a wood dowel and hammer. I then put another 60000 miles on the engine with no problems. That bike had 110000 on the odometer when I sold it and it is probably still on the road. | ||
Puls4521 |
Haha! That is one of the most inspiring things I have read in years! this thread is a testament to how awesome badweb is. I was actually worried to even post this, as I figured the first 10 posts and probably half of them after that would be telling me I was an idiot (which I already knew!), but in true badweb style, you guys came through with actual help and support!  | ||
Reepicheep |
We can learn something as well I think... It is reasonable to not want to drill to avoid any chance of putting debris into that bearing. However the alternative (punching a hole) runs the risk of pushing the seal further down, and damaging the bearing race. So of the two, probably better to drill a small hole with a greasy drill bit and carefully clean any shavings once the seal is out. And drill very carefully to avoid touching the bearing or races. New badweb community wisdom factoid. | ||
Harleyelf |
http://www.ebay.com/itm/231194160863?ssPageName=ST RK:MESELX:IT&_trksid=p3984.m1555.l2649 | ||
Puls4521 |
Harleyelf, Thanks for the link! I'm actually having someone turn the tool up, the dimensions were on here somewhere. I already bought another seal. If I hadn't already, I would probably fork over the $30 for that. It really seams worth it to make sure you get it right. If anyone is interested I found this pdf on here with the dimensions to make your own tool. Original credit to Steve_mackay. http://www.badweatherbikers.com/buell/messages/384 2/Seal_Install_Tool-219825.pdf | ||
Harleyelf |
I (sob) sold the S3. Actually, I traded it for a new motor for my big bike. Sold the SU carburetor last night. Haven't had a job since last March, need basic transportation to look for work, can't depend on the 48-year-old VW bus to commute, and am too old to spend many hours every day on a sport bike. Bought the tool from a badwebber (for $30), used it once. | ||
Gianni312 |
I am looking to have a crank seal tool made, what material should I use? | ||
Puls4521 |
My thought would be anything that is hard enough to turn on a lathe and not deform. Aluminum would probably be ideal, but I would bet that a hard plastic would work, maybe something like ABS. Aluminum would probably be best because it is relatively cheap and easy to machine. | ||
Lynrd |
Delrin? | ||
Reepicheep |
I made a tool (not like the FSM tool, but one that worked fine if you were careful) from a small dowel rod. The full tool is nicer for sure. But if you want to just get it in, you just need a "step on a stick". One part of the tip of the stick stops at the shoulder of the case to prevent seating too deep, the other part of the tip of the stick pushes the seal into the bore without damaging it. You can fabricate it in about 5 minutes with a dowel rod, a pocket knife, and a ruler. | ||
Harleyelf |
Just buy my aluminum one. Delivered in two days USPS. If you are going to cut your own, use a hard aluminum alloy such as T6. Not all aluminum is the same. | ||
Puls4521 |
I'm considering splitting the cases to replace the bearing. I really dont want to put this whole bike back together to have to tear it back apart. It may be best to take care of this preemptively. Can anyone direct me to a thread on splitting the cases on a S1? I'm not having much luck searching. | ||
Reepicheep |
Got a picture of the damaged race? Unless you already have the motor out and the jugs off, you are nowhere near the point of being close to splitting the cases. If the damage to the cage is structural, then you definitely have a problem you need to address. But if not, splitting the cases is a TON of unnecessary work and costs ($200+ in gaskets alone) and a fairly high risk of damaging something else. Even if the race damage is structural, I wonder if there are ways to replace the cage without pulling the bearing. That's a big bearing, it seems like it would be nearly impossible to really hurt it with a single poke from a drywall screw. | ||
Puls4521 |
Reepicheep, I'm going to my shop to work on it tonight, I'll take a bunch of pictures. I really hope I don't have to split the cases. I know your right about it being a ton of work and money, neither of which I was planning on. Thanks for the input. Should have pictures up about 5:30 cst. Thanks again everyone! | ||
Jim2 |
"I attempted to straighten out the cage, with pretty good success." You might have made your own case to just button it back up and ride. | ||
Puls4521 |
 | ||
Puls4521 |
 | ||
Puls4521 |
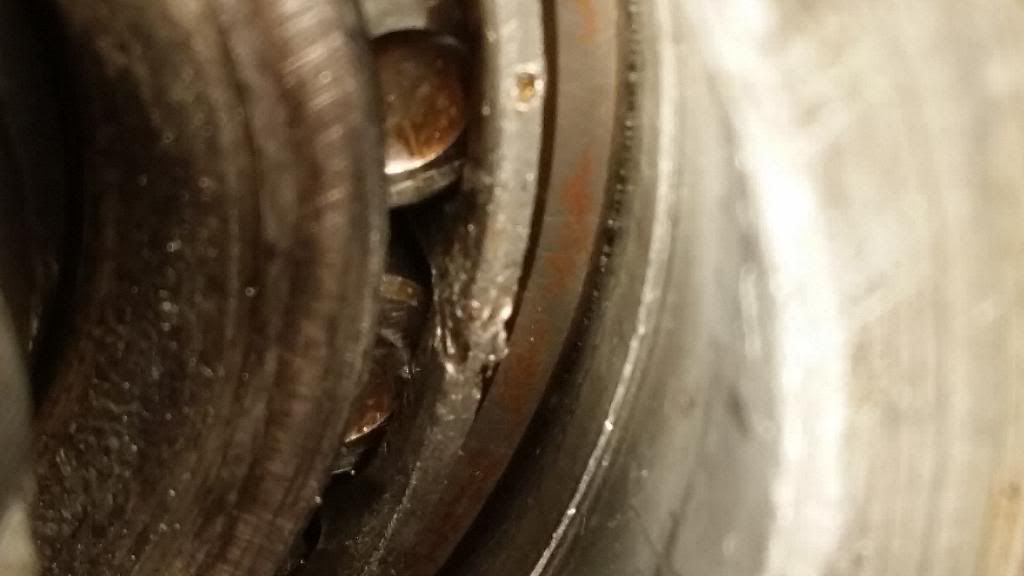
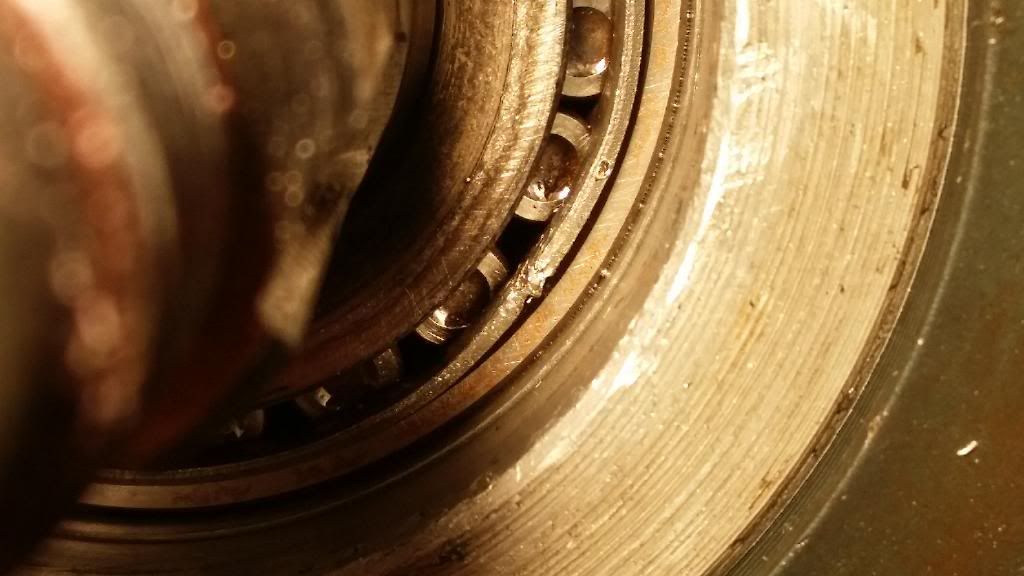
Here are some pictures of the bearing. It doesn't look like the the metal that the roller rides on was touched. What do you guys think? | ||
Reepicheep |
I think: A) They really changed that bearing relative to my old M2. B) I don't think you hurt anything, button it up and ride the bike. | ||
Harleyelf |
Agreed. The path of the rollers seems undamaged. | ||
Bluzm2 |
I'll concur, if it was mine I'd button it up and not give it another thought. | ||
Harleyelf |
Only the cage is dinged, not the hard surface the pins roll against. And it's dinged on the side facing away from the pins. Run it. | ||
Littlebuggles |
ABS will make a decent tool for the install. I put one together using parts from the local hardware store... I have a thread here somewhere on a number of things you should not do when replacing this seal. There's pics of my homemade tool in that thread. That said, James, did you get that tool sold? I see it's no longer for sale and would like to have the real deal in my tool box for the next time - I plan to have my M2 for a while yet. | ||
Harleyelf |
PM me, it didn't sell. Have a few other spare seals, like a shifter shaft seal. | ||
Puls4521 |
Thanks for the input everyone! After I took a closer look at it and noticed that it was just the cage not either bearing race, I definitely felt better about it. I also had input from a bike mechanic who said the same things as everyone here. Its already back together along with most of the rest of the bike. Just have to get the wiring harness hooked up and give it a shot! Thanks again for all the advice! |