| Author | Message | ||
Madgaz |
It’s pretty obvious what Eric was trying to achieve with the X1’s tail. A startlingly beautiful sculpted, pointed rear end that is uncluttered by an exhaust pipe or anything else that would detract from that end. Wonderful design till the yobbo’s in our respective countries felt that the need for a mud guard MUST be added, had an ugly fat plastic extension installed to meet (I suspect) design rules. Trojan horse UK has a plastic insert, as well as an alloy version. Some have opted for carbon fibre at a rather exorbitant price. While others have took a dremil cutting tool to sheet alloy (safety or road signs are perfect) and riveted and shoe horned into place. While others like myself have chopped the plastic and retained the ham sandwich box. Personally I like the idea of shaping the alloy insert to have the dent to accept the hugger. But I feel the rear wheel travel is not enough to justify doing this as clearance is fine without it. But it looks very professional. I like the look without the hugger where everything on the rear end is in plain view. Gents. There are many clever and inventive Buell minds out there that have come up with many different ways to achieve that neat uncluttered pointed bum that is so attractive and achievable on the X1. If you have an X1 with a modified rear end, drop your modification here to share with those of us who are looking at doing the same or similar. MadGaz | ||
Steveford |
I just put a Banke X1 Fender Eliminator on mine and it looks great. Would this be known as the dog's danglies in Australia or is that just a British thing? | ||
Madgaz |
Dogs danglies is definately not colourful enough to be an Ozy saying. Got a link for us to the Banke item? MadGaz | ||
Steveford |
I don't know if this is acceptable or not as they may not be a sponsor but it's www.bankeperformance.com. The downside is that I now need more carbon fiber from American Sportbike as that plastic rear hugger sticks out like a sore thumb. Look for an order on Monday, Al. | ||
Cu_chulann |
I think Steveford is being polite on air. The saying is probably not printable on air.it should be the dog,s and then the second bit begins with boll and ends with ocks. | ||
Steveford |
You mean the mutt's nuts? | ||
Piggos |
Here's my solution; .030 aluminum and some flat black Krylon, about $9 all up. 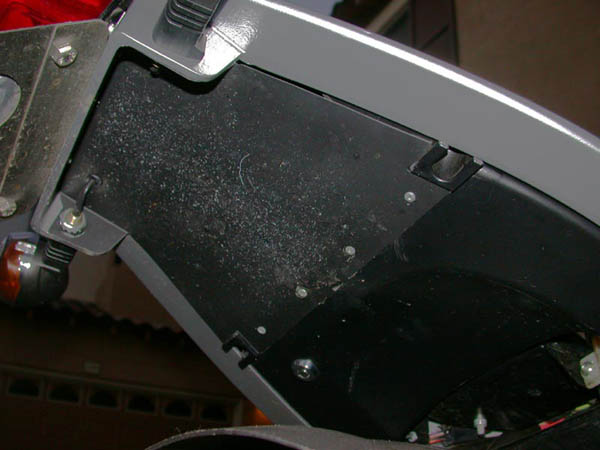 | ||
Rammons |
Hey Piggos, I think you sent me pictures of this mod before, but I want to know if you have and specs on the piece of aluminum you cut (Measurements specifically, or did you "eyeball" it)? I'm getting real tired of seeing that HUGE hunk 'O plastic sitting on the back of the X1! Thanks! Bob edited by rammons on May 28, 2004 | ||
Madgaz |
Sent to me by Paul (cowtown) Steps for converting stock trunk to chopped fender. Read steps and view all photos before cutting! Cut stock trunk into 3 sections at each bend as shown in photo (3 Piece). Discard the back section. Remove all vertical walls from the center section. See photo (Center). With center section turned over so the bend is facing down, place the back of it against the inside end of the tail frame and trace from the inside with very short pencil. Approximately 7 1/8" x 2" rectangle. Angle cut to meet the front corners of the center section. See photo (Center) and (Fender). You will need to replace the bolts that hold the seat lock to the tail section with (2) 1 1/2", 8mm x 1.0 pitch bolts. You will also need (2) lock nuts, 1/4" fender washers and 1/4" inside diameter x 1/2" outside diameter nylon spacers 3/16" thick. See photo (Hardware). Install the 2 bolts, mark and drill 1/4" holes in the center section. Drill (2) 1/4" holes, one on each side, approximately 3/4" from the back and 1" from the sides for turn indicators wires. See photo (Chopped) and (Under). Install the front section to the the tail frame. Put the center section in place, with spacers, but do not install the fender washers and lock nuts. Use masking tape along the seam on the top to hold the the 2 sections together and to keep the epoxy from seeping through. Stand the tail frame on its end and glue the 2 sections together with epoxy from the bottom. Hold the 2 sections in place until the glue sets. Lay the tail frame on a couple of 2x4 boards to lift the tail frame off the floor and hold the front section against the tail frame while the glue is drying. Drill a 5/8" hole in the front section (rear-left corner) for the seat lock. Use rat tail file to lengthen hole. See photo (Fender), (Under) and (Top). Install tail frame and fender, enjoy. See photo (Side). I found I had more control with a hand saw then a jig saw due to the shape of the trunk. Use 100 grit sand paper to smooth over cuts. If you install a heated O2 sensor, you can use the positive license plate light wire for the ignition activated terminal. Paul, aka Cowtown 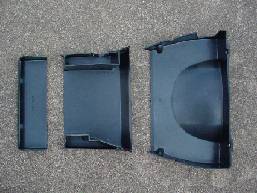      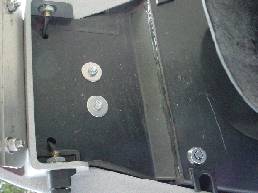 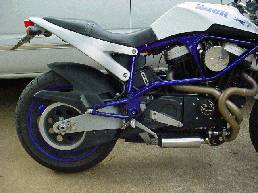 | ||
Rammons |
Thanks Madgaz! That's exactly what I'm looking for (instructions for the simple minded like myself)! I'll give it a try and see what happens. Bob | ||
Madgaz |
Thank Cowtown mate. MadGaz | ||
Rammons |
THANKS COWTOWN!!!!!!!!!!!!!!!!! Bob | ||
Madgaz |
Now this is a neat tail. Now how to get that dent in it for the hugger. Any ideas? 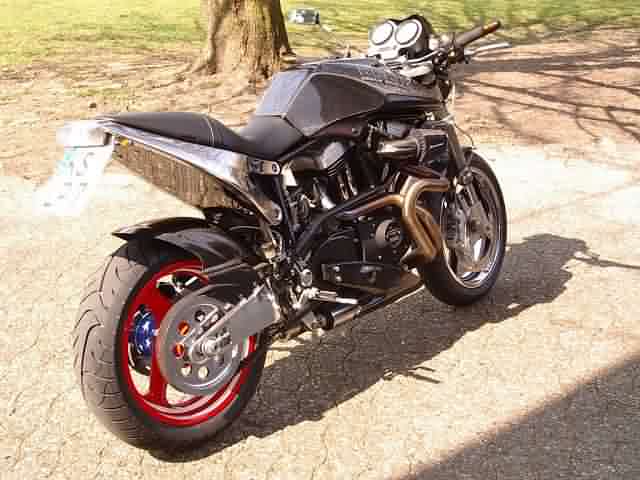 MadGaz | ||
Rammons |
Please pardon my ignorance, but what exactly is a hugger and why would you need a dent for it? On another note, that is a very nice looking tail section. I thought about having my tail section polished, but don't think it would look right (X1W). Haven't tried Cowtown's mod yet (waiting on a spare tail piece on which to practice first). MadGaz, do you happen to know of any other sites devoted to the "tubers" (specifically the X1). Thanks Bob | ||
Blackbelt |
hay Rammons, I also have an X1W, you can always try mod-ing your tail section like i did... I powdercoated my tail section and swing arm to match my wheels and frame.. and then painted the pegesus outline black to stand out... but someone tried to break in and scratch the •••• out of it.. but still looks good., i also chopped my tail section with the stainless sheet metal plate insert | ||
Rammons |
Blackbelt, Can you send me a pic of your tail end? I've toyed with the idea of powder coating the rear, but didn't think it would look good. I did paint my pegasus logo on the rear a nice blue to match the seat piping and the headers. I also painted the pegasus on the clutch cover and timing cover. Looks nice yet subtle. Bob | ||
Madgaz |
Hugger. Its that guard that covers the back tire from chucking road grime etc over everything under the tail. The belt guard part of it just dosn't look right. It sits too far above the belt and too far out the back as well. But i feel that another subject, but can be included in this. It is the tail end i suppose. MadGaz | ||
Madgaz |
I spose there is plenty of specificly X1 sites out there if you look in the right places. I just save time and use this link. http://e.webring.com/hub?ring=buell&list&page=0 Hope it helps MadGaz | ||
Blackbelt |
Rammons, I will snap a few pics tonight or sometime this weekend... and post em here for ya... give me an idea of what angles you want.. i powder coated the swingarm, tail section, and a friend painted all the black plastic peices (i.e. the scoop on the left side, the air box cover, the pully guards, and the rear fender). looks pritty good, but i am getting a Force intake soon, so the side covers will be gone in a couple months... | ||
Dano |
Here's a shot of the custom made rear fender eliminator on my 2000 X1. 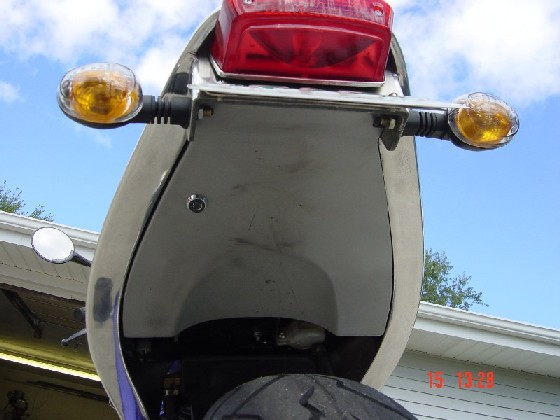 | ||
Madgaz |
Dano That is just perfect mate. *wipes a tear* Fair dinkum mate, its the ducks guts. Just what I have been looking for in a polished finish. Can you post details of how you made and fitted please. MadGaz | ||
Dano |
Madgas, The gent who sold me the X1 made the tailpiece. It is made from aluminum and he did a fine job. Spent some hours making it. He also polished the seat frame and swingarm. Sorry, I can't provide any more info than that. Dano | ||
Ironken |
I just got the Banke rear fender eliminator kit in my hot hands, pricey at 195.00, but very trick. I recommend it! Just my $.02. Ken | ||
Madgaz |
Send pics if you can Ironken, I had a look at the Banke site and couldn't find it. MadGaz | ||
Al_lighton |
You can see it here: http://www.americansportbike.com/shop/cgi-bin/cp-app.cgi?pg=store&sub_pg=splash Click the Buell RR1000, Click the X1 on the next screen, then select Body/Carbon Fiber. It's the first one you'll see there. For some reason I'm having a hard time posting the link right to it, the newurl feature doesn't accept the link. Al |