| Author | Message | ||
Mikef5000 |
I'll preface this post by saying this: This is the first vehicle I've ever purchased new, and therefor, bought as a clean slate. This is also the first motorcycle I've ever owned that I knew I wanted to keep forever. Having a clean slate, I wanted to do everything right the first time, and I wanted to avoid the common issues you get with adding accessories over time: Multiple in-line fuses Relays stuck here and there Wiring running everywhere So I decided the best thing to do would be to add everything (electrical) I would want right from the get go, at the same time, and integrate it all into a nice neat bundle. Here's the basic list of what I've added: A flush mount battery tender plug (also for heated gear). Single LED Voltage 'Gauge'. A new harness going up to the rear trunk, with running lights/brake lights in the rear reflector, as well as an automatic switch and interior light. An additional running light/brake light under the license plate in place of the reflector, as well as additional strobing brake lights as license plate bolts. An auxiliary fuse block with 4 fuses, as well as a single 40 amp circuit breaker. 2 Relays to convert the 4 signals into running lights that blink off, instead of blink on. A 55 watt HID low beam headlight, run through a 528T Timer Relay to delay startup for 15 seconds. 1 Fog light relay, with 2 35 watt HID fog lights. 1 Fog light switch in the left hand guard. 1 4-Way Flasher switch in the right hand guard. 1 Horn relay connected to a Stebel Nautilus Compact dual tone Air Horn. Ok, enough of the list. To package it up nicely, I wanted to hide everything inside a project box, but I could find one the correct size. What I ended up doing was placing relay sockets and ALL the wiring inside a project box, that the snapped into 4 relays, as well as the fuse block and main circuit breaker. Here is the nasty underside: 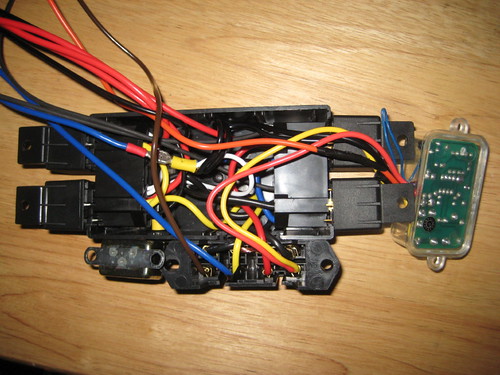 And the not nearly as ugly top view:  What you're looking at is 2 relays on either side, with the additional timer relay on the far right. Plus the fuse block at the top, with the main circuit breaker to the left of it. INSTALLED:  Not bad, all the wiring is condensed to one side, and it's not to hideous. I may shove it all in some looming. Haven't decided yet. Here's a basic wiring diagram of the setup (minus the timer relay):  Here's the basic wiring in and out of the whole thing:  Another wiring diagram:  4-Way Flasher addition:  Under the flyscreen I added the three HID ballasts, as well as the Horn relay, and air horn. It was tight, but fit no problem. I ran a few power lines up here: The delayed power for the low beam HID, the switched power for the fog lights, and an additional power line that powers all the small stuff, as well as the horn.  For the ground under the flyscreen, I ran two separate large wires from the frame ground up to the steel cross member. Then I bolted a ground post to the cross member. for everything to bolt too. In the tail I chopped off the tail light connector and added a bunch of wires:  I added a LED flasher for a strobe effect to the upper (trunk) and lower (beneath the plate) LED's. 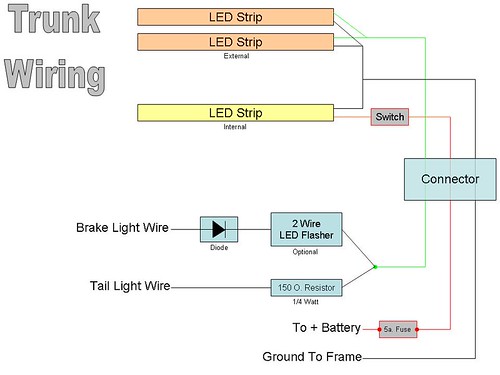 Trunk LEDs:   Internal switch and LED's. They automatically turn on whenever the trunk is opened, whether the key is in or not doesn't matter:     Off:  Tail Light:  Brake Light:  What those don't show is that now the signals are running lights: 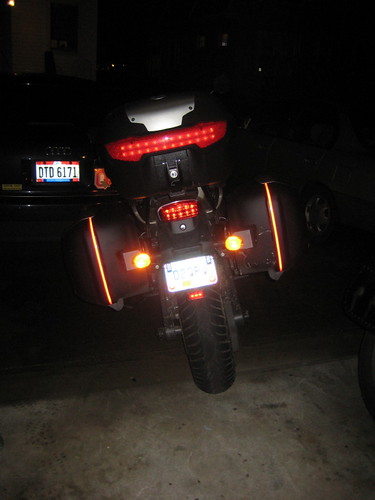 (That picture also shows the reflective red stripes on the side bags) Front HID with running lights:  I have red bulbs to go in the rear signals since they are running lights now. The switches were lighted Paddle switches mount in the handguards. Throttle side is the 4-way Flashers, Clutch side is the Fog Lights.      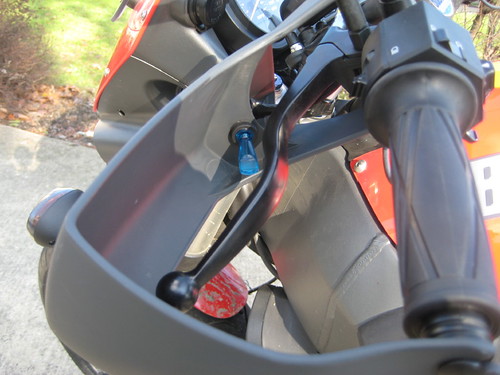 Fog lights are wired with the bulbs and ballasts installed, I just haven't bolted them up yet. 35 watt HID fog lights, 55 watt HID low beam, 55 Watt halogen high beam: 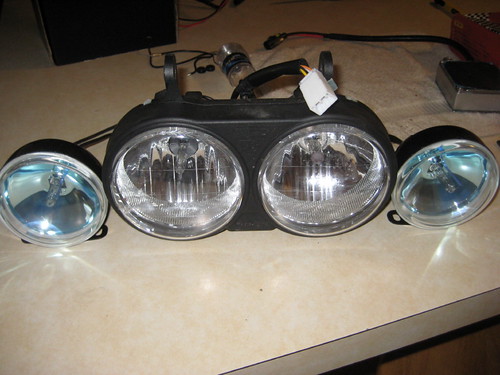 The Flush mount battery tender plug is installed under the seat:   I went with the Single LED voltage 'gauge' mounted in the dash. It changes colors with voltage between green, yellow, and red. To help everything last as long as possible, I crimped, soldered, and taped EVERY connection. I used 20 gauge wiring for all the low power stuff, and 12 gauge wiring for all the high power. I'm sure I'm forgetting something, but I'm super pleased with how everything turned out. It took substantially longer than anticipated, but it's done, and I know I didn't cut any corners. (Message edited by mikef5000 on December 15, 2009) | ||
Reepicheep |
Clever mounting point for the switches! | ||
Puddlepirate |
Curious as to where you bought those components from? | ||
Mikef5000 |
A Component list is a good idea! Flush Mount Battery Tender Plug: http://www.solarseller.com/low_voltage_dc_pumps__l vm__teel__accessories__plugs_and_extensions.htm Scroll to the bottom Trunk Switch and Project Box: https://www.allelectronics.com/index.php Relays, Relay Sockets, Red/Blue switches: http://www.parts-express.com/home.cfm Resistor and Diodes: Radio Shack (1/2 Watt 150 Ohm 5% Tolerance Carbon-Film Resistor) (3 Amp 200 PIV Epoxy Rectifier Diode) Fog Lights: Walmart Fuse Block: http://www.jegs.com/i/Painless+Performance+Product s/764/30002/10002/-1 Trunk LED's: Ebay, just search "LED 30cm SMD 5050 White" Trunk connector: Google "Weather Pack 4 wire square kit" Timer Relay: Google "528T Pulse Timer" LED Voltage gauge: http://www.customdynamics.com/LED_battery_gauge.ht m 2nd one down. Flasher: Napa Autoparts No Load LED 2 pin + ground strap unit Circuit Breaker Cover: http://www.jegs.com/i/JEGS/555/10595/10002/-1 I think that's about all of it! (Message edited by mikef5000 on December 15, 2009) | ||
Ghostrider |
Looking forward to photos and description of mounting those fog lights. | ||
Mikef5000 |
Fog lights are on! Not sure if I love them or not, but I've only got $30 in them (not including the HID's which I can reuse) so I'm not to worried about swapping them out down the road.  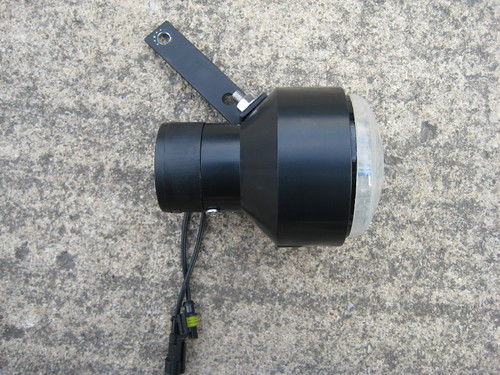      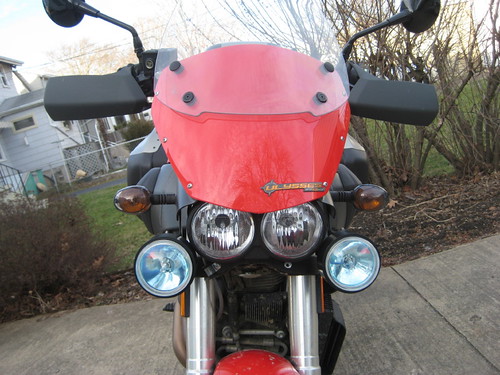   Now I need to go out and do some testing! | ||
Ghostrider |
I'm curious to know how stable they are at speed with that one little bracket holding them on. I imagine that at night you'd be able to see if they shake or not. Adds an interesting look to the bike. | ||
Scooternerd |
very impressive. thanks for sharing. | ||
Sweetfish89 |
That is an awesome set up! | ||
Sweetfish89 |
Mikef5000 how did the fog lights work at speed? | ||
Coolice |
Great job! I like the fuse/relay setup and your schematic layout. My 2010 is yet to be done, so ideas, ideas.... |