| Author | Message | ||
Upthemaiden |
So my rear pads were shot... my fault, I was too busy riding, and dealing with my front brake problems to notice how low my rear pads had gotten. At one point on my commute I was on a road with about 6 stop signs, one after another a few seconds apart from each other. I think my pads got hot enough from the multiple stops that the last little bit of pad pulled off, because instantly there was no resistance on the pedal and you could push it all the way down with no rear brake whatsoever, and after a few pumps the resistance came back but I was getting that metal on metal sound. I stopped using the rear brake but there were a couple times I stepped on the pedal out of habit. So I got some new pads and put them on, but now there's some little spots of metal build up on my rotor, I'm assuming because the rotor is harder than the pad backing, and when it heated up the rotor was pulling pieces off of the pad, and I'm guessing from the heat/friction, they stuck. My question, is if anyone's ever dealt with this before, is there a way that's better to clean this up than other ways? Sandpaper wasn't doing a ton, an old chisel wasn't able to chip/pry it off. Having a full size lathe would be ideal, to get it spinning and just run the surface smooth, unfortunately I'm working with hand tools. I thought about putting the rear on a stand and holding the belt sander with pretty course grip paper to it while the rear wheel is spinning... trying a metal file while the rear is spinning along with the potential risk of ripping one of my fingers off.... I can try a wire wheel on the angle grinder, but I didn't know if that would be abrasive enough. The spots look small in the pictures, but there's still enough there to best case scenario... wear down my new pads pretty quick, worst case scenario... wear down my new pads and cause some really bad pulsing/vibrations when I step on the rear brake. Thoughts? 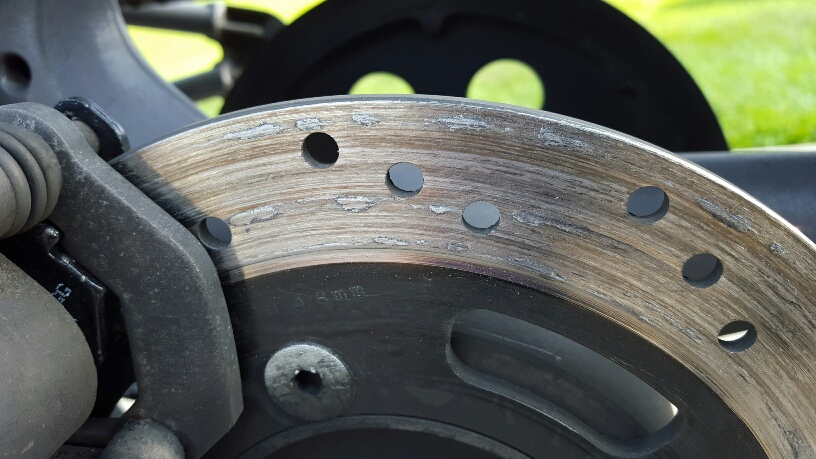 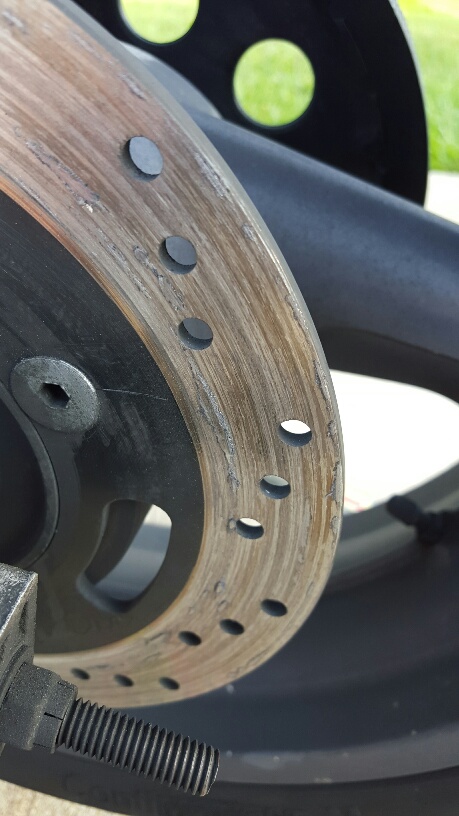 | ||
Hootowl |
Rear brake rotors aren't expensive...I'd just replace it. | ||
Hootowl |
http://www.ebay.com/itm/Buell-REAR-BRAKE-ROTOR-S2- S2T-1995-TUBE-FRAME-TUBER-M2-X1-S1-S3-/22260589294 2?hash=item33d4585d4e:g:UzgAAOSwA3dYLPJ2&vxp=mtr | ||
Buelliedan |
red scotch brite pad on an angle grinder should easily clean those up and actually help improve the rotors friction ability | ||
Upthemaiden |
I've actually already got that one saved in my ebay, and was leaning towards buying one, but then I figured there's gotta be a good way to clean mine up... plus every dollar helps when you've got a baby, and I HATE leaving the bike parked in the garage while I take the truck to work when it's nice outside. I was hoping I could just spend some time in the garage tonight and get it back on the road by tomorrow haha. How would I attach a scotch brite pad to an angle grinder?? I'll have to google that one. I know they make those "paint eater" attachments, I bet one of those would clean it up pretty well. Am I correct in assuming that the rotor is hardened, which the pad backing is just regular steel, so taking something abrasive to it should eat away at the spots a lot quicker than it does the actual rotor? | ||
Ralph |
If you decide you need one I can send you a good one for $25. Check the hardware store for mounted scotch brite pads for your drill. Now, the important question - why are you using your rear brake?  | ||
Buelliedan |
"How would I attach a scotch brite pad to an angle grinder??" https://www.harborfreight.com/complete-sanding-dis c-kit-43029.html | ||
Upthemaiden |
Haha I rode my bike for 2 and a half days back and forth to work(about 30 minutes each way) and just didn't use the back brake. It's very uncomfortable if you're not used to it haha. I see plenty of people on here who say they never touch theirs, but I use mine all the time(always with the front). I've tried to make up for it with engine braking. The other issue, is that from the time I've had the bike the back brake was the only one that triggered the brake light, so I just had to plan my route accordingly to limit the amount of time that there'd be a car behind me and that I'd be making frequent stops since only using the front brake would mean I had no brake light. On the upside, it was the motivation I needed to finally pull apart the brake light switch, clean it up, lightly sand down the contacts, grease everything up, and reinstall it. Ralph: I appreciate it! I'm going to try some coarse sandpaper on the belt sander first, since that'll be free. I *think* I might have a flap disk for the angle grinder in a box somewhere too, so I can give that a try. If those don't work, I'll definitely grab that rotor off of you. I'll let you know in the next day or two. | ||
Hootowl |
The flap disk in an angle grinder will likely give you a bit more control. | ||
Phelan |
I beadblast my rotors and then resurface them with a 120 grit brake hone in a drill. | ||
Natexlh1000 |
Won't it just wear away with normal use? | ||
Upthemaiden |
"Won't it just wear away with normal use?" I think it would've worn away eventually, but not before it took a bunch of chunks out of my new brake pads, and pulsed/vibrated when I used the brake for a while. If I spun the wheel slow with the pedal down you could feel the pedal pushing back similar to how it does with a warped rotor. Regardless, 36 grip flap disk was the winner. Took it all off in a couple of minutes. I was rushing and accidentally took off a little of the black paint in spots, but time was short due to the previously mentioned baby, so I'll take what I can get. Rode to work this morning and after the pads bedded in, it felt great. Thanks for all of the advice. 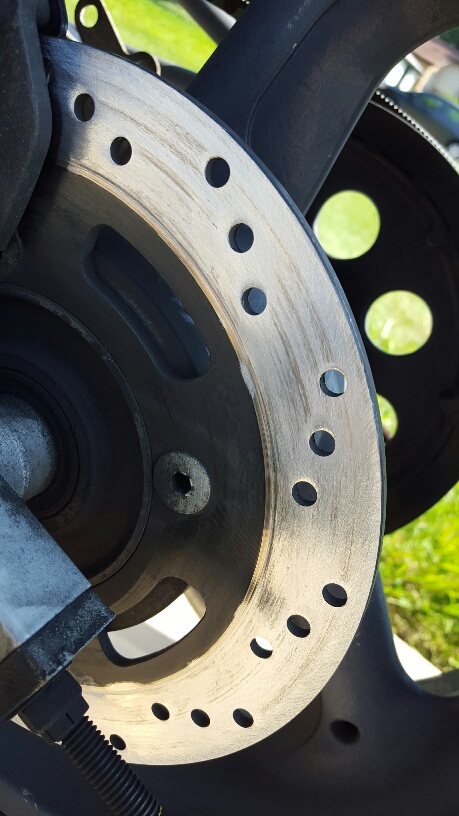 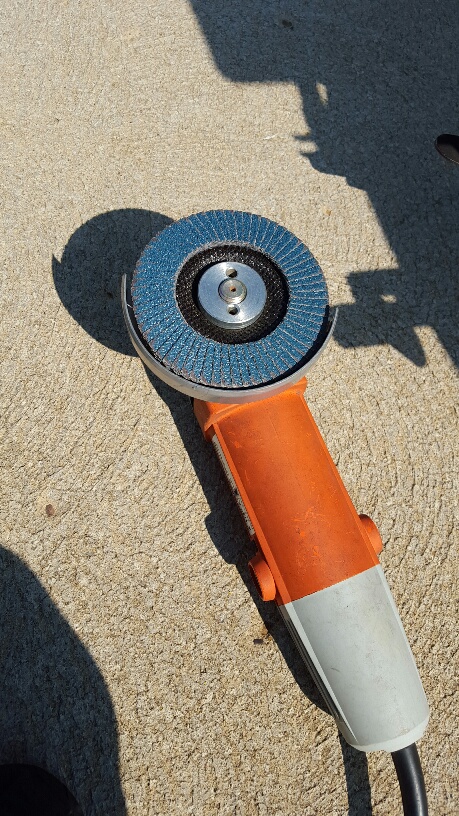 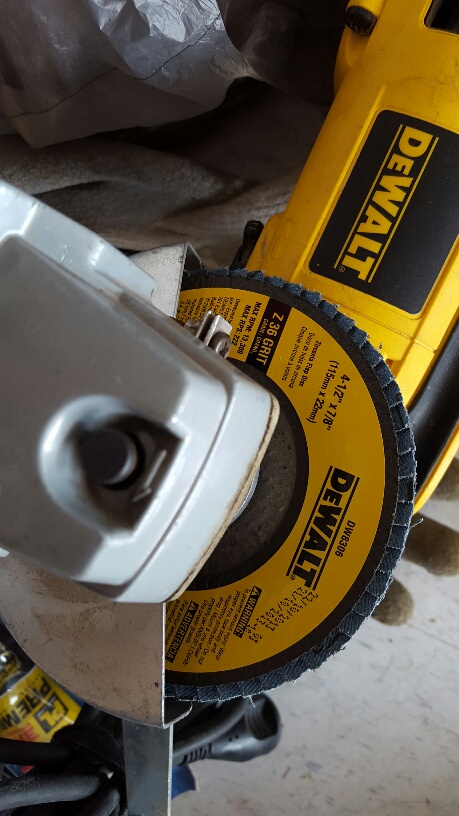 | ||
Brother_in_buells |
Nice and clean tools you have there! You aren't using them much do you? | ||
Upthemaiden |
Haha I'm still young, they've still got half of a century to get dirty. | ||
Phelan |
Did you take the rotor off? How did you manage the other side of the rotor? | ||
Upthemaiden |
I didn't even take the wheel off. Luckily the problem was only on the outside of the rotor. I put the bike up on the rear stand and slowly turned the wheel as I went. One of those jobs where it takes longer to collect the tools than it does to do the work. Still working great. Now all I need to do is get my front brake working better. Stupid DOT5 5/8" PM masters with no rebuild kits  | ||
Phelan |
Aftermarket MC? Stock was a PM caliper but Nissin master cylinder. | ||
Upthemaiden |
I'm definitely open to an aftermarket MC, or a used one off of another bike. It's a hassle looking on ebay because most people don't post good enough pictures or list in the description what size the piston is or what type of fluid it uses(not as concerned with the fluid, I know I can clean it out well with alcohol and just dump some DOT5 in). I've been wanting to get some new shorter brake levers, but I've only been waiting because I don't want to buy them, then get a new MC and have a brake lever that doesn't fit and have to buy another set. Tempted to just buy a newer Buell MC then I can still get a matching set of levers. Anyone ever switched from the 5/8 MC to a 1/2"? I know it'll result in a softer/longer pull on the brake lever, and more leverage on the brake. That wouldn't be a bad thing because I usually brake with 1-2 fingers, but I'd just be worried that it'd have too much movement and hit the handlebar before it reached the end of it's movement. | ||
Phelan |
I would be more inclined to disassemble, clean, and rebuild the caliper, change the front brake line, and run a radial master cylinder from a later model bike, like a GSXR, EBR, etc, with DOT4 fluid, which is less spongy and non-hydroscopic. The 3/4" Nissin on my 1190SX has excellent feel, even with the massive 8 piston caliper. 1 finger is all that's needed in my case. For your PM, the 11/16" Nissin radial MC on most late model GSXRs is a great fit for feel and leverage. (Message edited by phelan on August 18, 2017) | ||
Upthemaiden |
That's some good advice. Have you ever used that size radial master cylinder on a tuber? I remember reading that you have to switch the size when you go from normal to a radial cylinder, that the diameters aren't equivalent between the two different styles. I wonder if there's a way to get a stronger spring in my MC. I feel like that could resolve the slow return too. | ||
Phelan |
On my S2T, which was converted to 7/8" bars and controls, I put an 18mm Brembo radial MC from a Ducati 999 on it. I loved it. | ||
Phelan |
It's the bike pictured in my profile. You can see the MC in the picture. | ||
Upthemaiden |
Good to know. I found somewhere online where someone did a whole chart to convert axial MCs to radial, but the site it's on won't load on my work computer, and my phone doesn't have excel to open it, so I'll have to check it out at home. It sound like in general, if you're going from axial to radial you want to go up 1 or 2 sizes. I'll have to google and see what other bikes come with that size, I know it's the same as the GSXR MC you mentioned earlier, and it sounds like CBR1000's also use the same size. I clamped my lever to the bar over the weekend, I know people says that gives air bubbles a chance to rise up into the reservoir. It seemed to help a little. My brakes already stop me well enough, it's just the piston that returns a little slow, causing my brakes to drag for an extra second or two, and leaves my brake light on for that same time. |