| Author | Message | ||
Bikerrides |
Picked up a 95 S2 over the weekend with only a tick over 3000 miles! Price was $2k and I beat a line of folks to it; he was on the phone with a buyer when I pulled up in his driveway. Been sitting for several years; will start but not stay running. Don't have pix ready to post, but will do that soon enough. I will need your help debugging it, but I think I may have gotten a gem! More to come.  | ||
Phelan |
Pull the tank, petcock, and carb off and clean them, change fluids, add gas. Generally that will solve almost all sitting issues, at least in my experience. | ||
Davefl |
Congrats. I hope to be riding mine this weekend.  | ||
S2forever |
And I would do S2 specials 1. Upgrade trans sprocket 2. Upgrade primary chain tensioner 3. Shim correctly front brake rotor if it is original 9 pin design Welcome to the club! (Message edited by s2forever on April 30, 2014) | ||
Bikerrides |
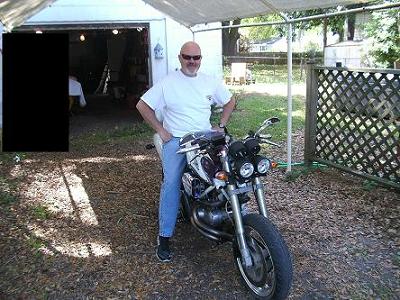  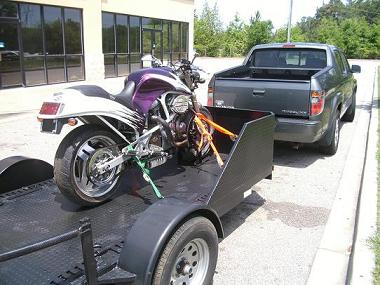 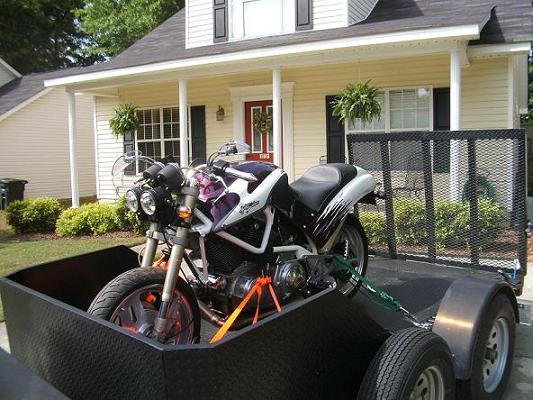 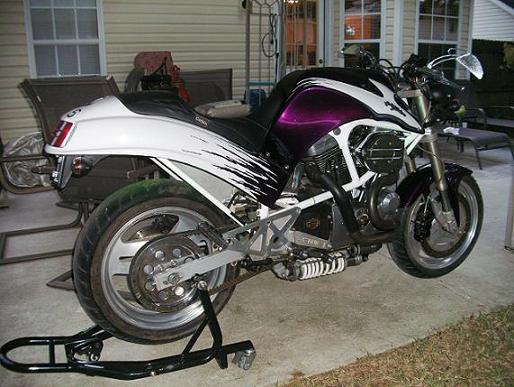 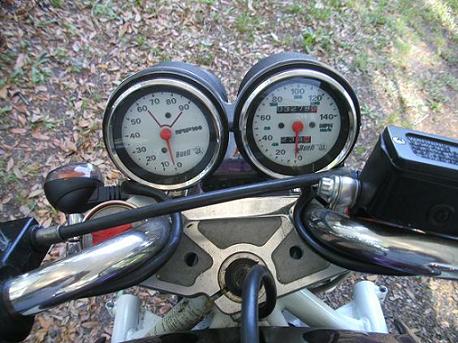 PO was making a cafe racer out of it, but thankfully, he still had all the matching bodywork i.e. fairing, windshield, fender, dash, etc. He didn't have the fasteners, so I'll need help with that from you guys. He also gave me another set of clip ons and a set of custom made billet triple trees that he had never put on the bike. I figure this bike must have been built as a show bike originally and this guy bought it in 1997 w/1500+ miles on it then basically never rode it. Can't wait to get it running and put back together! | ||
Hootowl |
All things considered, it looks fairly unmolested. Any sign of the original air box? Looks like you scored an original shock too. | ||
Bikerrides |
Hoot, Meant to ask about that when I picked it up. I just emailed him. I forgot to mention that I did get the original carbon fiber rear hugger. | ||
Phelan |
Most of the hardware is easy to get. Sutherlands is the best place I've found to get wellnuts for example. Larger selection than Lowes and just over half the cost usually. | ||
Blu1hockey |
I've started to buy some of my bolts from ace hardware. They have chrome bolts. And a pretty good selection. | ||
Bikerrides |
TJ, Thats good to know. The problem is that I have no idea what size is needed for each piece. Thats where I'll ned the most help. | ||
Blu1hockey |
Yeah I guess that helps. I have an x1 so I'm not much help there. | ||
Davefl |
Put up a list of the ones you need. I'm sure someone can help you out. | ||
Hootowl |
McMastercarr (sp?) is a good resource for fasteners. | ||
Bikerrides |
Gonna need all fasteners for front and rear (hugger) fenders, front fairing brace/bracket and fairing. Have no idea the sizes, washers, etc. | ||
Rex |
1. Upgrade trans sprocket what is the correct stock tooth number? 17, 19? 2. Upgrade primary chain tensioner Yep 3. Shim correctly front brake rotor if it is original 9 pin design My rattles, I assume, I need to do this? I will go out and check and see if it a 9 pin. gives the ducati dry clutch a run for its money | ||
Bikerrides |
Anyone know the part# for a carb rebuild kit for the stock CV carb? Thought it made sense to go ahead and do that while I've got it off to clean it. | ||
Leftcoastal |
rebuild kit for carb will be the same as the H-D Sportster for that and similar years. I think most of it is the same as Harley big twin carb, too. If that shock is working and not leaking, If it were mine I would NOT part with it for the recall unit. I had the same one on my RS (1991) which I think is the identical shock, and it WAS NOT recalled. Nice unit and worked better all around on my wife's S2T than the recall Showa piece that was put on at recall service. Others here may have varying opinions on that. | ||
S2forever |
Rex, s2 came with 29 T trans sprocket. My S2 rotor started pulsation at few thousands miles. This method worked miraculously for me. Here is summary: 1 . Adjust brake rotor play with proper thickness shims. 2. Remount the rotor 120 or 240 degrees rotated relative to rotor mount. 3. Ride the bike a few thousands miles. Here is long version: 98055A212 (0.2 mm) and 98055A213 (0.3 mm) from www.mcmaster.com: These are high quality metric shims that fit almost perfectly. Mark on iron rotor and aluminum rotor mount with pen to indicate where they were mounted. Simply pull out all 9 bolts, nuts and pins (I do not know proper name for these parts) that hold brake rotor on to aluminum rotor mount. Be sure sharp iron inner rotor edge does not scratch rotor mount when you dismount rotor. Once it touches it will create ugly scratch. You do not need to dismount rotor mount from the wheel. Rotate the rotor 120 or 240 degrees relative to rotor mount and remount with proper thickness shims (or you can even flip the rotor inside out, which I did not try). Tighten bolts with torque wrench at proper torque value. Still there MUST be some play even with proper thickness shims. If needed you can use more than one shim to get proper play. I ended up with one 0.3 mm shim per pin. Pulsation will get better with miles. In my case it completely disappeared after a few thousands miles. And it's been working perfectly for last 10+ k miles. If it does not work or if there still remains small pulsation, try another position of rotor relative to rotor mount. Grinding the rotor flat could be another solution, that I did not try. There may be some shops doing this kind of work. Disadvantage of this method is that it will make the rotor a little thinner (there is a minimum thickness for brake rotor for safety). Installing shims to adjust play is essential here too. | ||
Hootowl |
"Anyone know the part# for a carb rebuild kit for the stock CV carb?" There you go. http://americansportbike.com/newdir/Item/5037 Also, consider getting one of these as long as you've got the carb out. http://americansportbike.com/newdir/Item/5052 | ||
Hootowl |
"Others here may have varying opinions on that." Seems like I read (post by Court or 1313 or someone like that with direct knowledge) that the original S2 shocks were recalled because they were under sprung for two-up riding, and not because of some mechanical deficiency. So ride solo, or pick up a stronger spring. Springs are cheap. | ||
Essmjay |
That is a great score and fantastic you can take it back to stock. | ||
Bikerrides |
HD wanted $45 for the rebuild kit, so I've ordered one from American Sport Bike along w/the intake and carb-breather seals, as well as the special tool for the same amount plus about $10 shipping. When the parts guy told me the price, I told him I could get it for $15 online, so I'd take a pass this time. I'm really anxious to get this buellty running and back to looking like an S2 is supposed to! Gonna be fun! | ||
Hootowl |
"along w/the intake and carb-breather seals" The intake seals come with the rebuild kit that Al sells. You may want to call him and adjust your order. Or keep them for another bike I guess. | ||
Bikerrides |
Thanks for the heads up, Hoot! Order adjusted | ||
Bikerrides |
Well, I removed the bug eyes yesterday with the hopes of installing the fairing mount/fairing and discovered that the PO clipped all the wiring connectors behind the fairing off and used crimp connectors in their place...ugggh! What connectors and how many are actually behind the fairing? This could be a real nightmare to figure out and correct. Would it be easier and/or quicker to buy a full harness off ebay or get one here and go from there? | ||
Ratbuell |
I got one off ebay not long ago...they're out there. I wanna say it was something stupid like $45. Couldn't not-buy it at that price! If you want, I can pull it out and map it for you...but it comes down to whether you want to put time (build your own) or money (buy a new one) into the bike, and what your end result is going to be - rider? Or restoration? | ||
Bikerrides |
Joe, It'll probably be a little of both time and money. Since the bike has custom paint and is pretty chromed out, this will be more of a rider than a restoration. A map of it would be great! Any chance you can included pics? Wondering if it would be more time consuming to replace the harness altogether or rewire the connectors. Is your harness for sale? | ||
Phelan |
Dunno that I'd put them on an S2, but I really like those bug eyes. I think they look better than most. | ||
Bikerrides |
Ross, Gonna probably have to keep them until I get the bike up and running so it'll be street legal. At that point, I'm going to want to put the fairing/dash/etc back on, which will require removing the PO's wire crimps on all the fairing/dash electricals at the front of the wiring harness. Not looking forward to figuring that out on my own or paying to have it done.  If you know anybody that might want the lights, they'd be for sale at that point along with several other tidbits that I'll be removing as well. Maybe I can trade them for stuff that I need. | ||
Bikerrides |
As I've worked to get this thing streetable, I have discovered that the brake lights, front and rear, dim when the brake is applied. When either brake is not applied, the brake light is on. What is the most likely reason? I know on my S3, the front switch at the lever is counter-intuitive as it turns the brake light off when depressed and on when released, which is opposite of what the lever is doing. Pretty sure the S2 uses a different switch. Could it be that they're just wired backwards? Help! |