| Author | Message | ||
Alaskabuell |
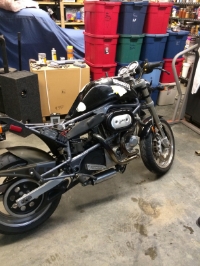
This is my first post to this site so here i go. I just pickup a 1996 Buell s1 lightning for 400 bucks guy wanted it gone and it had not ran for a couple months. After i brought it home I tried to start it but the starter was clicking. Right after i took the primary cover off and took the starter apart,the starter brushes where fine but the solenoid had some indention's on the contacts. Sanded the contacts and then put it together. Tried to start it still a click so I went to the grounds all were good.... replaced the battery and battery cables. After it started right up but wont run with out choke. post pics later (Message edited by Alaskabuell on January 24, 2014) | ||
Dannybuell |
the intake seals (O-rings) are found where the manifold and head meet. normal maintenance, reseal with two new O-rings and replace the rubber gasket between carb and intake. as long as the carb is off ... | ||
Alaskabuell |
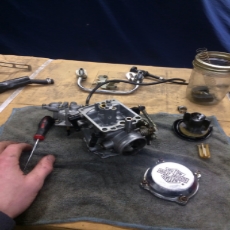
OK will do! I'm in the process of rebuilding the carb now just waiting on parts. Vacuum slide was all burnt up and the carb was all burned up on the inside deffidently had a hugh back fire. (Message edited by alaskabuell on January 24, 2014) | ||
Alaskabuell |
 | ||
Alaskabuell |
carb is torn apart, let the project start  | ||
Alaskabuell |
Shout out to fellow bad weather bikers what are something's to look out for? | ||
Dannybuell |
using a popsicle stick clean and polish the piston rails in the body with a very light polishing compound. If the piston is metal, do the same. Polished surfaces make the piston slide faster! There is a soft plug that covers the idle mixture screw from the factory. Is your mixture bowl screw visible? What size are the primary and main jet sizes? On a stock bike, the heads vent into the intake through the air cleaner. The vapors from the heads should be directed to a catch can. The carb will stay cleaner and the bike will run better. All things rubber need servicing. The bike has three rubber frame to engine isolators. One just behind the steering head and the other two in the back on each side by the foot pegs. These big pieces are known to tear, bike control becomes more than difficult when this happens. | ||
Jayvee |
I replaced the allen screw that holds the cables guide to the top-right side of the carb body with a hex head. Makes it much easier to deal with. Pretty sure I used a grade-8 stainless one, cute little tiny bolt, don't remember the size. | ||
Jolly |
CONGRATS ON THE BIKE! there is a standard list of things to watch for on these bikes, first cup of coffee this morning so let me see if I can rettle the list off: 1) front rotor uses 6 buttons to attach to carrier, these are weak and the rotor should be upgraded to either the 9 button carrier found on later years or an aftermarket wave rotor or similar with a better set up 2) exhaust mount is an "L" shaped piece of steel and should be upgraded to the "Y" shaped design that is a much better set up. improper exhaust installation leads to a lot of stress at the heads and will either break exhaust studs or the exhaust itself.. update soon! American Sport Bike sells them 3) front motor mount is a "v" style that sets up a vibration in the longer arm, upgrade to a CNC machined mount with grade 9 bolts from American Sport Bike, if this fails you will break a stud off in the head, you hve to extract the bolt then possibly repair the threads... I recently repaired stripped threads on my motor using a time-sert...outstanding product! did not have to pull the head to do the work! 4)upgrade the primary drive tension foot immediately! the stock ones are far too light weight and when they break...it goes poorly quickly..that hunk of metal gets trapped between the drive chain and the sprockets and it is expensive.... personal experience on that one! 5) the oil pump drive gear is made from too light weight of material and WILL fail...you can only guess the damage that does...obvious right? American Sport Bike sells a hardened drive gear... 6) upgrade the rocker box covers to XB style, the are one piece instead of 2 piece so there is one less place to leak and they change the way the motor breaths...much better design! you will also need a catch can... 7) the stock rocker box gaskets were paper...WTF right? change them out when you do the rocker box conversion..when you do the oil pump drive gear... 8) the push rod tube assemblies are really kind of a weak design...as long as you are doing the oil pump drive gear, and the XB rocker box conversion, and the rocker box gasket...from personal experience I recommend the collapsible push rod tub assemblies with billet bases sold by zippers performance...they have a much better design for mating against all surfaces with o rings and gaskets... http://www.badweatherbikers.com/buell/messages/47623/714295.html?1371451238 9) final drive belt needs to be "scary loose" or it wreaks havoc on the transmission and output shaft bearings and seals.... 10) check isolators,, replace as necessary special tools required: 1) primary locking tool American Sport Bike or other source (to remove clutch basket nut) 2) pinion shaft locking tool to change out oil pump drive gear) 3) 28mm socket (main rotor nut) 4) 30mm socket to remove clutch basket nut 5) rocker box wrench (to tighten right rear rocker box cover bolt that is under frame) amazon 6) push rod tool if youre installing collapsible push rod tube assemblies..you "can" do it with a screw driver if you are VERY careful 7) torque wrench one for medium range and one for 200 ft lbs 8) time sert 5/16 x 1inch with 1 inch stainless steele inserts if you or previous owner screwed up the threads on the motor mount bolt mount point (my solution only, the other method is to pull the head, weld it, re-drill and tap..the time-serts are stainless steel machined inserts) 9) bolt extractor from American Sport Bike to remove motor mount bolt in the event that you do have one sheared off...I've never done it but lots have and there is experience here you should reach out to if you have to do the job. don't use an easy out, it will break and then the job is that much harder... all of this can be done with most basic tools and a torque wrench and patience...and a manual....AND help from here! reach out to JeffC if you want a frame brace, he recently had a bunch made and I think he might have had one extra one made, http://www.badweatherbikers.com/buell/messages/476 23/727391.html?1389140262 if you are looking for a cool drive arm support/pulley guard, shoot me a note, I just had one designed and I am having about 10 made right now, if you want one, jump on the list.... most importantly...fix the stuff that is a safety issue, then just ride it and enjoy it, learn the bike, connect with it...then make it yours! I also ride moto guzzis and a great quote about guzzis..."whats the best thing a guy can do with this bike...put the tools down and go ride it!" I've learned all of this from the experts here, this is a fantastic forum with dedicated true riders and wrench benders who love to help. (Message edited by Jolly on January 26, 2014) | ||
Woodnbow |
Smoking deal you got there! If you did everything on Jolly's list you'd still have the most bang for your buck on two wheels! The two items I did first (no choice) where the front motor mount from American Sport Bike and the oil pump drive gear. Both stock parts failed at 25,000 miles give or take. Then I just rode... :-) | ||
Alaskabuell |
well I rode the bike for the first time was a hoot lots of crazy power..... only problem now is around 3 grand i have hiccup that happens when you flick the throttle a little but if you roll it on slowly it doesn't happen. any ideas? |