| Author | Message | ||
Tootal |
So my Uly seems to be the reliable one now-a-days. The Harley has been plagued with intake leaks ever since I had my heads ported and shaved. First off, these are not my original heads. I gave my heads to an engine builder who shipped my heads and another customer heads off to be ported etc. Both heads were getting identical treatment so when the other guys heads came back first they were given to me since he was not in any hurry and I was getting ready for a trip. Ever since then I can't get the damn thing to seal, or if I do it doesn't last long. So I'm putting this out there since our Buell and Harley heads are close cousins and anybody constantly fighting intake leaks might want to check this out if they can't find a cure. I have tried every type of seal out there and also two CV carbs and a Mikuni! In desperation I pulled both heads and cleaned the head gasket surface and put them on glass and measured down through the stud holes. The front head was flat and the intake surface was 90 degrees to that surface. The rear head was out .0025" and was not square with the intake surface. I skim cut the rear head gasket surface and got it to .0008", the same as the front. The intake surface was still not square though. I made up some dowels that fit snugly in the heads and placed the head gasket surfaces together sharing the dowels. So here's the new toy for this job: 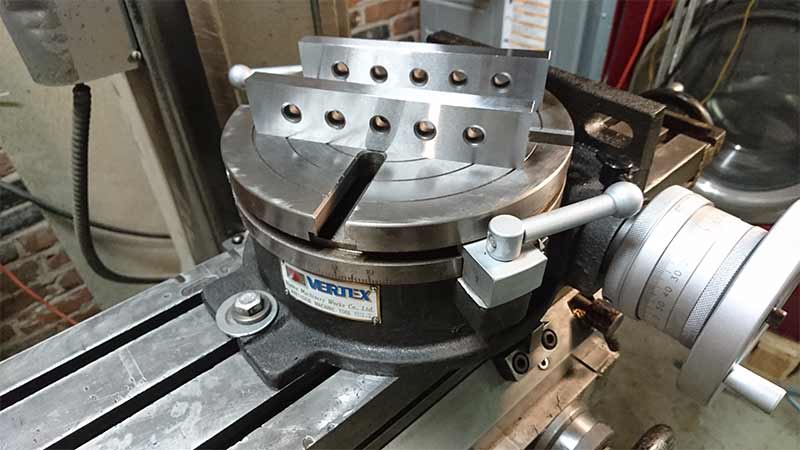 So I set the head bundle up on the rotary table like this: 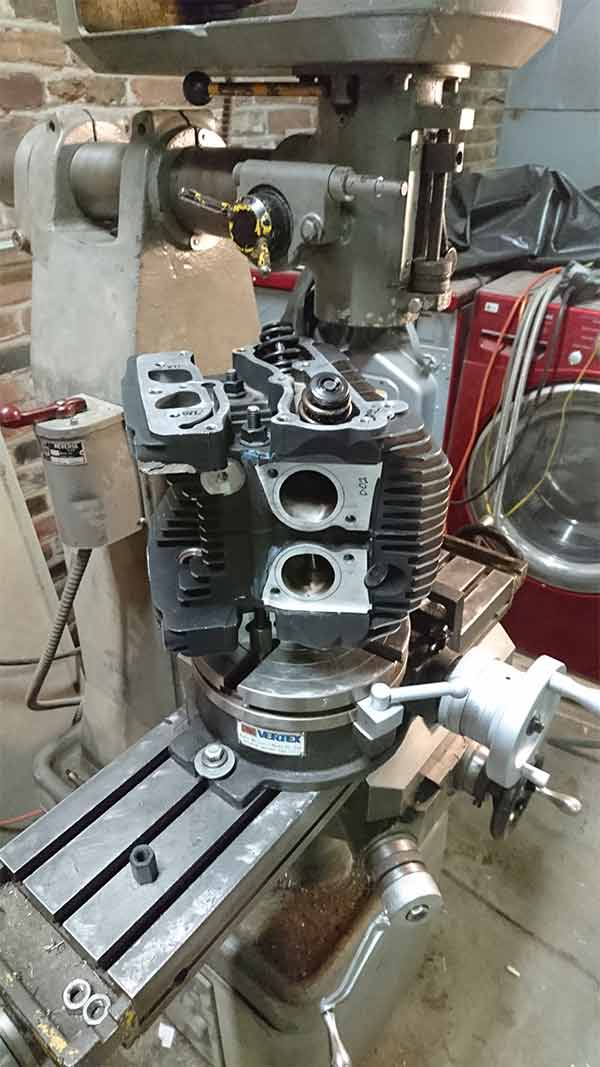 I then rotated it 90 degrees using the rotary table like an angle plate. There are two dowel pin holes on the rocker side that are 90 degree from the ones on the head gasket side. I put pins in these holes and a parallel across them and indicated to zero across the parallel: 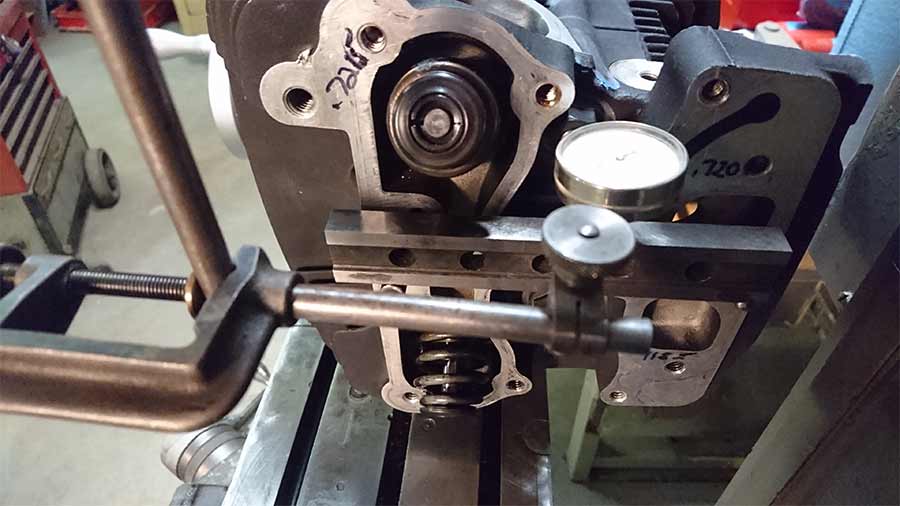 I set this as zero and rotated 20 degrees to bring the intake surfaces up to level: 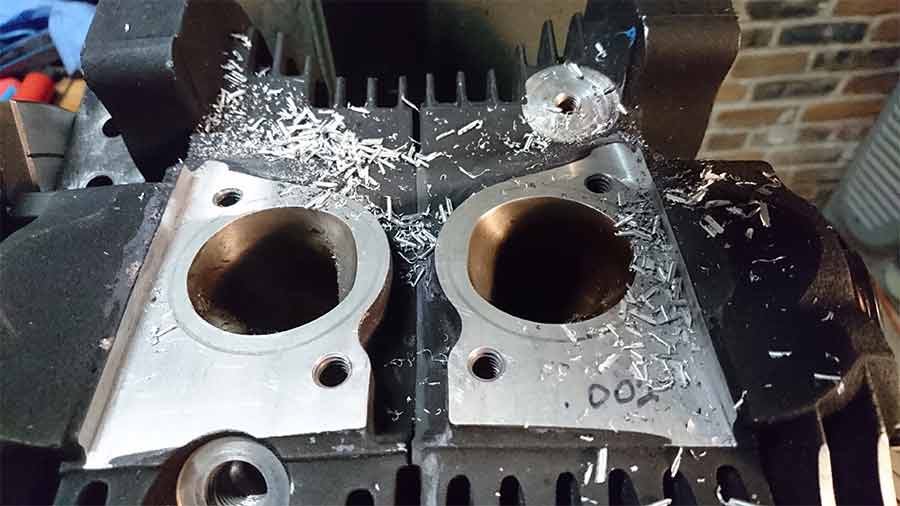 I put a level across these surfaces and they are not in the same plane and they are not level. The front head was 1 degree 5 minutes off. The milling you see was just to remove some material the factory leaves there that I didn't want to remove with a fly cutter. This odd measurement made me wonder so I took a spare, unmolested, front head and set it up on the rotary table and found the same thing. The indicated intake surface is at 18 degrees 56 minutes. So I guess I'll reset the offending heads back up and take a skim cut at this dimension. I just find it odd not to just use an even number. I would like to know the factory spec. for this and what the tolerance is. This is why I posted, in case anybody else out there might be fighting the same issues. Also in case anybody has seen this and can tell me any more information. Maybe somebody like Zack! | ||
Pwnzor |
I can't help but wonder if you've tried Super Glue at some point in this process... | ||
Tootal |
  | ||
Greg_e |
Hylomar probably would have filled it. But the cutting should get the job done the right way. I'd still smear some Hylomar on the seals for good measure. | ||
Tootal |
Hey Greg! I did try hylomar, Dow Corning 111 and WD40 but nothing helped. My tube of hylomar is pretty old, might get a fresh tube and try it again. Hopefully with the angles being the same it will work properly. | ||
Two_seasons |
Once again I am amazed at the expertise on this board. Thanks for the pics and comments to help a noob like me understand what you were doing.  | ||
Greg_e |
The old Racing Purple stuff apparently doesn't work as well as the correct stuff. Permatex had this but changed the formula and the owners of the Hylomar recipe pulled it. A new place is supposedly making it the correct way here in the USA, or you need to order from the UK. I have both types of the correct stuff but haven't open them yet to compare to the Permatex stuff. I think I got it on ebay from a place saying they were the official dealer, was cheaper than the Amazon price from the same place. I think it is an ORM-D substance so can't be shipped by air and requiring it be made here. | ||
Tootal |
Thanks for the info. We used some hylomar we bought at the track on a friends race car and it solidified quite a bit but didn't get hard. It worked well in our application. The old stuff I have never hardens at all, it just stays gooey. Wonder which is the better one? | ||
Tootal |
Hey Two seasons! Your profile picture shows you wearing an I.A.M. t-shirt. I wouldn't call yourself a noob! Thanks for the comment brother. | ||
Zac4mac |
Hey Greg & Steve - y'all are in deeper than I have been. I know HD's casting and machining process' are sloppy, that's why I can use a bubble level... Thanks for this, Greg. I'll study it.  On an aside, I have a 30+ year old tube of Permatex. Got it for the head gaskets on a Vega that needed replacement every 100.1 miles. It's still gooey. Z | ||
Two_seasons |
Tootal, me no machinist, just part of IAM. Someday I'd like to visit with you and your toys if that would be OK. Zac, I've got to catch up with you too. | ||
Tootal |
That would be great! I hope you like beer, my toys are at a brewery!  | ||
Greg_e |
I have the permatex stuff through my Buell and it's working, but I know it has hardened a bit more than it should. Was expecting I might need it on my Harley and my race bike so I ordered the new stuff. | ||
Two_seasons |
Do I like beer, you betcha  Have you ever had Sprecher "Czar Brew"? Excellent  Would be my pleasure to quaff a couple with you! Edit: I just looked how far from me you reside. As "my boys" are currently in recovery from my 4,318 mile trip (six days on the road, 11 days total, I am going to pass until I have some more acupuncture and spine de-compression. Maybe I need new isolators  By the way, I can now say the S2T has ridden the Bear Tooth Highway! Terrifying and exhilarating at the same time By the way, I can now say the S2T has ridden the Bear Tooth Highway! Terrifying and exhilarating at the same time  Edit2: Also rode the Chief Joseph Highway. Awesome! (Message edited by two_seasons on July 24, 2017) (Message edited by two_seasons on July 24, 2017) | ||
Sagehawk |
Tootal: when you rotated rotary table up and aligned to rocker box dowels , did you shim under rotary table, or did you rotate the mill head? Is rotary table marked that fine to see parts of degrees. How did you determine the amount of degrees the faces were out? Measuring the head originally, did you use a depth micrometer thru stud holes to glass beneath for differences taking four readings? Inquiring minds n all! Lastly, what gap between heads and manifold did you have after machining process? Glad too see retirement is serving you well! | ||
Sagehawk |
I looked at big picture and saw you actually rotated the head to get zero using rotary table. DUH! I can be slow sometimes. Orientation can be everything sometimes. | ||
Tootal |
Two Seasons, I've had some Sprecher beers but not that one. Sounds worthy! Sagehawk, The crank has a degree wheel on it and it's 4 degrees per revolution and it's marked in degrees and minutes. Each line is one minute and at the top you can see the vernier for seconds. 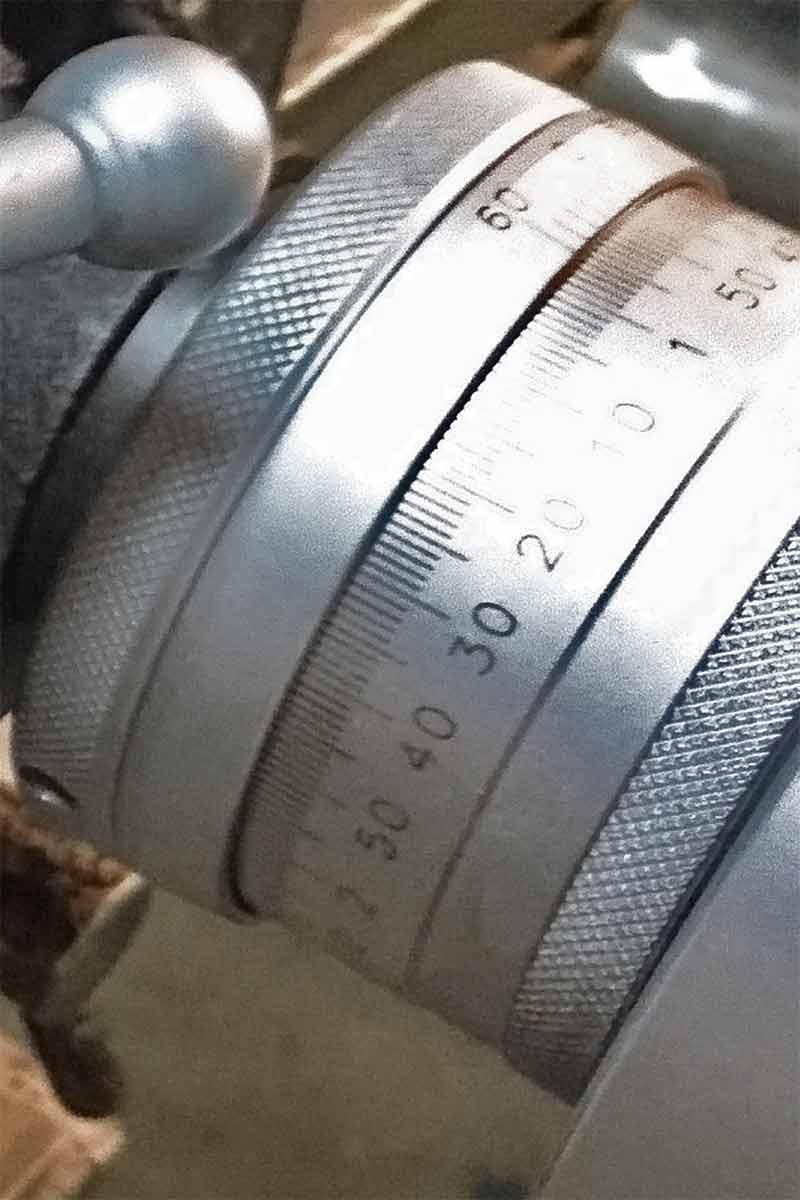 | ||
Zac4mac |
I have one, similar, on my knee-mill. I've been thinking of things to do with this stuff and there's just no time. I have used the rotary table to drill out exhaust studs. Indexing takes a while but then it goes real quick. I was thinking how I could do squish-bands without the Haas 4-axis CNC but decided the price was right with the Haas. I enjoy my retirement "hobby". Z | ||
Tootal |
OK, now you're just a bragging bitch!!  That's one nice machine, I guess you do enjoy it! The last CNC I ran I had to feed a tape full of holes into it!  | ||
Etennuly |
Sheesch! Such mechanical machinery overkill! I could have done the same thing with a three pound hammer, some sand paper, and a quart if resin! I see retirement has you practicing your Rube Goldberg methods! Good job!  | ||
Tootal |
So are you saying I should have tried the superglue?  | ||
Natexlh1000 |
If you machine it very perfectly, you don't need gaskets or sealant  | ||
Etennuly |
Not necessarily! Super glue is not so conducive to tolerate heat and vibration. High quality resins will do a better job. Heck doing it my way it could have been done in the bike in half an hour!   | ||
Tootal |
Heck doing it my way it could have been done in the bike in half an hour! And been 30 lbs heavier! | ||
Tootal |
So I made it back to the shop yesterday and set everything up and rotated to the obscure dimension of 18 degrees 56 minutes and put a level on both intake surfaces: 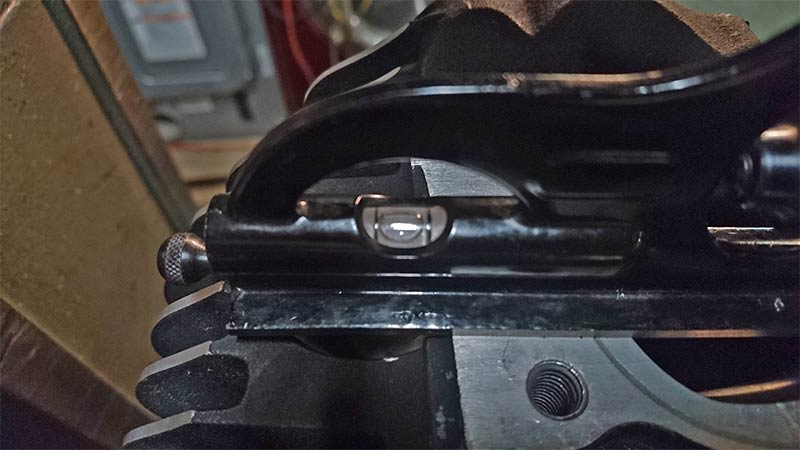 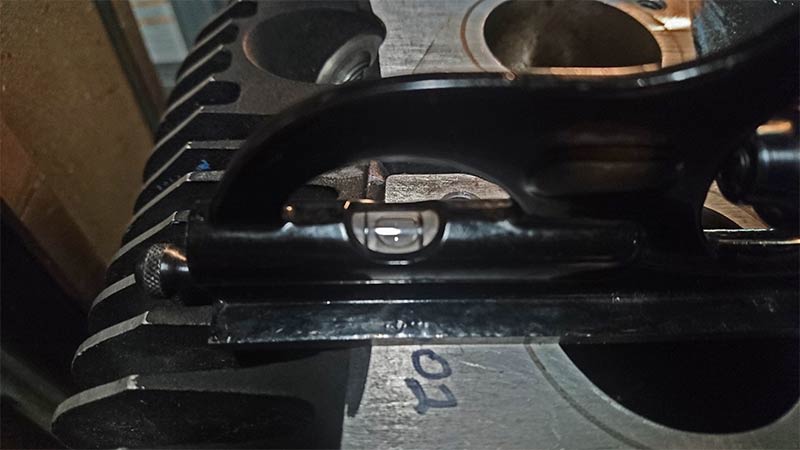 As you can see they are off in opposite directions. So it seems my spare head is between these two. I took some blue dykem and painted the surfaces to see where the high spots are.  Then I took a .005" cut and you can see the high spot. 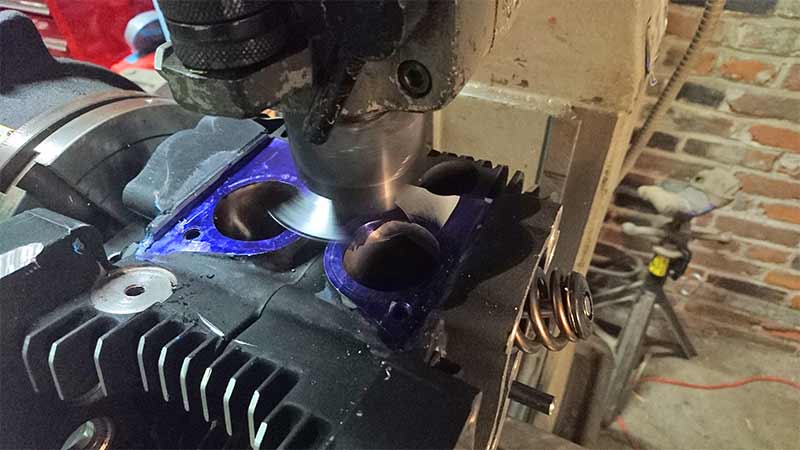 You can see better here:  I ended up taking .025" off to clean it all up. You can see a circle around the intake. That's an experiment I did a long time ago where I made a tool to cut a groove there so the seals would squish into it and hopefully seal better. All it did was tear the seal. Goes to show how much movement these intakes have during heat cycles. I filled them in with aluminum Devcon, a professional version of JB Weld. In this pic you can see how the ring has been cut away on opposite sides proving again how far off they were to each other. 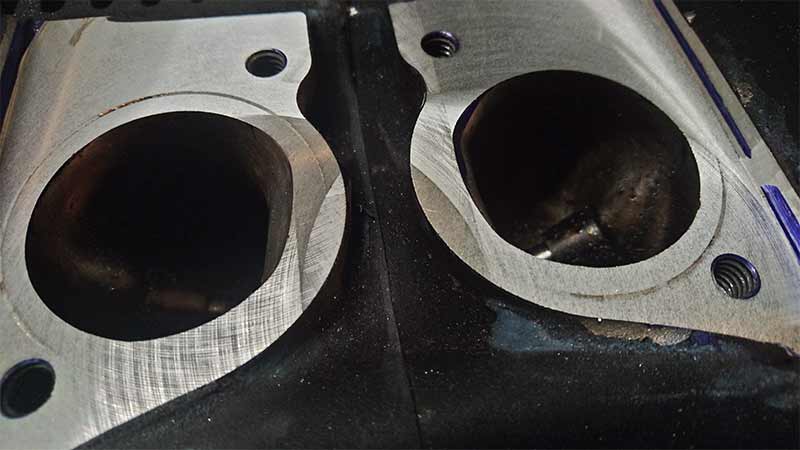 I rotated the table back to 0 degrees and indicated my parallel for height and also to make sure I was square with the table. I changed tooling and took a skim cut on the air cleaner mounts. The left side was sticking out further than the right but now by a lot. 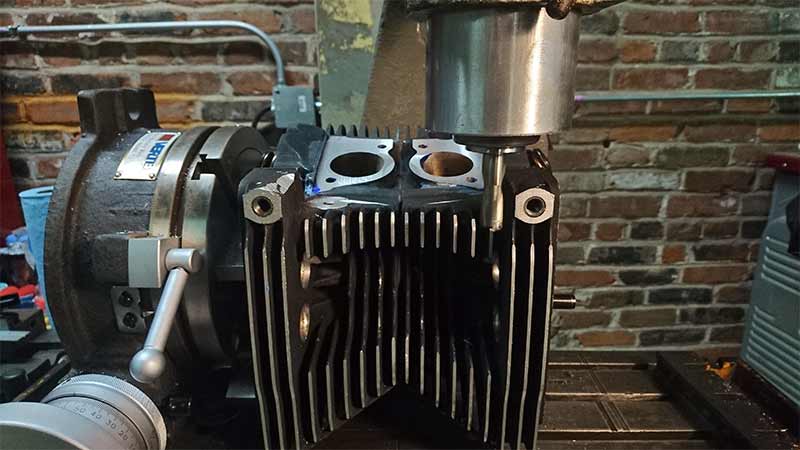 So both heads are identical except for the rear having .003" more squish. Not enough to worry about. My head gaskets are .040" instead of .036" that I had. Now I get to put it together and see if I just wasted a whole lot of time! If it doesn't work I'm calling Vern! | ||
Tootal |
Edit: I just looked how far from me you reside. As "my boys" are currently in recovery from my 4,318 mile trip (six days on the road, 11 days total, I am going to pass until I have some more acupuncture and spine de-compression. Maybe I need new isolators By the way, I can now say the S2T has ridden the Bear Tooth Highway! Terrifying and exhilarating at the same time Edit2: Also rode the Chief Joseph Highway. Awesome! That is an awesome ride isn't it! I went to a Rider magazine rally in Cody Wyoming and ended up taking that ride with Clement Salvadori. That man can not only write but he can ride! | ||
Greg_e |
Looks like very fine cuts with a fly cutter. Would it be of benefit to polish that with a scotchbright or leave it with the very fine texture from the cutter? How much more can be removed before the intake is too short? Before you seal it up, might want to dimple the ports and clean up any flaws. Really before you put them in the parts cleaner. | ||
Tootal |
Yes, they still need deburred. The surface is very smooth. I fed it real slow. You can't feel anything with your fingernail. A lot of those marks are just rub marks from the back side of the flycutter. The intake was too long already plus I'm going to use the James seals that have the lip on them. Should be about perfect for them. | ||
Etennuly |
It is amazing how far off the factory fit can be and still be in spec. Probably why I still prefer do my own alignments on my shop floor. Greg, you sir are a true professional!  | ||
Phelan |
I was about to mention about the James seals. I don't use them much in OEM situations, but I put late model XL/XB heads on bikes with earlier, narrower manifolds a bit and I've had good success using the James intake seals to bridge the extra gap. |