| Author | Message | ||
Torquehd |
Thanks Sifo. I hadn't thought about the line made by multiple colors. I've never cast epoxy but I have a few projects in mind for the future that would probably be suited for epoxy casting. I was considering foregoing a conventional taillight and casting all of the LED's directly into a small "bar" or half-tube that would light up instead... And you're not kidding, although I'm a total amateur, almost everything that I've done on the project was learned by spending countless hours watching Youtube vids and surfing forums. | ||
Sifo |
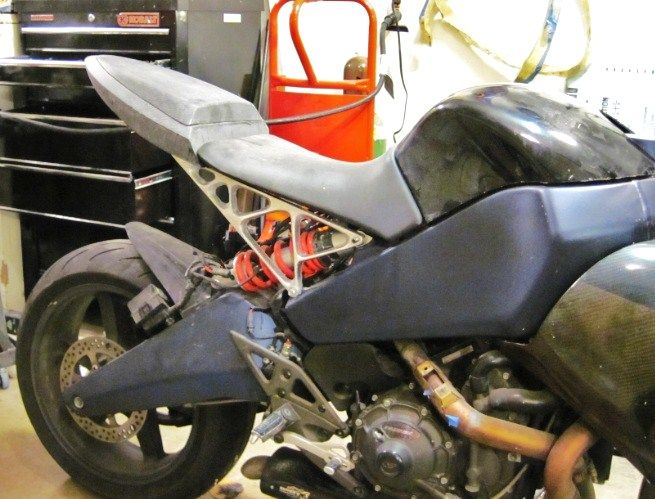
For really nice show quality work, the clear coat is built up enough to sand it smooth over the tape lines, vinyl pin strips, etc. the buffed/polished to a perfectly flat finish with no orange peel to the finish. It's a lot of work, but gives great results. It's typical to sand through the clear many times when learning to do this though. Most people will find the softened edge to be more than good enough. It's a high quality "show room" finish. I almost tried the route you describe for the LED lights when I built my tail light. I was afraid of screwing up and destroying all of my LED work though. Given that this was my first try at casting anything, it may have been a good choice to do a separate lens. Since then, I keep thinking that I could build a one piece LED light/lens to just about any shape. I keep looking at the tail of my XB and dreaming. I just don't feel like spending the money to customize a bike with that many miles on it and it still looks good enough that I don't feel the need to freshen it up. Someday maybe. Right now I'm getting drawn in a totally different direction. That's shaping up into a cool subframe! | ||
Torquehd |
I think, laying epoxy resin over the face of the LED, would change the viewing angle of the LED, but I'm not sure how that works. I haven't been willing to give up any LEDs to try yet. I should try it, since they're so dang cheap. I just can't seem to come up with a good way to execute my idea. I think ideally, the taillight would look like the lightbar in Robocop's visor and would emit perfectly equal intensity all the way across. You know I used to have an XB9S, I loved that bike so much. I hate that I sold it. I keep telling myself i'll find a good deal on an XBS model one of these days. I still love the lightnings so much. You're spot on, they are amazing looking motorcycles right from the factory, and the ergonomics are so good. | ||
Hootowl |
Regarding the voltage you see at the LED... Voltage = current X resistance. It can be said that a resistor, or any device in the current path "develops", or "drops" voltage (depending on your perspective) in the circuit. Between the resistor and the LED, the two components are developing or dropping 12V (or whatever your battery supplies). The component with the greatest resistance will drop or develop the greatest amount of voltage. If the resistance of the two components differ greatly (a few Ohms vs. several KOhms, the larger component will appear to drop all the voltage. Here's an online calculator for finding the best resistor value for your application. http://www.hebeiltd.com.cn/?p=zz.led.resistor.calc ulator | ||
Hughlysses |
 Wow! Very cool! | ||
Torquehd |
| ||
Ducbsa |
Is there a minimum quantity of casting sand that you have to buy? I am in awe of your skills. | ||
Torquehd |
Casting sand is called greensand and is easy to make, it just requires some tinkering to get the ratios dialed in. Its easy to figure out as long as you're using the right clay - it has to be bentonite. I'm using water bonded greensand but would like to make oil bonded, some day. I just used regular sand from home depot. Someday I plan on getting finer sand so the mold surface quality will turn out better. Im thinking some fine grain sand blasting media. I would also get better results if I had a machine mixer and took the time to run it all through a screen to keep it from clumping up. (Message edited by torquehd on January 28, 2014) | ||
Sifo |
So was that the lost wax method you were talking about earlier? Earlier you said "i was nervous about getting trapped sand grains in the aluminum, so i took a lot of time blowing all the loose sand out of the pattern cavity before I put the flasks together." That doesn't sound like what I understand to be the lost wax method, but what do I know? | ||
Torquehd |
Its not lost wax. I used the plywood patterns. I took a little video of putting the pattern in the flasks, I'll see if I got enough to show that part of the process. Despite my best efforts, I still got a grain or two of sand in the aluminum. I think oil bonded sand would mitigate that. I'll probably dig the sand grain out and build up the cavity with weld before powder coating. | ||
Sifo |
Ahhh, that's what I thought. I guess I know a little bit. About enough to be dangerous I think. | ||
Fast1075 |
Lost wax will produce a part as finely finished as the mold the wax was cast in. A close friend helped Mach Performance set up a propeller production shop near my home. To demonstrate how well the cast part matched the pattern, he touched the wax blade of a prop form before dipping. The cast prop came out with his fingerprint on it. Which brings up another point. When casting metal, remember the fumes can be long term toxic, from the metals, and from the binders. Wear ATGATT. | ||
Bads1 |
Jessee, Is there any porosity in area's that may make the part weak?? I was a aluminium/Zinc Die castor for several years. Quite a bit different then what you have done. | ||
Torquehd |
Bads- the porosity, I think, wasn't caused by improper degassing after all. I think it's just the porous texture left by the sand that I'm seeing. if I can find a big enough kiln, I intend to heat treat it. Heat treating is one of those things that is difficult to find open source information on. I believe I'd need to hold it at 1,000 f for 6 hours followed by a cold quench at room temp. Any experience with this? I believe hardened alum has almost twice the strength of non treated. The frame isn't complete yet, it still needs some crossbar supports, but it flexes more than I anticipated, when I bounce my weight on the passenger portion. So to answer your question, it could use a little more strength for riding 2 up but I don't think its due to porosity. If I can't heat treat it, I could add a whole pound of extruded flatstock and still be a pound lighter than stock. I was also surprised by the amount of deflection that was translated into torsion. Load applied straight down on the passenger area causes the longest chord of the truss(right side, front top chord) to twist a little. That can be mitigated by a simple crossbar. Having observed it, I understand now how it would translate into torsion. As for lost wax, the surface can only be as smooth as the material encasing the mold. So finer sand would mean a finer aluminum surface. | ||
Bads1 |
It depended on the parts whether they were heat treated or not. But all parts were Xrayed for porosity every hour. That's something you can't do I realize. Look for dark grey area's. Those are areas that your mold could of been colder then other areas. If you have that its a sign of weakness. If you have pockets like air bubbles sometimes some weld and grind down with a angle grinder can fix that up. Heat treating you should be able to send them out somewhere. We did in house. And you are right it will make it stronger for sure | ||
Hootowl |
An electric oven will get that hot during the self clean cycle, but it doesn't last 6 hours. You could probably find a used one and rig it to stay at whatever temperature you want for as long as you want. | ||
Hootowl |
You'll be surprised (or maybe you won't) how much stiffer it will be when you add the cross bracing. | ||
Reepicheep |
Seems like with 3d printing, and lost foam or lost wax, like we shouldn't be very far from some pretty freaking awesome garage fabrication possibilities. (Or at least local "fabrication centers" where you could email a design to a shop up the street at 8 am, and pick up your part on your way home). | ||
Torquehd |
When popsicle sticks don't cut the mustard, I resort to CAD - Cardboard Aided Design. Then fiberglass, bondo, and the molding process can start over again.    BadS1, do you remember much about heat treating aluminum? 1000F sounds dangerously close to the temp where Al gets brittle and starts crumbling into liquid, the way it does. I wish I had your experience, it would be helpful. Here's the video of prepping the subframe for casting. I tried to condense it so it covers a lot of ground in little time. (Message edited by torquehd on January 29, 2014) | ||
Rocket_in_uk |
How will you determine the strength of the casting for its required job? Would it not be better / stronger / safer to carve it from a billet either by hand or CNC? Rocket in England | ||
Ducbsa |
When you were mixing the sand and spraying it, was the bentonite already in the mix? The way the sand doesn't just collapse when you take the top flask off is what I don't understand. Great work!! | ||
Torquehd |
Determining structural requirements is subject matter for engineers - I just made the thing how I thought it should be, and now I will continue to develop it by creating the greatest bending moment I can by bouncing my weight on the back and reinforcing with flatstock until no deflection is observable. Sure, you can CNC it if you have the money and resources. Or you can cast your own aluminum for very cheap once you've built a comparitively inexpensive foundry. All of the things I do would be "better" done by computers and machines. But I guess the reason I enjoy making things by hand is because I don't have or need multi thousand dollar machines. Fast, Good, Cheap - pick any two. You can build good things for cheap, if you're willing to invest the time. Ducbusa, yeah greensand is about 10 or 12% bentonite. It comes in powder form, so it's not really visible once its mixed into the sand. The moisture content is critical and is controlled by adding water with a spray bottle. | ||
Ducbsa |
What do you melt down? I have been told that in England after WW2 that aluminum castings were cheap from all the crashed airplanes they had to melt down. | ||
Brother_in_buells |
Torque ,i like the way this project is going  And about the casting ,the original aluminum buell (xb)casted parts (tail ,side rails ,front fairings) are also having a lot of air bubbles in them ,so i think the work you did isnt that bad either! So keep it up with your project! | ||
Torquehd |
Thanks Brother. My second Buell, an XB9SX, had porosity in the engine case bad enough that it leaked oil after the initial startup and testride. I worked at the dealership as a tech at the time, but they didn't want me to work on the bike I was buying from them, so another tech got to replace the entire motor when the bike only had 11 miles on it. I have some old Ford wheels that I've been using, and I also throw extruded scrap in if I don't have enough wheel chunks already cut up and ready. Ha, I like the story about the planes - as long as they were Axis planes. Historically, metal has been very expensive in Afghanistan, because the country has had virtually no industry. Now that we are leaving, we are scrapping thousands of tons of steel and aluminum and selling it to them for pennies on the dollar. Its a shame that good American metal is going to them, and for so cheap. Whoever decided to scrap US equipment there instead of bringing it back Home should be put on trial and imprisoned. For goodness sake, when a working dog dies in Afghanistan, we ship the body home and bury them with honors. | ||
Bads1 |
Jessee, Our Alloy had a melting degree at 1200 degrees at the machine furnace. The remelt furnace was 1500 because it had to Supply 27 machine furnaces. As far heat treat... I didn't work in that area but I can tell you depending on the part size thickness and what it was used for the degrees it was heated to and how long all played roll. Best thing for you to do is find a plant that does treating in your area ask if they could look at the part and give advice. Maybe get lucking and they'd throw this in with something that needs to be treated of theres. | ||
Ducbsa |
Have you considered car junkyard aluminum heads? The seats, helicoils, etc. would have to be removed, but if the price was right... | ||
Rocket_in_uk |
I just made the thing how I thought it should be, and now I will continue to develop it by creating the greatest bending moment I can by bouncing my weight on the back and reinforcing with flatstock until no deflection is observable. Yes love it, lol. That's the way for your style. No doubt about it. And one that will no doubt garner you the very best of results, and very satisfying too I'm sure. But please don't miss my point. Sure, you can CNC it if you have the money and resources. Or you can cast your own aluminum for very cheap once you've built a comparitively inexpensive foundry. All of the things I do would be "better" done by computers and machines. But I guess the reason I enjoy making things by hand is because I don't have or need multi thousand dollar machines. Understood Torq, but I was thinking along the lines it would be equally as challenging and likely just as rewarding to hand cut, shape, carve, file, a piece of billet and still have a hand made rewarding result as a perhaps better alternative in this instance than a cast piece which must take up an awful amount of time to get right unless by some luck you're good from the get go. But you know, I'd have a concern for stress fractures and cracking over time and miles and use if that were me doing what you're doing, where as I wouldn't if using billet. I wouldn't trust a cast piece that I'd have made and tested in the same way and manner as you have for this particular item. Not a crticism. Just an observation on the side of safety, as that section has an awful lot of work to do and is subject to all sorts of loads, stresses, vibrations, frequency, oscillations. Though clearly you know your stuff and you have confidence in your end product so good on ya  Rocket in England | ||
Blake |
Smooth, blend, finish, bead blast, especially around the fastener points. If you've used a decent alloy, you're likely good to go. The bead blasting puts residual compressive stress into the surface. Cracks need tensile stress to initiate and grow. Too cool. Reminds me of metal shop, but even better. We just cast a hammer head and some ornamental junk. | ||
Torquehd |
If the frame were to fail, I believe it would be a tension failure. The shear and torsion bending moments are easy enough to observe with the naked eye and address. That's why I'd like to heat treat it. I need to buy a pyrometer and an old oven and see if I can't rig it to produce 1000F reliably. As I mentioned previously, from what i've seen online, proper heat treating will almost double the tensile strength of Al. Even without any crossbar bracing, I am 100 percent confident that this subframe will never brake while riding 1 up. But because I have a fiance who loves riding with me whenever she can, I'm going to figure out a way to either heat treat it, or over-build it with extruded flatstock (which will not be observable when the bike is assembled). I also have the option of making the castings thicker. However, following the juice vs squeeze mentality, it would be easier to reinforce with flatstock, or make myself an oven that I can use for heat treating (this and future projects). |