| Author | Message | ||
Aussie_buell |
XB9S owners, If you want both headlights on when you are on high beam. This is a post I posted on another site, apoligies for the length. If you want both headlights on when you are on high beam, all you have to do is open the switch block on your handle bars where the high/low beam switch is. And perminately connect the Yellow and Blue wires by either soldering directly to the switch or by using a wire splice to join the wires. If you use the soldering technique, be careful not to put too much heat into the plastic switch. It might be an idea also to check that you bike is wired the same as mine by using a small piece of wire held onto the blue and yellow soldering points on the switch and test the high beam. Try not to wiggle the wires or you may short and blow a fuse or bulb. Essentially all you are doing is bypassing the switch that turns low beam off, and tapping the power straight into to low beam circuit so it is always on regardless of the switch position. In more detail: I believe that the Blue wire is the Ďhotí wire. And the yellow is the wire that goes to the light. There is 3 wires, the other is white and that one seemingly goes to the high beam. The way I understand it is that the Blue hot wire feeds the power into the switch, from there it s either switched to one side for low beam or the other side for high beam. What we want to do is by pass the low beam switch by connecting the blue to the yellow. If you want to you could cut the yellow wire and join it to the blue how ever I strongly suggest that if you just use an extra piece of wire and loop it from the blue wire where it connects to the switch to the yellow wire where it connects to the switch (on the solder points) then you will have joined the hot wire into the low beam circuit to be powered all the time no matter what the position of the switch. Basically you have turned the switch into a high beam switch on and off rather then a switch thatís alternates from high to low. And by not cutting into the wires and just looping a new wire you have not disturbed the original system and it can be converted back easily if there was a need to (ie: heat problems that may occur). edited by aussie_buell on December 14, 2003 | ||
Cyclone1 |
Just my .02...I've still got the original battery in my 2000 superglide with 51,000 miles on it. Still starting strong. They told us in class they were expecting 5 years out of these AGM batteries IF the they are properly maintained (clean and tight terminals, on a battery tender plus when not riding bike on a regular basis). I'm a believer...  ...($80 ain't bad for a 5 year battery) ...($80 ain't bad for a 5 year battery) Frank | ||
2bbuell |
Tell me if I am imagining things, or if this is supposed to happen. My 98 S1W stays in my shop, and has been there for a week or so without moving- This morning I go out to do the pre-ride checks (checking tire pressure, etc) and because it is so quiet in there, I hear a faint noise that sounds like a pump or a solenoid turning on every 30 seconds or so for about 15 seconds, and then turns back off coming from the bike, in the area of the battery. I listened to this cycle about 6 times, and it is the same each time. I know the ignition is in the full off position, and there are no lights or indication. What is making the noise, and is it normal, or do I have a ground that is causing something to cycle?? I can't find anything in the shop manual electrical schematic that would do something like this. | ||
Rocketman |
A wild guess. Remove the flasher relay from under the seat then listen? Rocket  | ||
99x1 |
" a faint noise that sounds like a pump or a solenoid..." My fuel tank vent makes strange sounds sometimes - my garage is not heated, and as the tank warms up it seems to make an intermittent click and hiss sound. (I think there is a checkball in the vent and the end of the hose is near the front of the swingarm) | ||
2bbuell |
Yeah, that is probably it, because it had been quite cool, and was warming up- Thanks for the help 99x.  | ||
Seeeu911 |
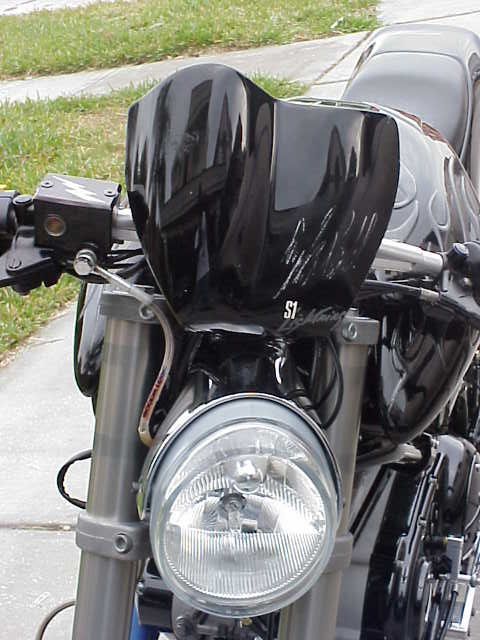
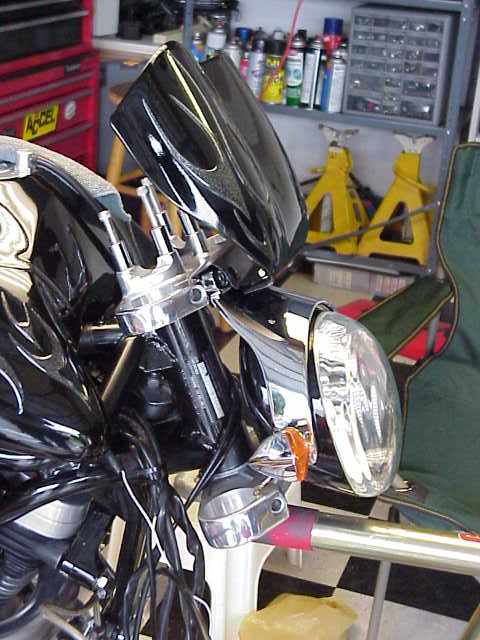
I am so tired of looking at that huge truck headlight on my S1W..so I swapped on a Vrod headlight...Thanks Brian all the bits were exactly what I needed. Whoever designed those headlight brackets was a sadist. To get them out I had to loosen the triple clamp and slide the forks down, then twist the top of the bracket to get them off. The stock S1W setup uses a Halogen H4 lamp. The Vrod lamp assembly uses 2 bulbs. A H11 high beam and a H9 lowbeam. Following the manual I pulled the light assy off and disconnected the 4 place AMP connector under the tank. On the Vrod the light bracket mounts to a bracket which recesses into the top fork clamps. Looking at my Triple Tree there was not enough material to recess the bracket and with a test fit it seemed that it would be too far between the forks and have clearance issues with the wiring connectors. I drilled ľ holes at the seam on the tree to bolt the bracket up, then with the light in place started looking at the fly screen. I experimented with clay and wire mesh and cardboard and over a couple evenings could not find what looked ďrightĒ I wanted that street fighter look u know. Inspiration came very early one morning on the toilet..  whilst reading an old issue of Cycle world the one with the Yellow Lighting on the cover the small fly screen jumped out at me. I have a fly screen signed by EB that was recently broken in a get off . I held it up, eyeballed the look and then taped and cut it down 4 inches on each side. Using a bench vice and propane torch I heated the underside about 4 inches up and then slowly bent the plastic as it heated to the angle I wanted. After it cooled the paint on the front and the EB SIG was not damaged ! tough plastic. The edges are rough still and Iíll be repaint it in the next few days. Hope to get another EB sig. (if he does not cringe at my modifications to his creation.) whilst reading an old issue of Cycle world the one with the Yellow Lighting on the cover the small fly screen jumped out at me. I have a fly screen signed by EB that was recently broken in a get off . I held it up, eyeballed the look and then taped and cut it down 4 inches on each side. Using a bench vice and propane torch I heated the underside about 4 inches up and then slowly bent the plastic as it heated to the angle I wanted. After it cooled the paint on the front and the EB SIG was not damaged ! tough plastic. The edges are rough still and Iíll be repaint it in the next few days. Hope to get another EB sig. (if he does not cringe at my modifications to his creation.) Using some sheet alumin I fabed up a mounting bracket to fit between the triple clamp and the flyscreen. Iím not yet satisfied have to sleep on it some more. Wiring turned out to be easy but I researched the web and read up on relayís and amps etc. I am using the stock Vrod Halogen bulbs and at 65watts the same as the S1W headlamp I decided to use the stock harness as much as possible. (I have a detailed wiring drawing if anyone wants.) I have made another harness that uses a relay and ties directly to the battery then into the factory harness for the existing switch etc. Perhaps Iíll try that out after I reassemble with painted parts. What do you guys think ? 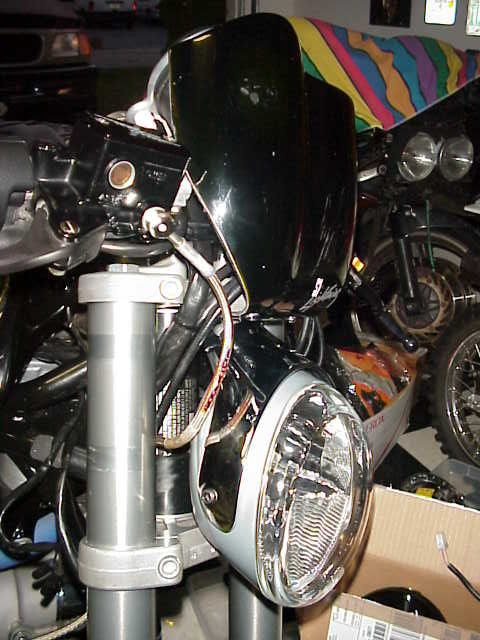 edited by seeeu911 on January 18, 2004 | ||
Seeeu911 |
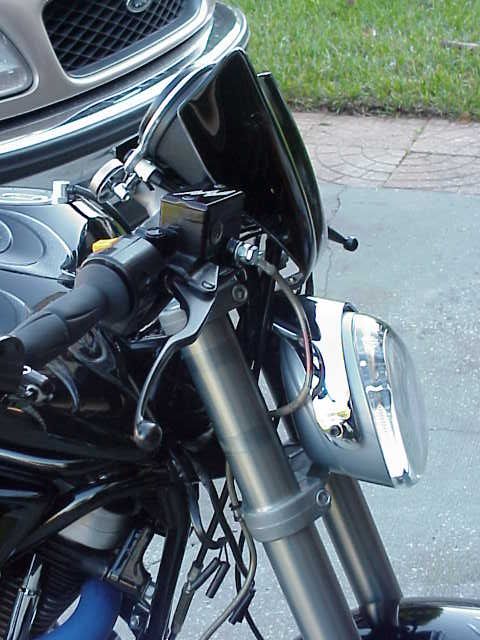 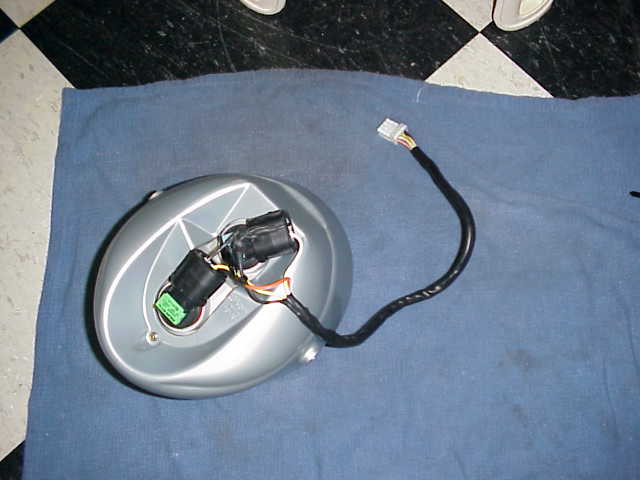 | ||
Seeeu911 |
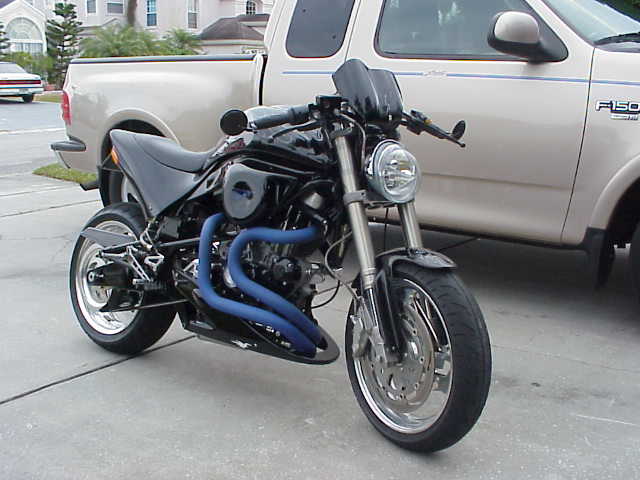  | ||
Blake |
I like the light, it articulates well with the natural lines of the tank. You sure did a nice job. What is cool is that it is totally different from anything else I've seen. | ||
Bomber |
great design work and "vision" (in quotes due to this being an election year and all {grin}) . . . . . while I like the locomotive look (or big truck headlight) on the MaDeuece, this is really a great look . . . .. . good craftsmanship, as well . . .. I'm most impressed, cuz, like blake said, it's yours and yours alone, and it never would have occured to me to do this! very coool, bro what kinda design you do for a living? | ||
Buckinfubba |
cool beans donn... Now that its on I see it...I couldn't get my brain wrapped around it..but now I get it... man your like the coolest daddio | ||
Seeeu911 |
Thanks for the good words guys. Working on my bike is grarrage therapy and the only thing better than standing back and feeling good after doing a project on her, is coming back from a fun ride and thinking up a new project.  Bomber you have email. | ||
Seeeu911 |
I got a couple emails so I might as well post the info here. 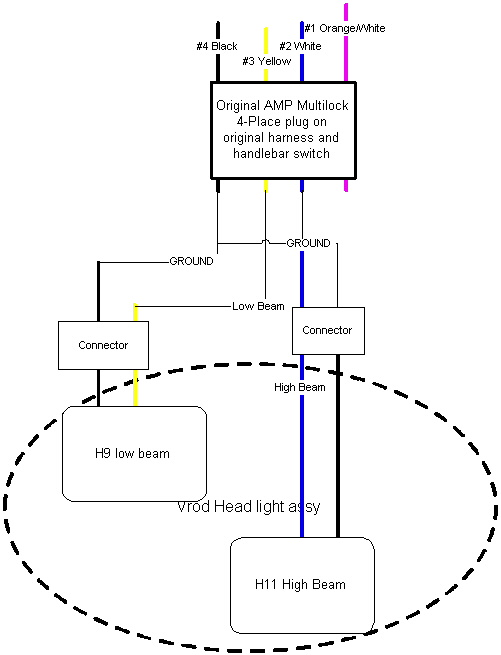 | ||
Seeeu911 |
I needed to clearance lower tripple tree clamp and drill mounting holes. 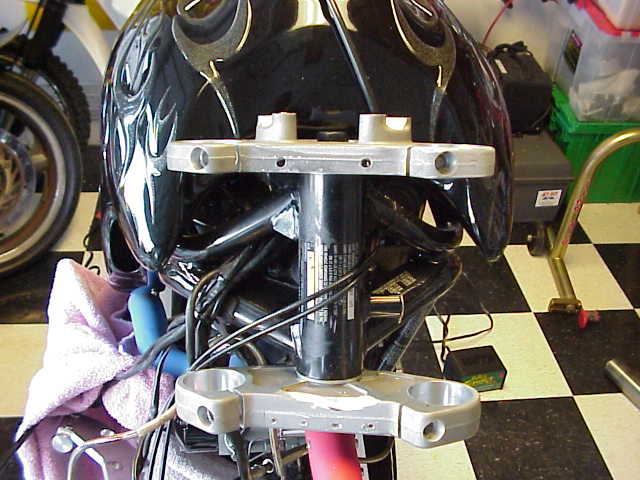 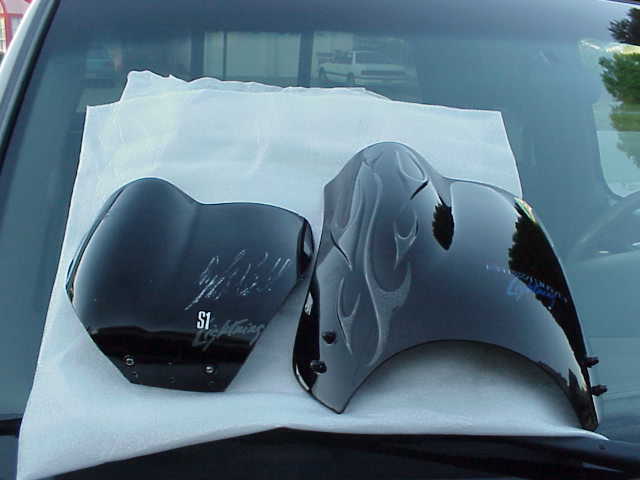 | ||
Seeeu911 |
 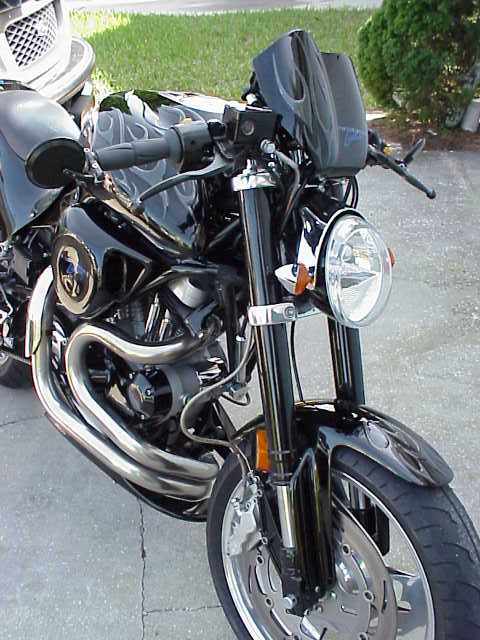 | ||
Reepicheep |
This question has come up a few times, and I just had to fix it on my Cyclone, so I thought I would put together a simple how-to. This is a beta version, whack away at it and we can clean it up before making it a top level topic. Diagnosing electrical problems where the bike won't turn over. First the disclaimer. Your owners manual gives a great and highly detailed series of steps to find exactly what the problem is. It is more right then this is. But the manual has some complicated procedures to handle every case, and the vast majority of problems come down to one of four things. This is an attempt to capture a simplified process to identify the three most common problems. If your engine won't turn over and start up, the problem should be one of five things. Your battery, your alternator, your voltage regulator, your starter relay, or your starter. This makes the assumption that the wiring is a part of each component. That is to say that the wires connected to the battery are considered part of the battery for this discussion. 1) Testing the battery. The battery must be able to both accept a charge and charge up, and deliver a charge to the starter. Put your dead battery on a trickle charger (or attach it to a car via jumper cables) for half an hour or so. You don't really want it fully topped off and charged, but rather you want it about half charged. If it then spins up freely (just with the lightly charged battery), the battery is probably fine, as is most of your wiring on that end of things. 2) If test one fails, it could be the starter, starter relay, or the battery. Disconnect your battery and try jumping the motorcycle off a car battery, or another known good bike battery. If it starts, the starter and starter relay are fine. If not, the starter or starter relay has a problem (or the engine is locked up, but that should be self evident). So by this point you should have either found the problem, or eliminated the battery, starter relay, or starter as the culprit. Even if you think you found the problem, you can do the next couple tests just to make sure everything makes sense. None take long or require much dissambly. 3) Start the bike (jump it, trickle charge it, bump start it, whatever) and keep it idling while throwing a DC meter across the battery terminals. Try to not have a fully topped off battery, but it would probably work regardless. You will burn your knuckles on the engine at least once during this step. Is the battery voltage getting higher, or lower? If the battery is charging, the voltage will slowly go up. If the battery is discharging, it will slowly go down. I had a pretty good meter (Fluke 77) and I could watch the battery drop about .01 volts every 20 seconds or so. Throw on the high beam to speed the process up. Revving the engine should bring up the battery voltage slightly as well. You probably are seeing the voltage drop. This just validates your previous conclusion that the problem is that the battery is not being recharged. This means that either the alternator is not producing current, or that the voltage regulator is not delivering current. 4) Disconnect the alternator wires outputs from the voltage regulator inputs. Follow the wires from the voltage regulator, there is a big rubber connector with cable ties around it tucked under the cam cover. You will probably need cut the cable ties holding it to the oil lines to get them apart. Measure the resistance between each pin on the wires coming from the stator (engine side) and ground. It should be really high (infinity). If it is low (mine read 5 ohms, toast), it is grounded and is toast. Also measure the resistence between the two pins (not pins to ground, which you did before, but pin to pin). This should be low, .2 to .4 ohms. Slap a meter set on AC volts across the two holes in the voltage regulator side of that connector you just pulled apart with the bike running (you will need a battery installed for this). You should see something like 30 to 50 volts AC. If you dont see it, either the alternator is dead, or the wiring between it and your connection has broken. If you do see enough volts AC, then the next piece of the puzzle left is the voltage regulator, and it is probably failing to regulate. Its a $98 part (GRRR) and probably only has a blown SCR (a $5 part) in it. Unfortunately it is a mondo PITA to get the potting out to get to that SCR. I can post a picture of about where the scr's are at though, so it may be possible to just drill down and do a surgical strike on those parts. This whole test procedure won't take long at all and has a pretty high chance of arriving at the right solution. Obviously, loose connections or internally broken wires could cause a part to look bad, but that stuff is pretty easy to check. These tests will at least help you know what sections to hunt. Batteries die most often, followed by voltage regulators. edited by reepicheep on April 02, 2004 | ||
Hootowl |
Good info Bill. You should add a resistance test of the stator in there somewhere. | ||
Reepicheep |
 The whole point was to get YOU to add it The whole point was to get YOU to add it  Do you just slap an ohm meter across that alternator connector? I assume it should read close to zero with the bike turned off. | ||
Hootowl |
Yes, it should read less than 1 Ohm. Don't forget to zero your leads. This can be misleading though as a shorted stator will read less than one Ohm as well. This test will tell you whether the stator is open. | ||
Aesquire |
Nifty Seeu911! I suspect H-D sells more of those headlamps than V-rods. Quite popular w/the hotrod crowd. | ||
Road_thing |
Reep: Don't forget the starter relay! If you've got lights, horn, etc and all you get is a faint "click" when you push the starter button, there's a good chance it's a bad relay. New ones are about $12, or you can pop the cover off the bad one and scrape the points clean with a pocket knife. Either way, the R&R job only takes a couple of minutes. I was just reminded of this chronic problem on my S-1 last weekend! (Thanks for the push, Dan!) r-t | ||
Darthane |
XB9/12S Dual Lighting Conversion 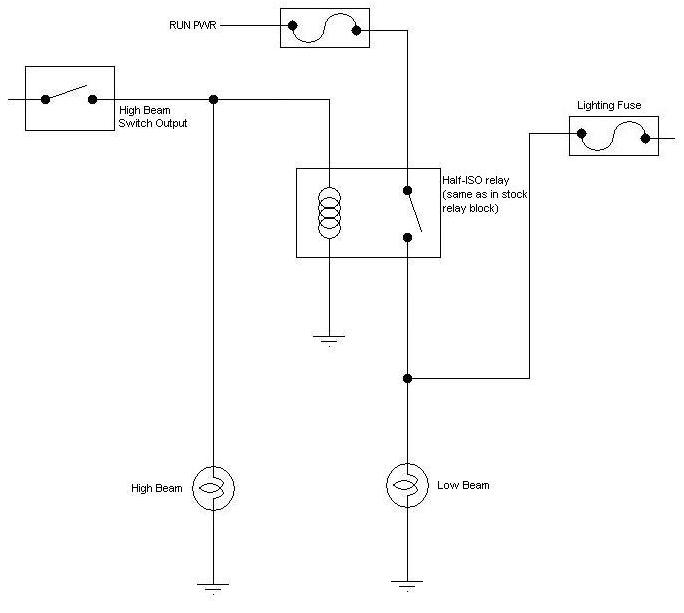 | ||
Darthane |
Frank was kind enough to give me some more information (for 2003 XB9S at least): The High Beam wire from 1.a. above is White. The Low Beam wire from 1.c. above is Yellow. The new fuse should be 5A. The current draw for the bulb is ~4.6A. Thanks, Frank! | ||
Henrik |
Can someone please post a picture of how the front turn signal wires are bundled/wire-tied up on an XB9R. I pulled the fairing and when I went to re-install I couldn't get the wires to bundle up right? They just sorta hang there - looks like the bundles should fit up and out of the way under the arms of the fairing stay. Thanks Henrik | ||
Teenc |
 During the past week I've had to put the battery in my X1 on the battery tender three times already. Its a new oddessy battery, and a new voltage regulator. When the battery comes off the charger it starts right up, and seems just fine when I ride it. However if it sits in the garage for a few days the battery doesn't have enough juice to start the bike. (everything works, it just turns the starter too slow to start the bike) I'm thinking there might be some battery drain from a short somewhere going on. Are there some common places to check for this. If I put a voltmeter between the battery and its cable should I see any current flowing? Any help would be appreciated! THANKS | ||
Reepicheep |
Not a voltmeter, an ammmeter. Voltmeters measure voltage (volts), ammeter measures current (amps or milliamps). A battery will try and deliver as much current as possible while maintaining a constant voltage. When the circuit is open (disconnected, turned off), zero amps flow and voltage is 12.x. When the starter is thumbed, the circuit is closed and a heavy load is on the battery. The voltage tries to stay at 12.x, but the amount of current goes from zero to 'whatever it takes to turn over the starter'. This will be lots of current... 50 amps? 100 amps? 150 amps? Whatever it is, it would SMOKE your meter (literally). So it is a little tricky to test. Most digital multi meters have the ability to measure current, but tread lightly as it is a good way to blow something up (probably just the fuse in the meter). To measure discharge with everything off, turn off everything (duh), and disconnect the negative battery terminal. Configure your meter to read current (probably a different hole to plug the positive meter wire into) and set it to the lowest scale (probably 10 mA or something). Put the positive lead from the meter on the wire you disconnected from the battery, and the negative wire from the meter on the battery negative post. With everything off, you should see about .8 mA if you have a pretty good meter, it will read zero otherwise. Thats 8 ten thousands of an amp. At that rate your battery won't discharge for... well... a really long time. Just for a sanity check, you can turn the key one click, which should light up the guage lights, but not the headlights. I believe this pulls around an amp or so, not much. Go to the next click, and you should see the headlight come on, which is probably 5 amps or so (just guessing). DO NOT TURN THE ENGINE OVER LIKE THIS. It will blow your meter. Want to find out for sure if the battery is getting a charge or not? Follow these instructions at your own risk. You will probably burn your knuckle on the header, and blow up your meter. You have been warned, don't send me complaints. 1) Get the bike started and warmed up normally, so it fires back up easily. 2) Stop engine, disconnect negative battery terminal wire that goes from the bike to the battery. 3) Replace the bolt that held the wire to the battery, but leave the wire disconnected. 4) Connect the negative lead from your meter to bolt you just put back in the negative battery post. 5) Connect the positive lead from your meter (rigged to measure current, on 5 or 10 amp scale) to a convenient (good) ground on the bike. 6) Use a screw driver to hold the negative wire from the bike onto the bolt in the negative terminal of the battery. Make sure it is a good connection. 7) So what you have at this point is a normal connection between the bike and the battery negative lead. This is where the current will flow, the meter is "bypassed". Start the bike this way, make sure you keep the negative wire held tightly to the negative terminal 8) Once the bike is running, you can just let go of the negative battery wire from the bike, and let it fall away from the battery terminal (hopefully not onto the exhaust header). The only path for current is now through your meter. Unless your battery is a dead short of some sort, there should not be so much current here that you blow the meter. But meters vary, and batteries can go to near a dead short. But yours probably is not, and your meter is probably fused. Hopefully. What I saw when I did this was at idle, I was pulling maybe 2 amps from the battery. As I revv'ed the engine, the current went up (got less negative), crossed zero, and then was reading a positive current of up to 5 amps or so as the RPMS went up (way up). This means it was charging the battery, but only at high RPM's. You can safely hit the kill switch now and just let it stop, you should see the polarity change again. Without the engine running, you can only be pulling current from the battery, so that is a good sanity check if you think you might have reversed your + and - leads on the meter. I just tried this, as my Cyclone was bleeding out a charge as well, so my numbers may reflect "something broken", but I don't think so. I just replaced my voltage regulator, and I don't think the old battery ever had a chance to get fully charged before it sat for a month, and just bled out normally. But if somebody with a known good charging system and a meter handy wants to do this test and report back, we would all appreciate it. Let me know if this is not clear... It's not as bad as it sounds. | ||
Teenc |
Reepicheap, Perfectly clear! Thank you so much for all the information. With all the electrical problems I've had I think its time for me to invest in a good ammeter. I will definitely respond back and let you know what I find. Thanks Again!  | ||
Darthane |
Reep, just for reference, the starter on a Buell won't pull anywhere near that kind of current. The starter on a 3.5L engine I'm involved with only pulls 17A. The inrush is something like 120A, but only for about 5ms, not enough to even blow most 20A fuses. Great info, though. I'm bored - needed something to read! | ||
Opto |
I seemed to remember my old Sportster pulling 150A constant during cranking, so I checked the 2004 Buell FM, it says 140-180A. The easiest and safest method to see if you're batt is charging is to measure the voltage across the batt terminals with the engine running. It should go up to around 13.8V or more at 3000rpm. If it's around 12.6V with the motor at 3000rpm then it's definitely not charging. With everything turned off there should be less than 2mA draw on the batt (FM). Hope this helps. |