| Author | Message | ||
Pizzaboy |
its only mocked up, i havent actually started mounting the kit | ||
Tougelabs |
Geforce I'm still waiting on my set up but so far I have it planned to bend some brackets and use the mini sprung zeus clips on the upper to attach and the normal butterfly to do the lowers. | ||
Tougelabs |
BTW I got my mounting kit today "thought it was going to involve more brackets like the stock add on fairings" and I am extremely pissed I wasted that much money on it ! I could of fabbed something up for a fraction of the cost. (Message edited by tougelabs on April 30, 2011) | ||
Geforce |
So instead of shelling out the 70 bucks plus shipping on the GSD mounting kit... I might as well start looking for my own stuff? I guess I am fairly reluctant to separate the inlets from the ABS plastic pods until I figure out how I am going to attach them to the new fiberglass. DEAN! Bust out the aluminum! | ||
Geforce |
I looked at Mr_Critical's bike. http://www.badweatherbikers.com/buell/messages/290 431/589309.html?1282498520 Looks like he attached the inlets with fasteners. I wonder what sort of bracketry he used for the fairings and belly pan? | ||
Zac4mac |
Originally they are heat-staked. If you're careful, you can soften the plastic and separate the pieces with minimal material loss. Add a little donor material from a model car parts-tree and re-stake it to the new host-piece. I use a variable temp Weller solder station to weld plastics. Styrene works well around 500-550 degrees. Z | ||
Pizzaboy |
BTW I got my mounting kit today "thought it was going to involve more brackets like the stock add on fairings" and I am extremely pissed I wasted that much money on it ! I could of fabbed something up for a fraction of the cost. thats just the post i was waiting for regarding that bracket kit!!! i keep going back and forth about buying the kit to help with this fairing install.. but im pretty sure i could do it exactly how i want by myself for a lot cheaper. this confirms that fact! | ||
Geforce |
Found this website... pretty good info here. Wanted to share. http://www.trackdaymag.com/Articles/Mounting-Fiber glass-Bodywork.aspx Gonna need a Unibit. | ||
Tougelabs |
I never use a unibit on fiberglass, Just a fair warning shit can get pretty terrible real quick  Hopefully going to have my fairings mid week if all goes well, I cant wait anymore. Hopefully going to have my fairings mid week if all goes well, I cant wait anymore. | ||
Craigg |
Just a question with people using this on the street already. How does it hold up to normal every day use? I know when I had a fiberglass kit on my car it chipped up pretty good on the front bumper cover. No cracks but paint chips and a lot of them. Wondering how this would be on the bike even though I know there isn't that much surface space that should see rocks as a car. I already contacted Trev to see what costs were just curious before I place my order which I'm going to place in the near future. | ||
Tougelabs |
In all honesty it seems that your paint job was crappy...I mean all street bikes run a fiberglass of some sort. I currently run fiberglass bumpers fenders doors on my TT car and I have minimal issues. | ||
Russmannnn |
I just order my kit from Trev and wanted to see how you guys are installing them. Whats the best hardware kit to use, how much is it, how did cutting out the kick stand and fitting work? Thanks for the help. | ||
Craigg |
Tougelabs - it wasn't the paint job because it wasn't just chips it was dents in the fiberglass not just paint chips. Could have been bad fiberglass. The bodyshop I use always wins awards for best paint. That's another thread. Like I said I'm going to place my order with Trev and get this just curious on what people thought about it is all. | ||
Jrfitzny |
Updates on mounting? I'm pretty busy stripping the blue paint at the moment, but I want to mount this fairing soon. I'm thinking about flat black... POST PICS!!!! | ||
Tougelabs |
Your stripping the paint off the frame ? Motor and everything on or what ? | ||
Jrfitzny |
everything blue; frame, swingarm, etc. | ||
Ratgin |
Waiting on the mounting kit. Its in the mail somewhere. Nobody finished putting them on yet? Im still wondering what color to paint them. Mines a Blue and white 09 so i was leaning toward blue. All white would make the rad pods look larger then they already do imo | ||
Pizzaboy |
everything blue; frame, swingarm, etc. why?? 08 diamond blue is sexy imo. my bodywork will be getting either jet black or matte black with a clear coat.. more details next week after im done mounting, and all of the parts get sent to be painted. | ||
Jrfitzny |
I'm partial to the dull aluminum frame on the Erik Buell Racing bikes. Flat black with clear coat will look nice. 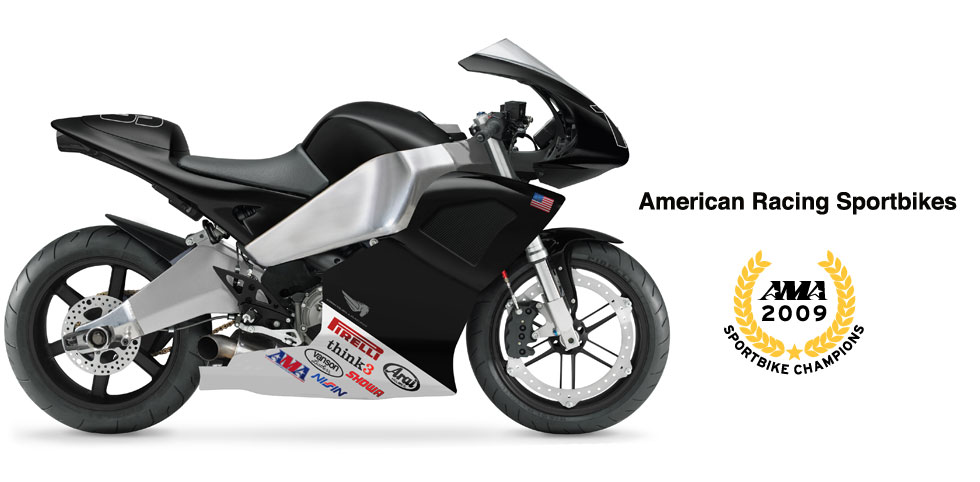 | ||
Steve1232 |
Some pics of installed fairings using GSD kit. Rough finish with messy garage. 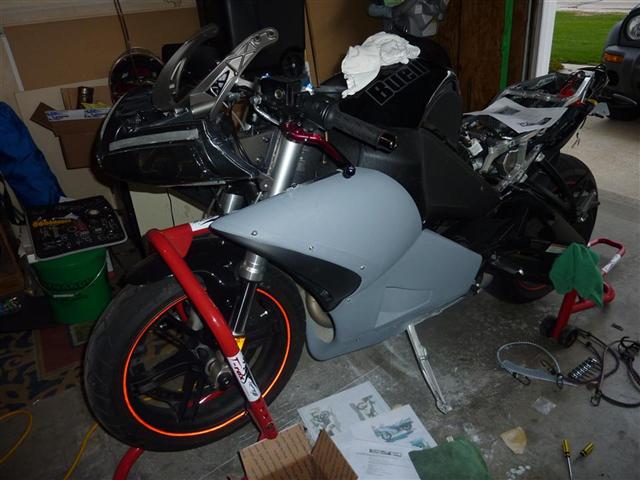 GSD kit came with washers not shown in pic 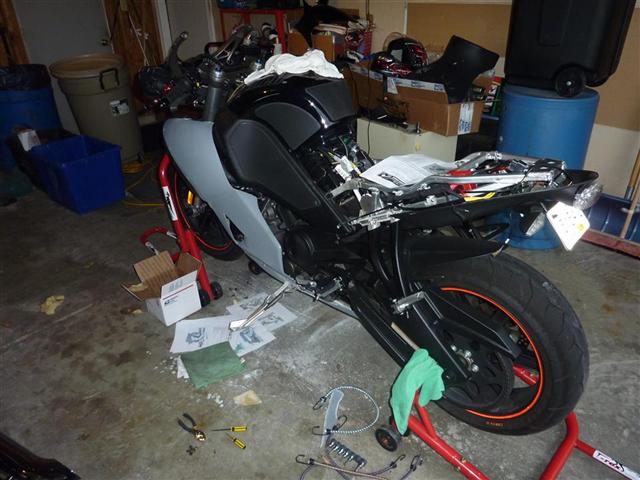 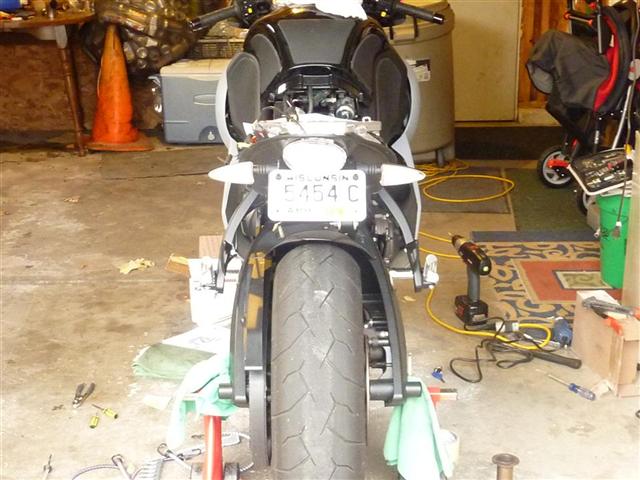 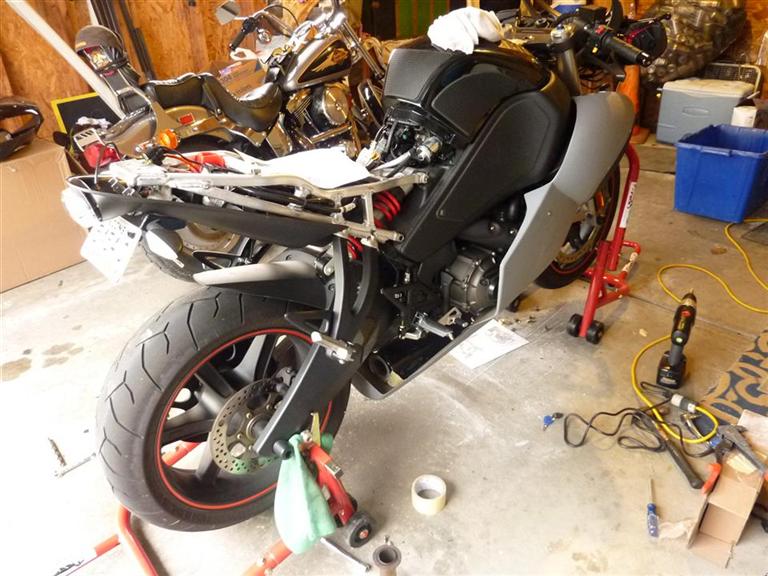 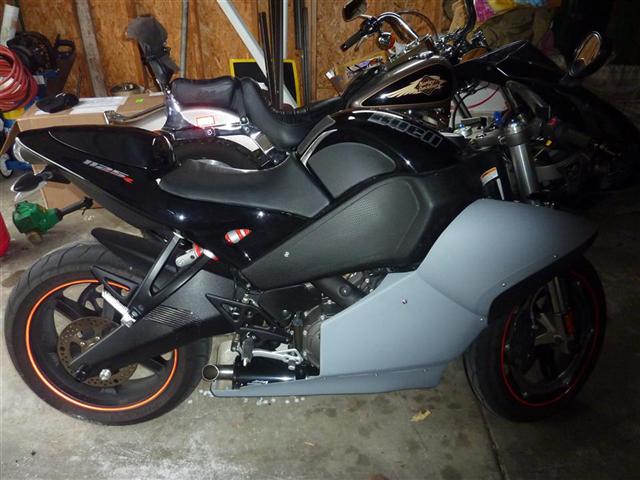 My size 12 boot kept rubbing against panel, will have to trim both sides 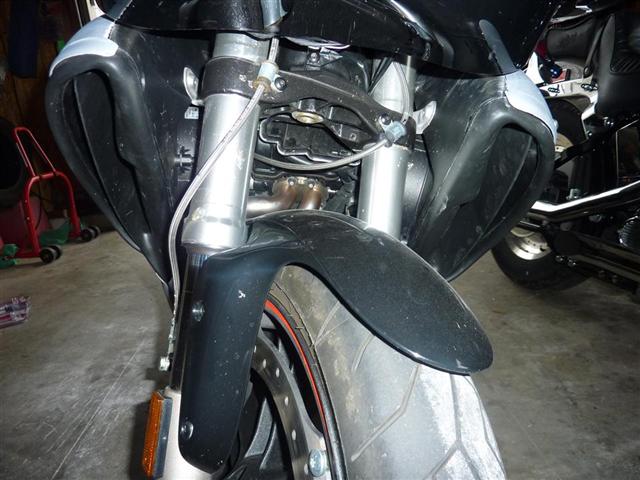 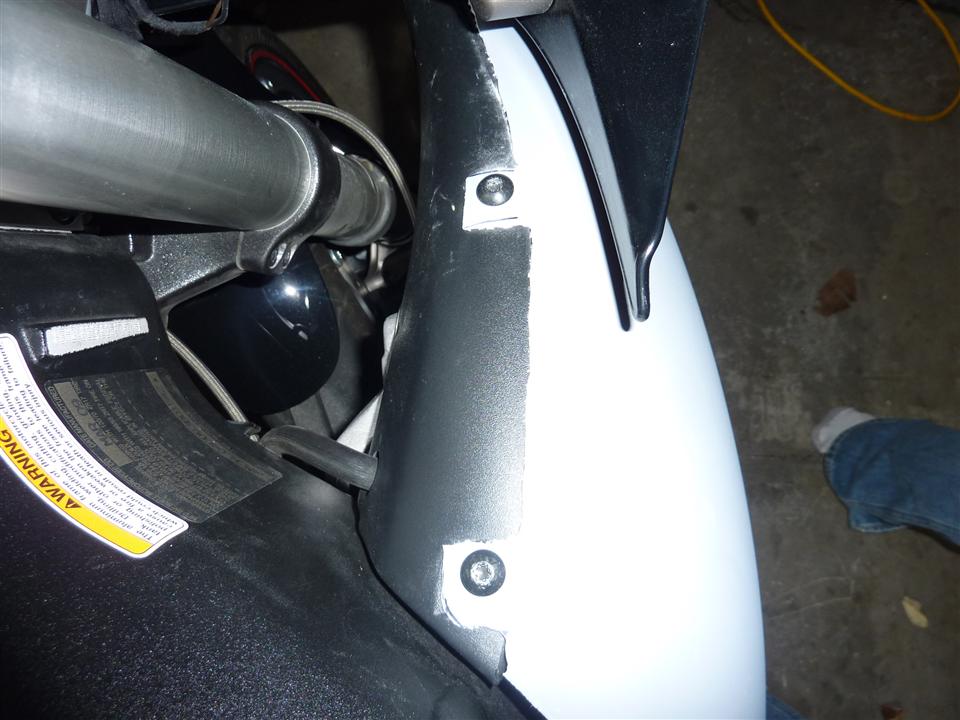 Used the U-Nuts from stock Rad cover and slipped it over plastic after being dremel'd If I were to do it again, I would have not cut the fiberglass on top. 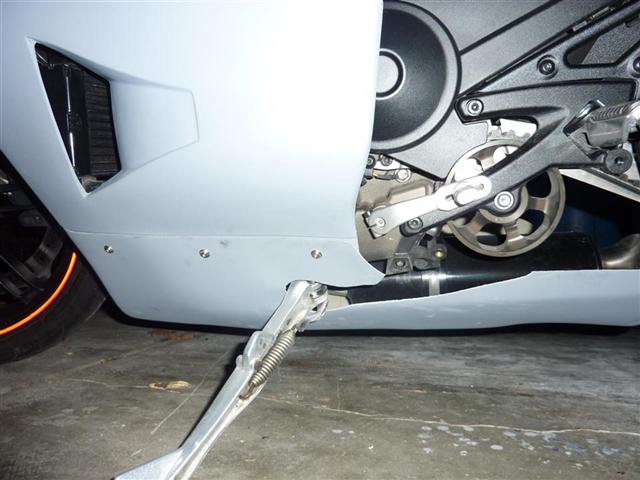 Used a dremel with belly pan on over kickstand and used it to guide the dremel 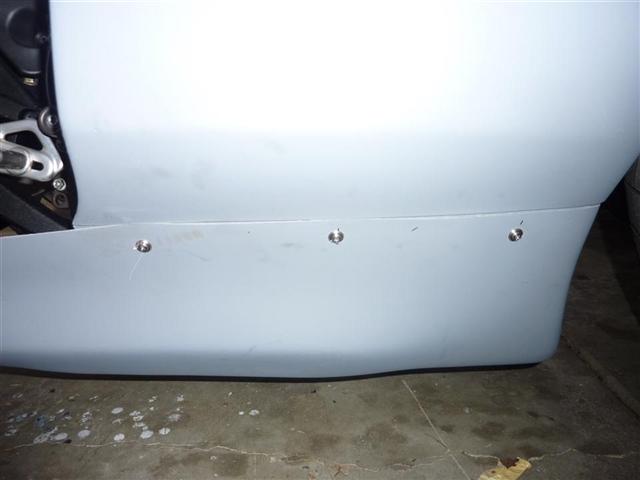 3 of 7 fasteners from GSD kit, slowly used a stepped drill bit on holes with no cracking. 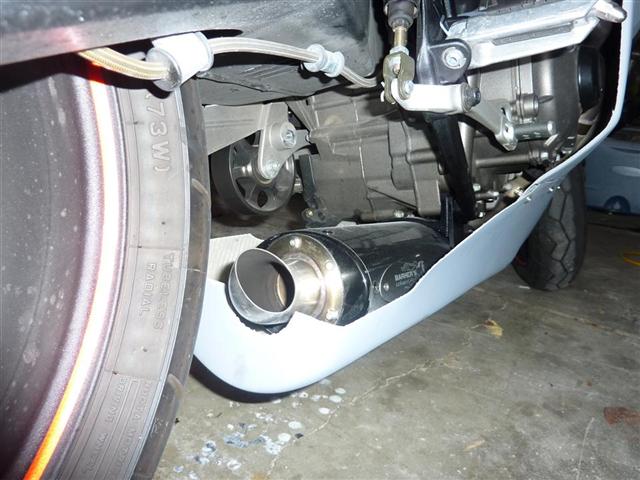 Belly pan cut to fit Barker's Exhaust, had to redrill tip to face up, otherwise it would have partially blown in belly pan. Plenty of room to move battery down if I feel the urge 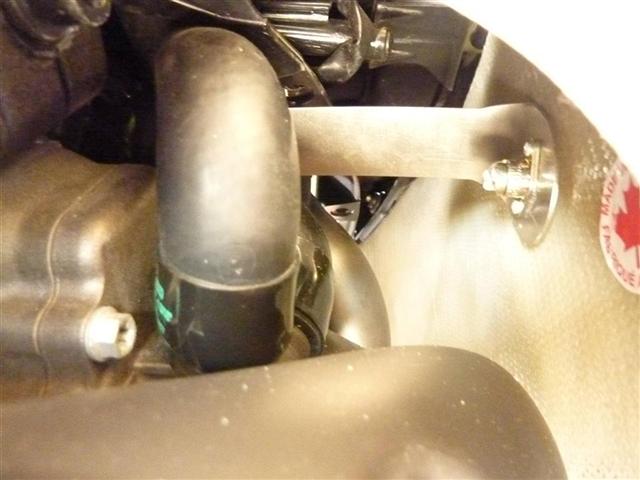 Bracket from GSD kit used to keep fiberglass off of the header, attached to front water pump bolt (Message edited by steve1232 on May 09, 2011) (Message edited by steve1232 on May 09, 2011) | ||
Russmannnn |
Nice work Steve thanks for all the pics too. Do you have a link for the bracket kit, I emailed GSD but got no reply and need to get one. Thanks for the help Russell | ||
Steve1232 |
Link to brackets http://grandstanddesigns.com/shop/index.php?l=prod uct_detail&p=62 | ||
Jrfitzny |
Thanks for the pics Steve, it's looking good! How robust is the mounting kit? It looks like it's only secured to the bike in a few spots. (Message edited by jrfitzny on May 12, 2011) | ||
Ratgin |
Anyone else having issues with the stainless bolts being too short for the well-nuts? Mine was a restocked kit from GSD and wondering if the 10 bolts were 1/2 inch too short. Just setting the bolt into the nut it just touched the top of threads (not enough to thread). Adding the fairing, washer and lock washers theres no way in hell to catch a thread. | ||
Fran_dog |
I just took a look at my mounting kit, and it looks like I have the same length (Qty. 10) 1/4 - 20 button head screws for the wellnuts. The length of the screws are slightly less than 7/8 of an inch, and as you have said "Just setting the bolt into the nut it just touched the top of threads (not enough to thread). Adding the fairing, washer and lock washers theres no way in hell to catch a thread." Have you contacted Pete at Grandstand Design? | ||
Ratgin |
yup hes looking into it.. just wondered if other folks had bolts that fit the same way or were they longer and would thread easily sure mines just a mix up on length | ||
Fran_dog |
"sure mines just a mix up on length" Looks like I'm in the same boat as you. I'll be sending Pete an e-mail tomorrow. | ||
Ratgin |
Wondering if the restock kits had the wrong bolts tossed in. Mine was a restock and is too short. Will be looking tomorrow for some regular bolts to put the kit on till i can get proper length stainless. | ||
Stirz007 |
"Anyone else having issues with the stainless bolts being too short for the well-nuts?" Same here - I decided to use lath screws instead of those contraptions. The inlet duct is almost 1/4" thick, so I just screwed 'em right in. They look OK, IMO, and are plenty secure. Will post photos after the paint dries and I put it back together. Also - I am running HeeBeeArr race exhaust and I must have more clearance. I did not need the water pump stand-off. I have the taylormade case cover and the right lower rests against that at just the right spot. Dumb question, though... The rubber/metal washers (retainer)... rubber side in, or rubber side out? Thanks - more painting today. I give props to Flexi. These things went on really fast and fit was excellent. | ||
Bob_thompson |
Jeff, how about posting up a picture? I'm kind of anxious to see how it turned out. Is it back together with a new windscreen after the mishap at MMP? (Message edited by Bob_thompson on May 22, 2011) |