| Author | Message | ||
Notsofastblast |
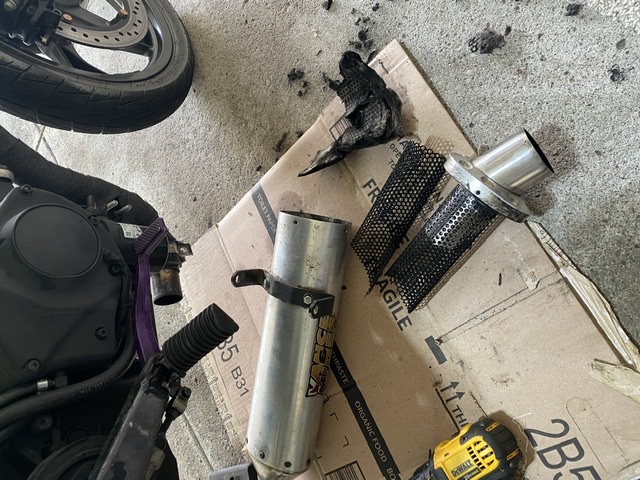
I have spent a lot of time digging online and have found no answers about if we can get a replacement baffle for the vance and hines exhaust. Ive found a few that are similar size but nothing that would fit. Mine has shattered into a few pieces and completely blew out the packing. I want to get a new baffle and repack it. (Preferably a performance baffle) im not trying to be quiet, just want to have good back pressure  | ||
Mnscrounger |
Ok this might be a dumb redneck fix, but it might work.. Home Depot and Lowes sells perforated material. Usually aluminum, but sometimes the steel with the round holes. Get yourself a section and roll it into a tube the same length as your original baffle. Then use stainless hose clamps to hold it that way, (you could even roll the new mesh tight enough to go inside the original baffle, but I wouldn't recommend it for fear the holes don't line up between the inner and outer mesh, and you fail get enough flow.). Wrap the new packing around the clamped "replacement baffle" and secure the wrap with some masking tape. It only needs to hold its shape while you get it all back into the can. Once the screws are in, with all that fresh packing, it isn't likely to shift enough to cause any serious problem. | ||
Pajoe |
It has been a while and I do not remember the details of size or cost etc, but on my wife's Blast we added a bigcitythunder baffle that reduced sound and increased back pressure. If you look at the photos on their web site you can get an idea how they work, we installed it in the header pipe where it attaches to the D&D muffler. https://bigcitythunder.com/collections/2000-series -thunder-monster-baffles | ||
Missionbolts |
That thunder baffle is something I saw 15 years ago. I remember digging up the patent for it and totally tore into that design. Made a copy and decided it wasn't really what I wanted The washer creates a vortex, which in turn acts to dampen the flow. The vortex will blow out & stop interfering at high exhaust flow. This is kinda interesting, but I have since found better ways to do that kind of thing. At slower flows, it'll re-establish itself and act like an air curtain. Just like the ones you walk through at the entry to larger stores. It doesn't increase back pressure, as that would act to choke off the ability of the engine to flow. Like stuffing a potato into someones tailpipe is a surefire way to 'increase back pressure'! Trying to get the exhaust to spin by using a bladed vortex generator was also interesting, but not interesting enough To use that vortex generator properly, there needs to be a decent length of pipe directly after it for the tail of the vortex to anchor onto, and it really doesn't work as well if there's a sharp bend in the first few inches just before, or after. It absolutely wont do diddly squat if you put it right at the very end of your tail pipe, as the vortex will dump out into the open air and the exhaust will flow out all around it without any damping effect That V&H muffler looks like a straight-through style. I don't see any sign that it uses a baffle in the center of the perforated tube. Straight-through style mufflers work purely by absorption. There's no significant flow going through the holes in the screen. So in that style design, the screen is only there to keep the packing in place. The packing material is what does all the work Anything that keeps the packing from shifting or blowing out will work just fine, but a heavy wire mesh would actually work better than the perforated sheet. The blank areas in between each hole just means there's less area for soundwaves to flow through the inner core and get absorbed by the packing material. Changing out to a decent mesh is the same as making the original muffler a couple inches longer, but without the added weight The most important part is to use a packing material that will hold up to the hot exhaust & constant hammering from exhaust pulses. If you try using some fiberglass for homes, it'll disintegrate quickly. I've done that. I only made it about 50 miles before deciding it was a failure. The correct stuff is a ceramic fiber, much like what you would find packed around the firebox of an old RV propane refrigerator. It looks just like ordinary fiberglass insulation except it's pure white The proper stuff(annealed) is sold to race teams, as they regularly must repack their mufflers in order to prevent loss of low end power If possible, I would only use stainless to rebuild the inner core. Aluminum will melt & disintegrate. Don't If I could only find some flat material, then I'd just wrap that around the old tube sections as a kind of splint. That avoids trying to figure out how to find the correct diameter. You can cut open an old oil filter to get some fairly stout mild steel screen. I would cut that lengthwise down each side of the spot welds, so it could be rolled tight around the broken sections. Then wrap that with stainless wire. Sporting goods stores usually have some nice stainless wire in the fishing department. You can also peel off a long length of solid core from a wire feed welder. The alloys are usually pretty nice to use in high temp service Getting the right amount of packing is important. Too little and it'll bounce around too much and not dampen the exhaust shockwaves. Too much and only the innermost layer will do anything, plus you need the volume of the main can in order to hold the volume of each exhaust pulse, or it'll just get squeezed out the end of the muffler instead of pausing for a moment inside the can | ||
Mnscrounger |
Mission bolts for the win! (For the record, and preservation of my ego, I did NOT suggest aluminum..)  | ||
Missionbolts |
ps: dirtbike & tech savvy motorcycle parts stores ought to carry some sort of muffler packing material But online sources are easy to find, if you search for 'muffler packing' https://www.amazon.com/MPK1-Material-2-Stroke-Moto rcycle-Universal/dp/B011PW22DE Stay away from stainless muffler packing. That creates new problems like torching your outer can's skin & melting the pop rivets! And yeah, I make my own mufflers. So far just for fun. To me, it's a bit absurd to see how much work goes into custom frames, and something so simple as a standard 'glass pack' muffler - always has to be store bought! pps: it won't hurt if you make the volume inside the main can a little larger than it needs to be. That will make a tiny bit smoother bottom end power and get a mellower bass sound. Hint: EB picked the correct volume for the Blast muffler. He just wasn't trying for maximum power, so he used a very contorted flow path that involves a lot of tight turns and badly executed transitions. It's supposed to be an economy bike, after all | ||
Notsofastblast |
You guys are awesome! Thanks for all the suggestions. I think ill try making one out of perforated metal. Would you guys suggest larger or smaller openings? Like i stated in my original post, im aiming for max performance so the sound doesn’t matter. Id prefer for it to be louder. | ||
Missionbolts |
I look at that as a trade-off between two basic factors A larger hole in the perforated core will allow each exhaust pulse to be absorbed by the packing with the least delay & less 'dumping' of excess pulse volume out the end of the can. In other words, a larger hole works better On the other hand, a larger hole means the amount of metal in between the openings is less capable of resisting cracking So, to get away with a larger hole, you need an alloy that is more fatigue resistant Your old core is an example of what happens when the alloy wasn't the best choice for the way it was used A simple solution to get everything you need might be: https://barkersexhaust.com/products/barkers-exhaus t-complete-repack-kit But I don't know if the core diameter in that kit will fit your can properly. It's just an example of what to look for You don't need to worry about the loudness of the exhaust. You already got that covered with the muffler you have! Changing the hole size/packing density will not affect the loudness by ear, only by decibel meter. What you will be able to tell by your own senses is if the bike is slower going up through the gears, or if it's getting up & going faster than before So my vote is on the setup that can change gears soonest, and whatever it sounds like, is whatever it wants to sound like Right now, my modded stock muffler is shifting faster than before & got me 15 mph faster with no jet changes, bone stock airbox & filter. But it's also loud enough now, that I need earplugs for long rides. I still have that OEM skidplate keeping rocks & stumps from taking out the oil filter, so I'm not even thinking about changing over to a skinny can! | ||
Notsofastblast |
I believe the baffle is 2”x12” take or give some minor fractions. I appreciate the advice. Id probably cut the original baffle short (maybe like 2”) and use it to mount a new one with a band clamp. Any tips on what metal would be best to use for this? Id like to do it once and be done with it. | ||
Notsofastblast |
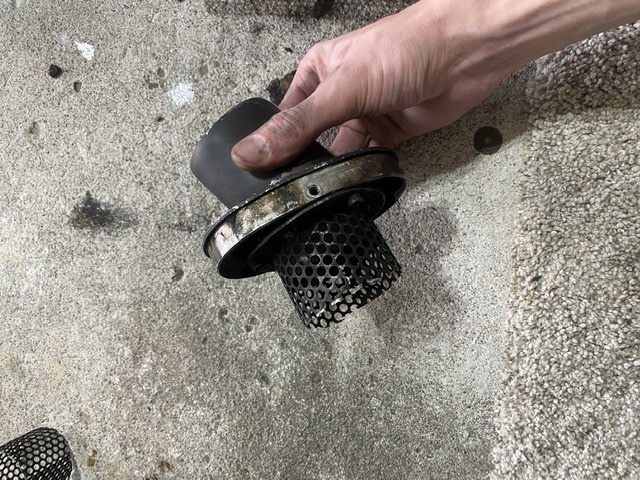
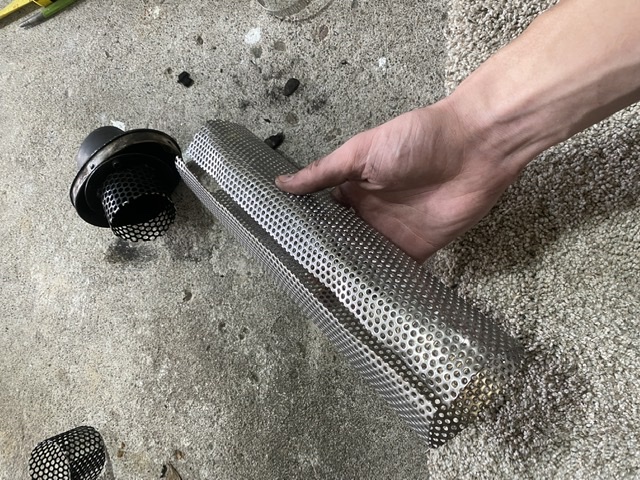
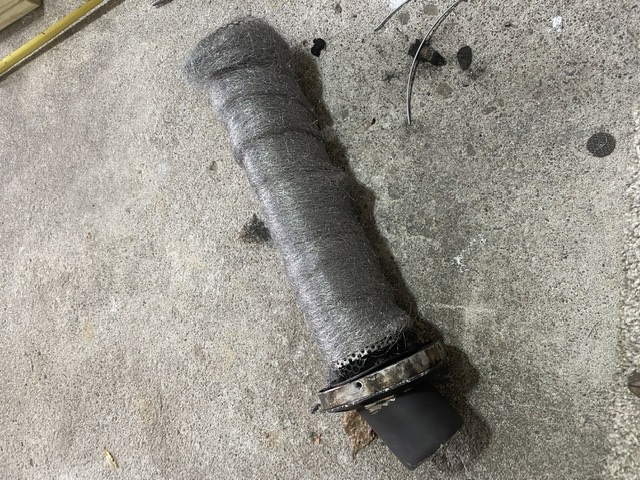
Alright guys, so i finally got around to rebuilding the exhaust. I took some pics along the way. So i started by cutting the baffle down  Then i rolled the stainless steel sheet as close as i could get to being round  I clamped it on with band clamps and hammered it as round as possible (it wasn’t quite long enough so i ised the old baffle to extend a bit further) I wrapped it tight with fine stainless mesh  Then a layer of steel wool  And finally a ceramic packing  All in all it sounds a lot better and it definitely seems to ride better. Or at least my butt dyno thinks so. She seems to be a much happier bike after that. | ||
Missionbolts |
I'm not so sure about the steel wool, but otherwise looks pretty good. The finer pitch mesh fabric is a nice touch A year from now, you should pull all that apart to see how it held up And I hope everyone else is thinking about how easy that looks Some rolled up magazines held with packing tape would have helped get the core shaped into a cylinder. Or a short length of exhaust tube, if it's the right diameter. There's a good bit of 'spring back', so I would want a forming rod 1/2" smaller than the old core |