| Author | Message | ||
Ezblast |
Ok -I'm going to lay it out plainly, step by step. While sitting astride your bike looking foward toward the front wheel,handlebars,tank,seat,etc. Now facing in that direction look down to the left side of your bike behind the cylinder and you will see the plastic air scoop that directs air into the mouth of your intake  the black plastic thing sticking out with the wierd shaped hole - looks like a stack). Peek in that hole and you will see your intake venturi sticking out (that black bugle mouth shaped thing sticking out of the left wall - your left). Now disassemble your intake - remember where each screw and bolt goes or ziplock in a bag and label bag w/paper tape and a pen. I would suggest that you have both a service manual and parts manual before you do any ssembly/disassembly on your bike so you'll have good references. Now the best tool for this is a Dremel with a small plastic/wood drill - cutting blade,others have used hole saws,and there are other choices as well - just be carefull - there is no redo without buying another intake - lol - Essentially what you are going to do is cut the bugle/venturi off and then widen the hole to just before the filter holding circular wall(that circle of plastic that holds the base of your filter in place - the base being the large end), then cut out the part of the outer filter wall facing the carb - see pics below 14 posts for how that looks. Now is the time to reroute your breather lines. "Additudes" Site: http://www.bcrider.com the black plastic thing sticking out with the wierd shaped hole - looks like a stack). Peek in that hole and you will see your intake venturi sticking out (that black bugle mouth shaped thing sticking out of the left wall - your left). Now disassemble your intake - remember where each screw and bolt goes or ziplock in a bag and label bag w/paper tape and a pen. I would suggest that you have both a service manual and parts manual before you do any ssembly/disassembly on your bike so you'll have good references. Now the best tool for this is a Dremel with a small plastic/wood drill - cutting blade,others have used hole saws,and there are other choices as well - just be carefull - there is no redo without buying another intake - lol - Essentially what you are going to do is cut the bugle/venturi off and then widen the hole to just before the filter holding circular wall(that circle of plastic that holds the base of your filter in place - the base being the large end), then cut out the part of the outer filter wall facing the carb - see pics below 14 posts for how that looks. Now is the time to reroute your breather lines. "Additudes" Site: http://www.bcrider.com gives very good instructions on this topic. If at this time you do not wish to reroute your lines, then do the following at least to help your engine's peformance. Looking at your carb with only the air boxcover off (the 5 snaps and philips screw) you will see a spigot aimed at your carb.s' throat/mouth/opening (this is an epa thing that sucks and is totally unnescessary) turn the spigot 200 degrees so that it is now facing away and down from the carb throat - this will safely vent any waste to the bottom of your air box (now also your catch can so clean regularly (once per month unless doing serious miles/high rpms then much more often - once per week). When reassembling, remember that all screws that go to the engine- NEED to be red Lock-tited (only engine - not carb or others) in reassembly. Your airbox will still mostly look stock to the casual observation, however with the K&N you will breathing at about 90% the efficiency of a stack (velocity stacks are as good as it gets) and anything else such as an exhaust will appreciate the extra air improving the exhausts performance as well. Well thats it - a simple modification that will really improve the bikes breathing - thus improving engine performance (if you have a good ear for tones you'll notice the difference in sound). I tried to keep it simple, not because I think anyone is stupid, but because experience has taught me that we all see things differently, and our true common denominators are few and because I believe firmly in KISS - lol :-) GT - JBOTDS! EZ  (Message edited by ezblast on September 27, 2006) | ||
Ezblast |
Some may wonder why I posted this - I have received numerous requests for a description of this mod on several different forums - including this one, and you could search for it piecemeal through the carb section, but I've reviewed all that plus other questions on the topic from other sources and decided to lay it out here simply so that any who wish to go there can. In no way am I sugesting Buell doesn't know what its doing, just that practical epa stuff allows for les than ideal compromises, and I'm offering away around that - plus a small performance gain. GT - JBOTDS! EZ  | ||
Ezblast |
New airbox mod! Brought to you by guys with too much time on their hands - thanks to Lou and Ralph for conformation of my sanity when I thought of this. First you did everything described above, however, you did not bother getting a K&N filter, instead you paid 12 bucks for an OuterWears bootie filter for a Blast stack setup - 12-1267-01 Black is the part number - will fit the American Sport Bike Torque stack for the CV40 as well - 25 - link in the Thumper Links section, you'll need a stock carb intake gasket as well. You also got a 3 1/2" hose clamp to fit the area where the base of the stack filter fits over the holding sleeve - that area that the air box was widdened to. You will mount the filter over the holding sleave and hose clamp it. Your not done there - the next step is to cut alternating triangles with quarter inch spacing into the interior filter cover area or cut it away totally - we haven't decided yet on how much of that part of the part suports anything besides the filter. Still - with this set up you not only have the airbox there for suport for the rubberintake/carb, but you will be breathing as well as a totally open system (but filtered to 0.0250) or stack (though at certain rpms a stack is still superior). I don't think you could get any more free breathing than that! - lol - you know me - always on the search for that little extra edge! Got Thump?! Just Blasting on the Dark side! EZ (Message edited by ezblast on June 14, 2012) | ||
Ralphthe3rd |
LOL  -EZ, you may have posted it first... but I thought about that a year ago, and just dismissed the idea. One point against it is, the total surface of the filtering media. On a large element filter that is pleated, you have a alot of surface area to stop particulates and still keep filtering. (i.e.-it will take alot of dirt to clog a normal filter), while the bootie method has a very small (dry) surface area which could get clogged alot faster if exposed to lots of dirt/dust. And once the smaller surface area gets clogged- air flow GREATLY diminishes. While a Big pleated filter(like an oiled K&N) will have lots of surface to fill up before air flow starts to get restricted. Another PLUS point for oiled air filters, is that the dirt particles are okay when the they start building up and actually act like more filtering media...or at least thats whats always been claimed by K&N and other filter makers !? -EZ, you may have posted it first... but I thought about that a year ago, and just dismissed the idea. One point against it is, the total surface of the filtering media. On a large element filter that is pleated, you have a alot of surface area to stop particulates and still keep filtering. (i.e.-it will take alot of dirt to clog a normal filter), while the bootie method has a very small (dry) surface area which could get clogged alot faster if exposed to lots of dirt/dust. And once the smaller surface area gets clogged- air flow GREATLY diminishes. While a Big pleated filter(like an oiled K&N) will have lots of surface to fill up before air flow starts to get restricted. Another PLUS point for oiled air filters, is that the dirt particles are okay when the they start building up and actually act like more filtering media...or at least thats whats always been claimed by K&N and other filter makers !? So IMHO, I'm never going to be too keen on ANY Bootie filter media as the ONLY filtering system. And if you wonder Why I say this, look at all racing endeavors on cars and bikes...they usually have one of two types...either Oiled filter elements or, NO filtering what-so-ever. So EZ, not to dis your idea...I think this system isn't the best for people who may not(?) be keeping a close on the bootie Filter.... it may clog fast (bugs etc), or may even get torn or perforated before anyone looks in to see that occurance. Sure the theory sounds great, but in practice- it may not be so wise for the average Joe, who may often neglect filter media inspection on a regular basis. Thats just MY $.02 worth of opinion.... | ||
Ezblast |
First - its not a bootie - The Stack filter - filters 0.0050 particulates - cleaning would entail poping open the airbox cover, taking it off and cleaning it in water through the element, replacement could be done the same way. Filter cost is cheap. Sigh - none of these mods are for anyone who would neglect their bike - period. I will testify to the fact that I've gone through only three on my stack, and other guys that run stacks on the street usually use a filter as well. These are easy to clean, and if you where carefull with it, it could last for a year plus. I have never had a clogging issue on my Black bike and it is the traveling bike, so if it was going to clog, it would have by now. I'll stand by the above for any who want that last ounce of breathing for their bike. Like everything we discuss on this forum, it all comes down to this - how far and where do you want to take your bike. An exhaust and filter switch out would be one step, the first airbox mod would be a second step, etc. - heck I wanted to garentee the breathing performance for my bike so I went to a stack and stack filter for my bike - and I can now say that the long term test is over - it definately passes! For those not wanting to go to that extreme, this becomes a viable alternative. Got Thump?! Just Blasting on the Dark side! EZ  edited by ezblast on July 22, 2004 | ||
Ralphthe3rd |
EZ, Oh ok.... I just skimmed your post... I thought you just meant JUST a Bootie. A tiny stack filter -eh... hmmm... where can I see pix of this ??? But if I'm reading this correctly, you mean to install this filter on the inside of the box ? And want it clamped on the inside to the ridge/sleeve ? Is that correct ??? If so- how would one tighten that clamp ??? Also, thru suction and vibration, might that filter tend to pop off and suck into the airbox ??? Or am I reading this backwards ??? If I did read it correctly, I again don't think a small filter on the inside of the box would be a good idea.... it still doesn't have the filtering surface area of the longer filter, and it doesn't appear to have a satisfactory way of holding it in place... i really would see it falling inward...and you might not notice it for a while...all the time it would be just sucking in un-filtered AIR into the motor !? | ||
Ezblast |
I'd use Breeze industrial clamps - they don't back out - as for the filter - its what I've been running on my black bike - a bootie would never be satisfactory since it would still let dust in. I'm trying it out physically on my airbox for fit this weekend - unlike my stack - this is just now getting tested - with a good clamp though I don't see a problem - but lets see this weekend for sure and I'll report back - unlike the 1st airbox mod - this one is still in an experamental stage - lol Got Thump?! Just Blasting on the Dark side! EZ  | ||
Ralphthe3rd |
I still stand behind my warning of this filter falling into the airbox. BECAUSE, there is NO way to clamp tightly enough onto that smooth delrin/plastic lip, as it deoesn't have enough friction or a ridge/bump and indent on the filter (like the manifold connector boot has). I will guarantee it will eventually pop off into the airbox, and my guess is -that it will pop off within the first 15 minutes of riding ! If by some chance you could either safety wire it, or bolt it in place....well that would be another story !? The basic idea/premise is sound...but your engineering/mounting lacks  But we shall see-since you're going to test your theory out  | ||
Ralphthe3rd |
P.S.- EZ, can you direct me to Wear I can see a photo of this stack filter ? Or do you have a good close up photo of the one on your black Blast. Any Url/links would be appreciated, as I've never seen this filter before. Thanks ! | ||
Ezblast |
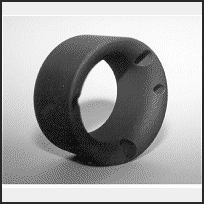 My stack from American Sport Bike - very nice! The material was developed for streetrodders running open stacks - so a lot of different things went into it - the booties are for non running engines they filter to 0.05 and are more for show. The filter on the other hand was tested and developed for a running engine - they sell a ton of them - they filter to 0.0050, are not affected by fuels, no air resistance measurable(practically), are flame resistant (though when tunning in the bike a backfire flame took one out on its 1st dyno, none since - a small burn hole in the very center), the other was just wear taking it on and off to clean once a month - its held on with a 3 1/2" hose clamp and is a light enough intake system that the springs have sufficed for support. I've got pics of the intake in the carb section - minus those braces - it is what I run today - I must say it is fairly waterproof as well (though I cover it when washing the bike). GT - JBOTDS! EZ  edited by ezblast on July 22, 2004 | ||
Ralphthe3rd |
EZ, -no no no, I didn't mean to ask what the stack looks like- I've seen your pix before. What I was asking to see was the filter. And there again -there was confusion. As you seem to be calling those Pre-Filters... FILTERS ! I went to the Outerwears website and looked at everything. Ahem, YOU maybe using a Pre Filter as a Filter, but I Sure as heck would never do that. In my correction post, I though you had found some cheap, new fangled tiny filter....like a small K&N Pod filter. But after further reading, I see that I was correct in my first accessment- all you meant was those Pre-Filter (shower caps-LOL). Ya know, there are some serious reasons WHY people are using REAL Air filters, not just "Outerwear Socks"! But whatever.... Personally, I would try for a bigger surface area. And I wouldn't just clamp on one from the inside- that seems like a recipe for disaster. I haven't looked at that opening on the airbox lately, but my thought(and one I expressed over the phone)was, why not enlarge the opening to the max diameter of the cylindrical part of the box, and clamp a Larger Pre-Filter Sock over the outside end ??? Less chance of it being pulled inward !? But for MY personal preference- I'd NEVER use JUST a Pre-Filter Sock(whatever you want to call it) as my ONLY filtering media. LOL- ya know they don't call it a "Pre Filter"(not an "ONLY filter"  for nothing..... for nothing..... | ||
Ezblast |
It is a filter - 135B is the stock number - http://www.cas4.com/Carburetors-Intakes/Air-Cleaners/Velocity-Stacks/carburetors -air-cleaners-wimmer-velocity-stack-filters.html CAS4 sells them for over 4 times their price, but here a link showing them - you should research better at your own site - this link is there for information purposeses with the outerwear link as a source to buy from - a quarter the price - you mistake one for the other - but if you check the CAS4 site you'll see the old fashioned type there as well. You don't charge 20 buck for a prewear bootie (those are only 8) - lol - these are dailly run by a lot more folks than just me Ralph. You've been assuming again - lol - but the Outerwears does have a phone number, and that is where I verified my info., nice try though - Got Thump?! Just Blasting on the Dark side! EZ<img src="http://www.badweatherbikers.com/buell/clipart/vader.gif" border=0> (Message edited by ezblast on August 30, 2006) | ||
Ralphthe3rd |
Ohhhhh- those things! Now I'm on the same track as you...My Bad, and I apologize and stand corrected. I forgot all about seeing those things, but I never knew that thats what YOU were running now. Yeah yeah- Assuming making an Azz out of U and me !  Hmmm...BIG Price difference in those two vendors- That Sucks ! Anyway, I see now says the blind man  Although I'm still worried about that thingie falling off on the inside of the airbox. Can you safety wire it in place ??? P.S.- are you happy that I'm posting so much on Blakes Site ?!  | ||
Ezblast |
Upon thinking though - the idea of cutting the bugle/ventury down to just the height of a hose clamp and clamping it there would be a very good alternative also - then you really would take mr. Dremel out and clean out all the non suport plastic (remove the filter inner suport walls for more uninterupted air flow - you don't want to cut any air box suport) for air flow, and solve your worry about the filter sucking into the carb - yes Ralph that could be a tidy solution all around - easy to check/change/clean filter, just luv a good exchange of ideas - everyone wins - lol Got Thump?! Just Blasting on the Dark side! EZ  | ||
Ezblast |
And here are pics of just that, ecept I left the full Venturi on for that effect through the bootie/filter - clamping it in place with a 3" hose clamp and opened up the inner airbox filter area for better flow and air to the carb, and with the filter totally deleted the whole system is now lighter also - lol - probably as much as the Pro-series, hower, the stock airbox needs no extra suport. 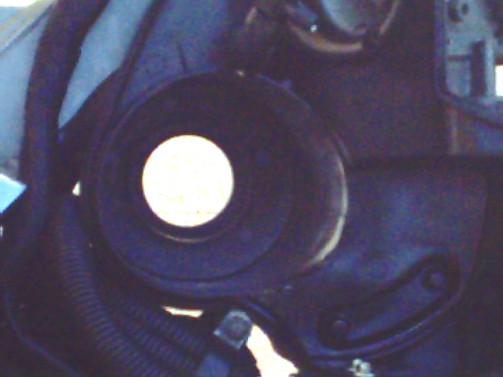 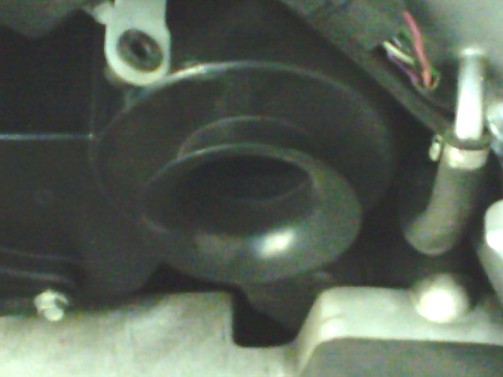 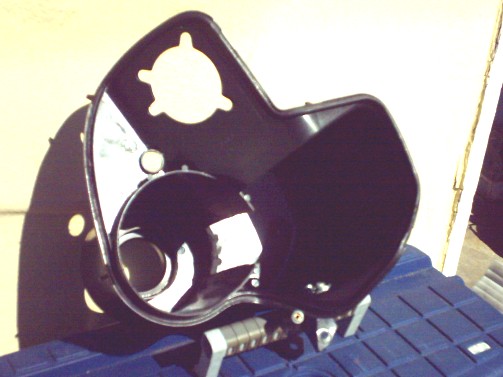   Now you can hear a quiet little huff on shut down - enjoy! Got Thump?! Just Blasting on the Dark side! EZ  | ||
Naustin |
So do you have a picture of the filter you're using? | ||
Ezblast |
Look closely you'll see its already on - look where the venturi is suposed to be and you'll see no light because it is clamped on - last pic and the 2nd to last pic is a closeup of the filter clamped onto the venturi! Middle pic shows the cut/modification on the airbos itself. The 1st two are stock pics. GT - JBOTDS! EZ  (Message edited by ezblast on March 07, 2005) | ||
Naustin |
OK... I see it now. Before when I looked at that I was like wtf, and didn't see it for what it was. | ||
Mar_wilmington |
Have you found the 3" hose clamp to be a must? My filter is pretty snug on the venturi w/o the hose clamp but I haven't taken it on any longer rides yet. | ||
Ezblast |
Yes it is a must! | ||
Buellistic |
Ezblast: Why is the rocker arm breather still in the AIR BOX ??? Guess "i" will have to take pictures of my "PRODUCT IMPROVED" OEM Air Box for you to look at ... In BLASTing LaFayette | ||
Ezblast |
That was Scott's bike - he's turned the valve away, Sealed the box and uses it also as a spit can that he wipes out regularly - thus finding another use for the airbox as well - lol GT - JBOTDS! EZ  | ||
Wardo |
So basically, this just involves cutting the uneeded crap from the current airbox right? | ||
Ezblast |
Read & study the pics though before cutting. EZ | ||
Wardo |
For sure. I may tackle this Saturday if i have time. I dont suppose there are better pics of what to cut? | ||
Ezblast |
Definitely the 3rd pic down and look at the venturi coming out of your air box - you cut that off and widen the hole to the filter holder walls - add K&N and your done. EZ | ||
Wardo |
Sweet. I think even my simple mind can handle that. I just hope i dont decide to sell the blast when i get my new bike next year. Im thinking of keeping it as a short range and project bike. Not like it cost a fortune. | ||
Ezblast |
Concur! | ||
Hld01blast |
I have done the rejetting and getting ready to drill out the PMS cover. When I removed das boot, it had a 2 inch long cut clear through - looks like the clamp band was tightened too much. Anyway, I want to do EZ's air box mod and then insert the K&N filter ordered over the weekend. I am new to all this and even though there are great pics around - including here and on BCRider - I still have a question or too. I know that the breather tube ends down by the oil drain tube on the left side of the bike. I also see the T connector off of which a piece of hose in the airbox attached. I guess I need an "idiot's guide" to which tube is what and how I need to mod them to help the bike breath better. All input appreciated. Thanks so much for this awesome forum. Hil | ||
Ezblast |
Pull the tube out of the airbox, cover hole, take tube and put breather filter on end of it, then ziptie all that to where your scoop mounting point was just above your coil. EZ |